
# Nginx 负载均衡基于 uri 调度场景
# 1. Nginx 负载均衡调度场景
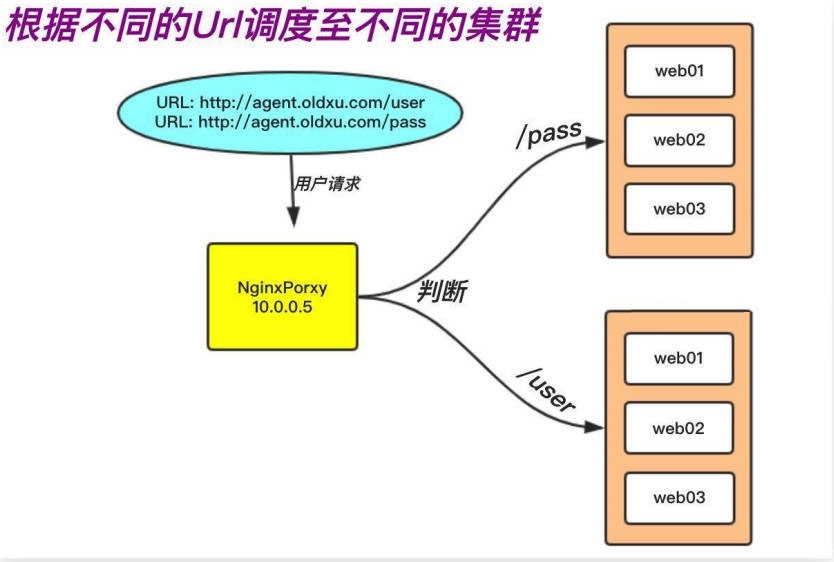
# 1.1 根据 uri 进行调度 (路由)
# 1.1.1 环境准备
| 系统版本 | 主机角色 | 外网 IP | 内网 IP | 端口 |
|---|---|---|---|---|
| CentOS7 | 负载均衡 | 10.0.0.5 | 172.16.1.5 | 80 |
| CentOS7 | 提供 /user 集群 | 10.0.0.7 | 172.16.1.7 | 80 |
| CentOS7 | 提供 /pass 集群 | 10.0.0.8 | 172.16.1.8 | 80 |
# 1.1.2 配置应用节点
1、web01 配置
[root@web01 conf.d]# cat uri.hmallleasing.com.conf | |
server { | |
listen 8081; | |
server_name uri.hmallleasing.com; | |
root /code/user1; | |
location / { | |
index index.html; | |
} | |
} | |
server { | |
listen 8082; | |
server_name uri.hmallleasing.com; | |
root /code/user2; | |
location / { | |
index index.html; | |
} | |
} | |
[root@lb01 conf.d]# mkdir -p /code/user1 | |
[root@lb01 conf.d]# mkdir -p /code/user2 | |
[root@lb01 conf.d]# echo "user-8081" > /code/user1/index.html | |
[root@lb01 conf.d]# echo "user-8082" > /code/user2/index.html | |
[root@lb01 conf.d]# nginx -t | |
[root@lb01 conf.d]# systemctl reload nginx |
2、web02 配置
[root@web02 conf.d]# cat uri.hmallleasing.com.conf | |
server { | |
listen 8081; | |
server_name uri.hmallleasing.com; | |
root /code/pass1; | |
location / { | |
index index.html; | |
} | |
} | |
server { | |
listen 8082; | |
server_name uri.hmallleasing.com; | |
root /code/pass2; | |
location / { | |
index index.html; | |
} | |
} | |
[root@web02 conf.d]# mkdir /code/pass1 -p | |
[root@web02 conf.d]# mkdir /code/pass2 -p | |
[root@web02 conf.d]# echo "pass-8081" > /code/pass1/index.html | |
[root@web02 conf.d]# echo "pass-8082" > /code/pass2/index.html | |
[root@web02 conf.d]# nginx -t | |
[root@web02 conf.d]# systemctl reload nginx |
# 1.1.3 配置负载均衡
# 根据不同的 URL 请求调度到不同的资源池 | |
[root@lb01 conf.d]# cat uri.hmallleasing.com.conf | |
upstream user { | |
server 192.168.40.7:8081; | |
server 192.168.40.7:8082; | |
} | |
upstream pass { | |
server 192.168.40.8:8081; | |
server 192.168.40.8:8082; | |
} | |
server { | |
listen 80; | |
server_name uri.hmallleasing.com; | |
location /user { | |
proxy_pass http://user/; | |
include proxy_params; | |
} | |
location /pass { | |
proxy_pass http://pass/; | |
include proxy_params; | |
} | |
} | |
[root@lb01 ~]# cat /etc/nginx/proxy_params | |
proxy_http_version 1.1; | |
proxy_set_header Connectin ""; | |
proxy_set_header Host $http_host; | |
proxy_set_header X-Real-IP $remote_addr; | |
proxy_set_header X-Forwarded-For $proxy_add_x_forwarded_for; | |
proxy_connect_timeout 60; | |
proxy_send_timeout 60; | |
proxy_read_timeout 120; | |
proxy_buffering on; | |
proxy_buffer_size 32k; | |
proxy_buffers 4 128k; | |
proxy_temp_file_write_size 10240k; | |
proxy_max_temp_file_size 10240k; | |
[root@lb01 ~]# nginx -t | |
[root@lb01 ~]# systemctl reload nginx |
# 1.2 Proxy 添加 / 与不添加 /
在使用 proxy_pass 反向代理时,最后结尾添加 / 和不添加 / 有什么区别?
proxy_pass http://localhost:8080;
proxy_pass http://localhost:8080/;
# 1.2.1 不添加 / 示例
server { | |
listen 80; | |
server_name uri.hmallleasing.com; | |
location /user { | |
proxy_pass http://172.16.1.7:80; | |
} | |
} | |
#用户请求 URL: /user/test/index.html | |
#请求到达 Nginx 负载均衡: /user/test/index.html | |
#Nginx 负载均衡到后端节点: /user/test/index.html |
# 1.2.2 添加 / 示例
server { | |
listen 80; | |
server_name uri.hmallleasing.com; | |
location /user { | |
proxy_pass http://172.16.1.7:80/; | |
} | |
} | |
#用户请求 URL: /user/test/index.html | |
#请求到达 Nginx 负载均衡: /user/test/index.html | |
#Nginx 负载均衡到后端节点: /test/index.html |
# 1.2.3 结果总结
- 1. 带 / 意味着 Nginx 代理会修改用户请求的 URL,将 location 匹配的 URL 进行删除。
- 2. 不带 / 意味着 Nginx 代理不会修改用户请求的 URL,而是直接代理到后端应用服务器。
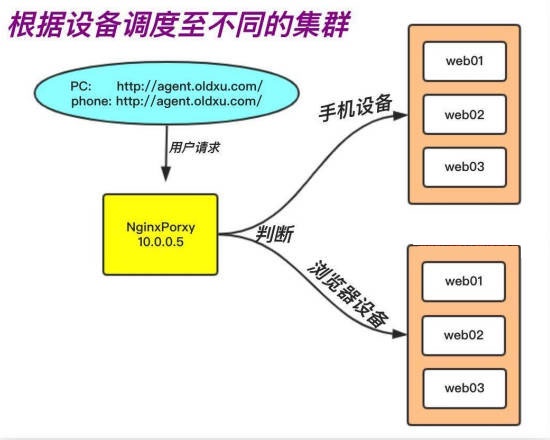
# 1.3 根据请求设备进行调度
| 系统版本 | 主机角色 | 外网 IP | 内网 IP | 端口 |
|---|---|---|---|---|
| CentOS7 | 负载均衡 | 10.0.0.5 | 172.16.1.5 | 80 |
| CentOS7 | 提供 /user 集群 | 10.0.0.7 | 172.16.1.7 | 80 |
| CentOS7 | 提供 /pass 集群 | 10.0.0.8 | 172.16.1.8 | 80 |
# 1.3.1 配置应用节点
# 配置后端 WEB 节点的 Nginx 配置。(注意 pc 和 phone 准备的站点内容不一样) | |
#1.PC 端配置 | |
[root@web01 conf.d]# cat /etc/nginx/conf.d/agent.hmallleasing.com.conf | |
server { | |
listen 80; | |
server_name agent.hmallleasing.com; | |
root /code/pc; | |
location / { | |
index index.html; | |
} | |
} | |
[root@web01 conf.d]# mkdir /code/pc -p | |
[root@web01 conf.d]# echo "PC..." > /code/pc/index.html | |
[root@web01 conf.d]# nginx -t | |
[root@web01 conf.d]# systemctl reload nginx | |
#2. 手机端配置 | |
[root@web02 conf.d]# cat /etc/nginx/conf.d/agent.hmallleasing.com.conf | |
server { | |
listen 80; | |
server_name agent.hmallleasing.com; | |
root /code/phone; | |
location / { | |
index index.html; | |
} | |
} | |
[root@web02 conf.d]# mkdir /code/phone | |
[root@web02 conf.d]# echo "phone" > /code/phone/index.html | |
[root@web02 conf.d]# nginx -t | |
[root@web02 conf.d]# systemctl reload nginx |
# 1.3.3 配置负载均衡
[root@lb01 conf.d]# cat /etc/nginx/conf.d/proxy_agent.hmallleasing.com.conf | |
upstream pc { | |
server 192.168.40.7:80; | |
} | |
upstream phone { | |
server 192.168.40.8:80; | |
} | |
server { | |
listen 80; | |
server_name agent.hmallleasing.com; | |
location / { | |
default_type text/html; | |
#如果 agent 为手机则匹配 | |
if ($http_user_agent ~* "iphone|android|ipad") { | |
proxy_pass http://phone; | |
} | |
#如果浏览器为 IE 则下载火狐浏览器 | |
if ($http_user_agent ~* "MSIE|Trident") { | |
#return 403; | |
#return 200 'Please Change Browser...'; | |
return 302 'https://download-ssl.firefox.com.cn/releases-sha2/stub/official/zh-CN/Firefox-latest.exe'; | |
} | |
#如果以上都没有匹配,则匹配 pc | |
proxy_pass http://pc; | |
include proxy_params; | |
} | |
} | |
[root@lb01 conf.d]# nginx -t | |
[root@lb01 conf.d]# systemctl reload nginx | |
[root@lb01 conf.d]# cat /etc/nginx/proxy_params | |
proxy_http_version 1.1; | |
proxy_set_header Connectin ""; | |
proxy_set_header Host $http_host; | |
proxy_set_header X-Real-IP $remote_addr; | |
proxy_set_header X-Forwarded-For $proxy_add_x_forwarded_for; | |
proxy_connect_timeout 60; | |
proxy_send_timeout 60; | |
proxy_read_timeout 120; | |
proxy_buffering on; | |
proxy_buffer_size 32k; | |
proxy_buffers 4 128k; | |
proxy_temp_file_write_size 10240k; | |
proxy_max_temp_file_size 10240k; |
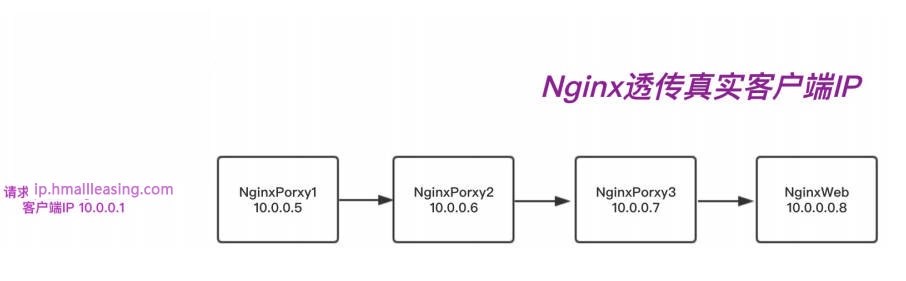
# 2. Nginx 多级代理获取真实 IP
# 2.1 多级代理获取地址概述
用户发起请求,沿途可能会经过多级代理,最终抵达应用节点,那应用节点如何获取客户端真实 IP 地址
- 实现方式 1:通过 X-Forwarded-For 透传客户端的真实 IP
- 实现方式 2:使用 Nginx RealIP 模块实现客户端地址透传
# 2.2 多级代理获取地址实践
# 2.2.1 环境准备
1. 基于代理 *(七层负载均衡)* 情况下环境
192.168.40.150 proxy_node1 一级代理
192.168.40.7 二级代理
192.168.40.8 真实节点
# 2.2.2 配置一级代理
[root@lb01 conf.d]# cat proxy_ip.hmallleasing.com.conf | |
server { | |
listen 80; | |
server_name ip.hmallleasing.com; | |
location / { | |
proxy_pass http://192.168.40.7; | |
proxy_http_version 1.1; | |
proxy_set_header Host $http_host; | |
proxy_set_header X-Real-IP $remote_addr; | |
proxy_set_header X-Forwarded-For $proxy_add_x_forwarded_for; | |
} | |
} | |
[root@lb01 conf.d]# nginx -t | |
[root@lb01 conf.d]# systemctl reload nginx |
# 2.2.3 配置二级代理
[root@web01 conf.d]# cat proxy_ip.hmallleasing.com.conf | |
server { | |
listen 80; | |
server_name ip.hmallleasing.com; | |
location / { | |
proxy_pass http://192.168.40.8; | |
proxy_http_version 1.1; | |
proxy_set_header Host $http_host; | |
proxy_set_header X-Real-IP $remote_addr; | |
proxy_set_header X-Forwarded-For $proxy_add_x_forwarded_for; | |
} | |
} | |
[root@web01 conf.d]# nginx -t | |
[root@web01 conf.d]# systemctl reload nginx |
# 2.2.4 配置应用节点
[root@web02 conf.d]# cat ip.hmallleasig.com.conf | |
server { | |
listen 80; | |
server_name ip.hmallleasing.com; | |
root /code; | |
location / { | |
index index.php index.html; | |
} | |
location ~ \.php$ { | |
fastcgi_pass 127.0.0.1:9000; | |
fastcgi_param SCRIPT_FILENAME $document_root$fastcgi_script_name; | |
include fastcgi_params; | |
} | |
} | |
[root@web02 conf.d]# nginx -t | |
[root@web02 conf.d]# systemctl reload nginx |
# 2.3 多级代理获取地址测试
# 2.3.1 通过 php 脚本分析
# 通过如下页面获取真实 IP,或查看 phpinfo () 函数中的 HTTP_X_FORWARDED_FOR | |
[root@web02 conf.d]# cat /code/index.php | |
<?php | |
phpinfo(); | |
?> |
# 2.3.2 通过日志分析
#1.proxy_node1 代理的日志 | |
192.168.40.1 - - [31/Aug/2025:17:18:16 +0800] "GET / HTTP/1.1" 200 95487 "-" "Mozilla/5.0 (Windows NT 10.0; Win64; x64) AppleWebKit/537.36 (KHTML, like Gecko) Chrome/138.0.0.0 Safari/537.36" "-" | |
#2.proxy_node2 代理的日志 | |
192.168.40.150 - - [31/Aug/2025:17:18:16 +0800] "GET / HTTP/1.1" 200 95463 "-" "Mozilla/5.0 (Windows NT 10.0; Win64; x64) AppleWebKit/537.36 (KHTML, like Gecko) Chrome/138.0.0.0 Safari/537.36" "192.168.40.1" | |
#3. 真实节点 | |
192.168.40.7 - - [31/Aug/2025:17:18:16 +0800] "GET / HTTP/1.1" 200 95458 "-" "Mozilla/5.0 (Windows NT 10.0; Win64; x64) AppleWebKit/537.36 (KHTML, like Gecko) Chrome/138.0.0.0 Safari/537.36" "192.168.40.1, 192.168.40.150" |
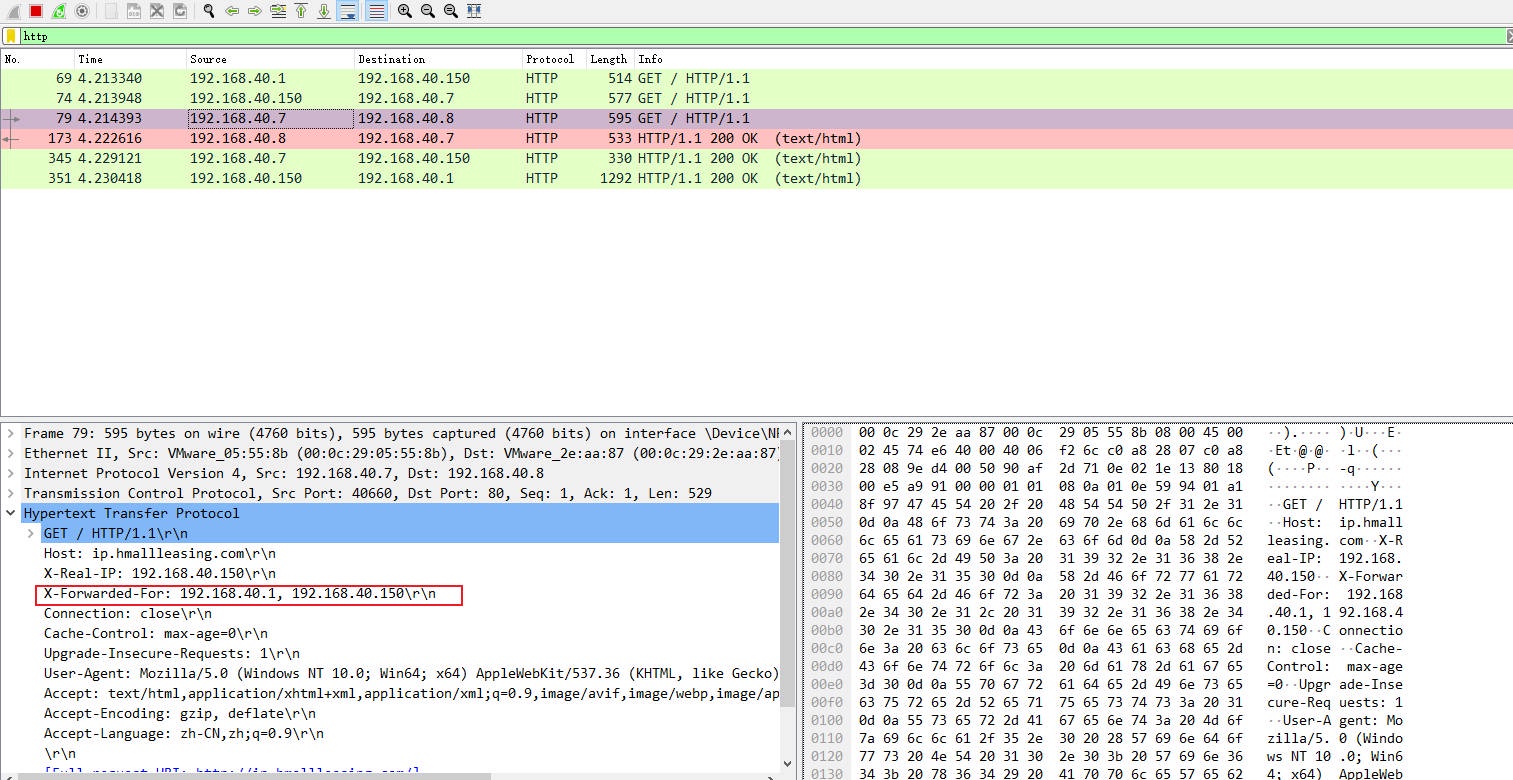
# 2.3.3 通过抓包分析
通过抓包分析 X-Forwarded-For 记录所有代理的客户端真实 IP,而 X-Real-IP 只记录上级代理的 IP
# 2.4 RealiP 模块获取真实 IP
使用 nginx Realip_module 获取多级代理下的客户端真实 IP 地址,在后端 Web 节点上添加如下配置即可(Realip 需要知道所有沿途经过的代理节点的 IP 地址或 IP 段);
# 2.4.1 配置示例
[root@web02 conf.d]# cat ip.hmallleasing.com.conf | |
server { | |
listen 80; | |
server_name ip.hmallleasing.com; | |
root /code; | |
set_real_ip_from 192.168.40.150; | |
set_real_ip_from 192.168.40.7; | |
real_ip_header X-Forwarded-For; | |
real_ip_recursive on; | |
#set_real_ip_from:真实服务器上一级代理的 IP 地址或者 IP 段,可以写多行 | |
#real_ip_header:从哪个 header 头检索出需要的 IP 地址 | |
#real_ip_recursive:递归排除 set_real_ip_from 里面出现的 IP, 其余没有出现的认为是用户真实 IP | |
location / { | |
index index.php index.html; | |
} | |
location ~ \.php$ { | |
fastcgi_pass 127.0.0.1:9000; | |
fastcgi_param SCRIPT_FILENAME $document_root$fastcgi_script_name; | |
include fastcgi_params; | |
} | |
} | |
[root@web02 conf.d]# nginx -t | |
[root@web02 conf.d]# systemctl reload nginx |
# 2.4.2 结果验证
192.168.40.1 - - [31/Aug/2025:17:34:16 +0800] "GET / HTTP/1.1" 200 95487 "-" "Mozilla/5.0 (Windows NT 10.0; Win64; x64) AppleWebKit/537.36 (KHTML, like Gecko) Chrome/138.0.0.0 Safari/537.36" "192.168.40.1, 192.168.40.150" |