
# Nginx 高可用 - Keepalived
# 1. 高可用基本概述
# 1.1 什么是高可用
简单理解:两台机器启动着相同的业务系统,当有一台机器宕机,另外一台服务器能快速的接管,对于访问的用户是无感知的;
专业理解:高可用是分布式系统架构设计中必要的一环,主要目的:减少系统不能提供服务的时间。假设系统一直能够提供服务,我们说系统的可用性是 100%。如果系统每运行 100 个时间单位,会有 1 个时间单位无法提供服务,我们说系统的可用性是 99%;
高可用的目的:减少系统 down 机时间,提高 SLA 服务等级;
# 1.2 高可用使用什么工具
通常服务高可用我们选择使用 keepalived 软件实现。
# 1.3 高可用是如何实现的
- keepalived 软件是基于 VRRP 协议实现的。
- VRRP 虚拟路由冗余协议,主要用于解决单点故障问题。
# 1.4 VRRP 诞生背景及原理
比如公司的网络是通过网关转换进行上网的,那如果该路由器故障了,网关无法转发报文了,此时所有人都将无法上网,这么时候怎么办呢?
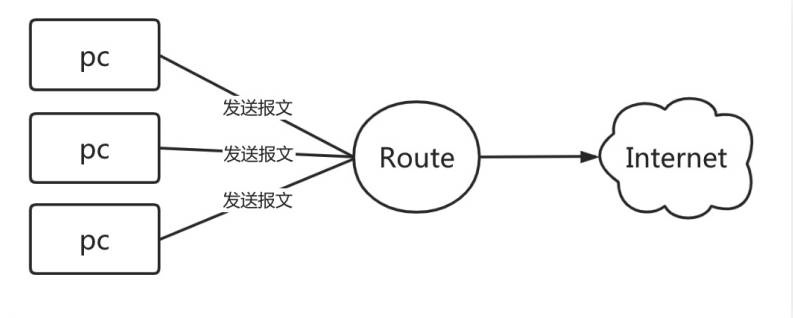
通常做法是增加一个 Backup 路由,然后修改用户 PC 电脑网关指向为 Backup,但这里有几个问题
- 1. 如果用户过多修改起来是不是会非常的麻烦;
- 2. 如果用户将指向都修改为 Backup,那 Master 如果恢复了该怎么办?
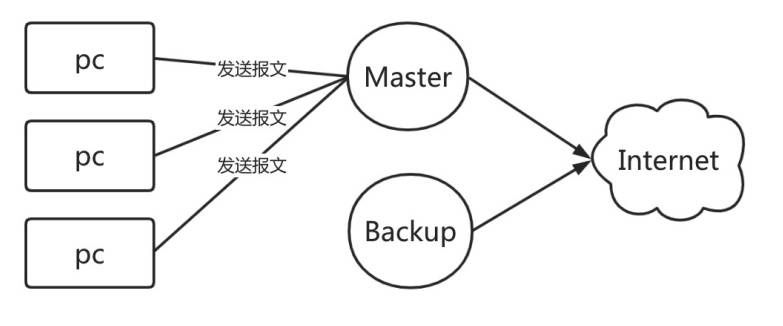
那我们直接将 Backup 网关 IP 配置为 Master 网关 IP 不就可以了吗?(其实也不行,why)
- 因为 PC 在第一次通信时,是通过 ARP 广播获取到 Master 网关的 Mac 地址、IP 地址,同时 PC 还会将 Master 网关对应 IP 与 MAC 地址存储至 ARP 缓存表中;
- 所以当 PC 与网关进行通信时,会直接读取 ARP 缓存表中的 MAC 地址与 IP 地址,进行数据包转发,也就意味着当 Master 节点故障,将 Backup 节点 IP 修改为 Master 的 IP,最终 PC 的数据包还是会转发给 Master,不会转发给 Backup 节点。(除非 PC 的 ARP 缓存表过期,在次发起 ARP 广播的时候才能正确获取 Bakcup 的 Mac 地址与对应的 IP 地址。)
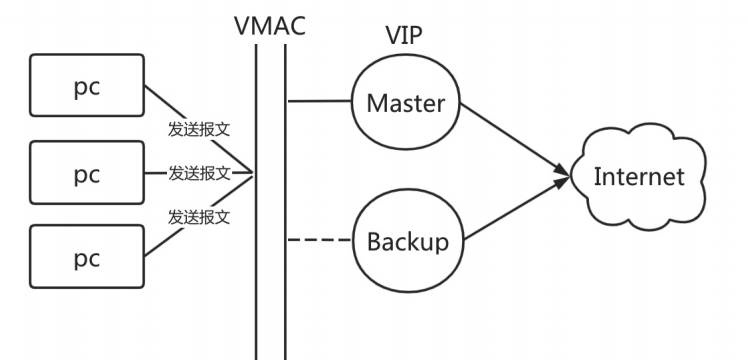
- 那如何才能做到出现故障自动转移,此时 VRRP 就应运而生;
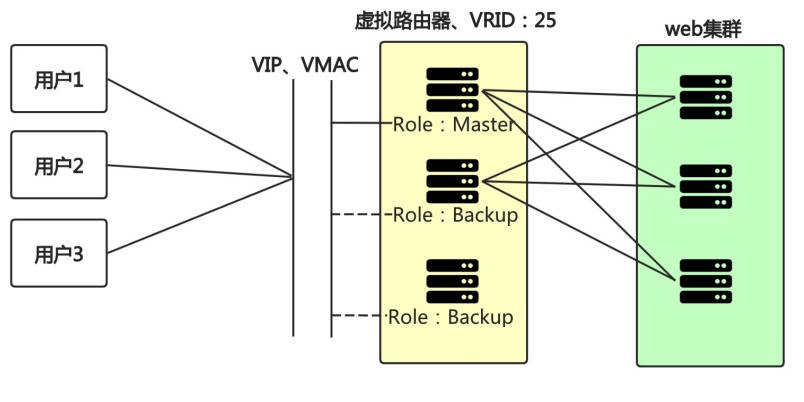
- VRRP 其实是通过软件或硬件的形式在 Master 和 Backup 外层增加一个虚拟 MAC 地址(简称 VMAC)、以及虚拟 IP 地址(简称 VIP);
- 那么在这种情况下,当 PC 请求 VIP 的时候,无论是 Master 处理还是 Backup 处理,PC 仅会在 ARP 缓存表中记录 VMAC 与 VIP 的对应关系。
# 2. 高可用 Keepalived
# 2.1 Keeplaived 基本介绍
Keepalived 基于 vrrp 实现,原生设计是为了高可用 lvs 服务。
- 通过 vrrp 协议,可以完成地址漂移技术;
- 为 vip 地址所在的节点生成 ipvs 规则(需要在配置文件中预先定义);
- 为 ipvs 集群的 RS 节点做健康状态检测;
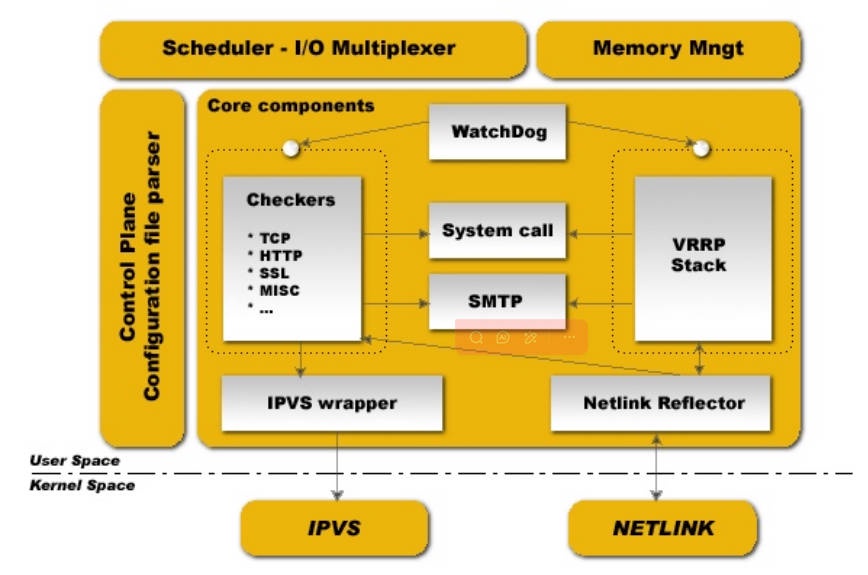
Keepalived 核心组件:
- vrrp stack:用来实现 vrrp 协议重要组件之一;
- Netlink 接口:设置和删除网络接口上的虚拟 IP 地址;
- ipvs wrapper:使用 getsock 和 setsock 来建立 IPVS 规则;
- checkers:监测 RS 节点的方式,支持 tcp、http、ssl 等;
- system call:支持启动额外系统脚本的功能;
- SMTP:为 当发生角色状态转换时,发送事件通知邮件;
- WatchDog:监控进程
# 2.2 Keepalived 核心概念
- 虚拟路由器:由一个 Master 路由器和多个 Backup 路由器组成;
- Master 路由器:虚拟路由器中承担报文转发任务的路由器;
- Backup 路由器:Master 路由器出现故障时,能够代替 Master 路由器工作的路由器;
- VRID:虚拟路由器的标识,由相同 VRID 的一组路由器构成一个虚拟路由器;
- 组播:组播是有特定的成员,是一种可控的广播,组播成员需要加入 “组播组” 才能收到该组播的信息。
- 虚拟 IP 地址:虚拟路由器的 IP 地址,一个虚拟路由器可以拥有一个或多个 IP 地址;
- 虚拟 MAC 地址:一个虚拟路由器拥有一个虚拟 MAC 地址;
- 优先级:VRRP 根据优先级来确定虚拟路由器中每台路由器的地位;
- 抢占式:如果 Master 故障,Backup 自动接管,当 Master 恢复了会将 VIP 地址抢回来;
- 非抢占式:如果 Master 故障,Backup 自动接管,当 Master 恢复则自动转为 Backup,不会抢占 VIP;
# 2.3 Keeplaived 应用场景
当需要使用 Keepalived 时,通常是因为我们的业务系统需要保证 7x24 小时不 DOWN 机,也就是说作为企业的业务系统,要保证随时随地都可以使用,不可以中断。
- 比如公司内部 OA 系统,每天公司人员都需要使用,则不允许 Down 机;
- 比如公司对外发布的业务系统(单车),每天有大量的用户使用,是不可以出现故障的;
# 2.4 Keeplaived 安装配置
# 2.4.1 环境准备
| 主机名称 | eth0 | eth1 | 角色 |
|---|---|---|---|
| proxy01 | 10.0.0.5 | 172.16.0.5 | Master |
| proxy02 | 10.0.0.6 | 172.16.0.6 | Backup |
| VIP 地址 | 10.0.0.100 |
在 Master 以及 Backup 节点分别安装 Keepalived
[root@proxy01 ~]# yum install keepalived -y | |
[root@proxy02 ~]# yum install keepalived -y |
# 2.4.2 配置 Master
[root@proxy01 ~]# cat /etc/keepalived/keepalived.conf | |
global_defs { | |
router_id lb01 # 当前物理设备的标识名称 | |
vrrp_mcast_group4 224.0.0.18 # 组播地址,default 224.0.0.18 | |
} | |
vrrp_instance VI_1 { | |
state MASTER # 角色状态; | |
interface eth0 # 绑定当前虚拟路由使用的物理接口; | |
virtual_router_id 50 # 当前虚拟路由标识,VRID; | |
priority 200 # 当前物理节点在虚拟路由中的优先级; | |
advert_int 3 # vrrp 通告时间间隔,默认 1s; | |
#nopreempt | |
authentication { | |
auth_type PASS # 密码类型,简单密码; | |
auth_pass 1111 # 密码不超过 8 位字符; | |
} | |
virtual_ipaddress { | |
192.168.40.100 # VIP 地址 | |
} | |
} | |
[root@proxy01 ~]# systemctl enable keepalived && systemctl start keepalived |
# 2.4.3 配置 Backup
[root@proxy02 ~]# cat /etc/keepalived/keepalived.conf | |
global_defs { | |
router_id lb02 # 当前物理设备的标识名称 | |
vrrp_mcast_group4 224.0.0.18 # 组播地址,default 224.0.0.18 | |
} | |
vrrp_instance VI_1 { | |
state BACKUP # 角色状态; | |
interface eth0 # 绑定当前虚拟路由使用的物理接口; | |
virtual_router_id 50 # 当前虚拟路由标识,VRID; | |
priority 100 # 当前物理节点在虚拟路由中的优先级; | |
advert_int 3 # vrrp 通告时间间隔,默认 1s; | |
#nopreempt | |
authentication { | |
auth_type PASS # 密码类型,简单密码; | |
auth_pass 1111 # 密码不超过 8 位字符; | |
} | |
virtual_ipaddress { | |
192.168.40.100 # VIP 地址 | |
} | |
} | |
[root@proxy02 ~]# systemctl enable keepalived && systemctl start keepalived |
# 2.4.4 地址漂移测试
检查 keepalived 的 VIP 地址能否在两个节点间漂移。
1. 在 Master 上进行如下操作
# Master 存在 vip 地址 | |
[root@proxy01 ~]# ip addr |grep 192.168.40.100 | |
inet 192.168.40.100/32 scope global eth0 | |
[root@proxy01 ~]# systemctl stop keepalived |
2. 在 Backup 上进行如下操作
# 发现地址已经漂移至 Backup 端 | |
[root@proxy02 ~]# ip addr |grep 192.168.40.100 | |
inet 192.168.40.100/32 scope global eth0 |
3. 此时启动 Master 上的 Keepalived,会发现 VIP 被强行抢占
[root@proxy01 ~]# systemctl start keepalived | |
[root@proxy01 ~]# ip addr |grep 192.168.40.100 | |
inet 192.168.40.100/32 scope global eth0 |
4. 通过 windows 查看 arp 缓存表,验证地址漂移后是否会自动更新 MAC 地址。
接口: 192.168.40.1 --- 0xb
  Internet 地址         物理地址              类型
  192.168.40.5          00-0c-29-36-d2-b6     动态
  192.168.40.6          00-0c-29-14-f6-61     动态
  192.168.40.100        00-0c-29-36-d2-b6     动态
# 2.4.5 抓包分析切换过程
通过 抓包分析 keepalived 地址切换过程。
# 2.5 Keepalived 延迟抢占
延迟抢占指的是,当 Master 故障后,Backup 接管,当 Master 恢复后不立即抢占 VIP 地址,延迟一段时间在抢占 VIP。
配置延迟抢占式步骤如下:
1、两台节点的 state 都必须配置为 BACKUP;
2、在节点的 vrrp_instance 中添加 preempt_delay
#1. Master 配置 | |
[root@proxy01 ~]# cat /etc/keepalived/keepalived.conf | |
global_defs { | |
router_id lb01 # 当前物理设备的标识名称 | |
vrrp_mcast_group4 224.0.0.18 # 组播地址,default 224.0.0.18 | |
} | |
vrrp_instance VI_1 { | |
state BACKUP # 角色状态; | |
interface eth0 # 绑定当前虚拟路由使用的物理接口; | |
virtual_router_id 50 # 当前虚拟路由标识,VRID; | |
priority 200 # 当前物理节点在虚拟路由中的优先级; | |
advert_int 3 # vrrp 通告时间间隔,默认 1s; | |
preempt_delay 10s # 延迟 10s 后抢占 | |
#nopreempt | |
authentication { | |
auth_type PASS # 密码类型,简单密码; | |
auth_pass 1111 # 密码不超过 8 位字符; | |
} | |
virtual_ipaddress { | |
192.168.40.100 # VIP 地址 | |
} | |
} | |
#2. Backup 配置 | |
[root@proxy02 ~]# cat /etc/keepalived/keepalived.conf | |
global_defs { | |
router_id lb02 # 当前物理设备的标识名称 | |
vrrp_mcast_group4 224.0.0.18 # 组播地址,default 224.0.0.18 | |
} | |
vrrp_instance VI_1 { | |
state BACKUP # 角色状态; | |
interface eth0 # 绑定当前虚拟路由使用的物理接口; | |
virtual_router_id 50 # 当前虚拟路由标识,VRID; | |
priority 100 # 当前物理节点在虚拟路由中的优先级; | |
advert_int 3 # vrrp 通告时间间隔,默认 1s; | |
preempt_delay 10s # 延迟 10s 后抢占 | |
#nopreempt | |
authentication { | |
auth_type PASS # 密码类型,简单密码; | |
auth_pass 1111 # 密码不超过 8 位字符; | |
} | |
virtual_ipaddress { | |
192.168.40.100 # VIP 地址 | |
} | |
} |
# 2.6 Keepalived 非抢占式
通常 master 服务故障后 backup 会变成 master,但是当 master 服务恢复后,master 会抢占 VIP,这样就会发生两次切换;对业务繁忙的网站来说并不是太友好,此时我们可以配置 keepalived 为非抢占式,(前提两台主机的硬件配置信息一致);
配置非抢占式步骤如下
1、两台节点的 state 都必须配置为 BACKUP;
2、两台节点都在 vrrp_instance 中添加 nopreempt 参数;
3、其中一个节点的优先级必须要高于另外一个节点的优先级;
#1. Master 配置 | |
[root@proxy01 ~]# cat /etc/keepalived/keepalived.conf | |
global_defs { | |
router_id lb01 # 当前物理设备的标识名称 | |
vrrp_mcast_group4 224.0.0.18 # 组播地址,default 224.0.0.18 | |
} | |
vrrp_instance VI_1 { | |
state BACKUP # 角色状态; | |
interface eth0 # 绑定当前虚拟路由使用的物理接口; | |
virtual_router_id 50 # 当前虚拟路由标识,VRID; | |
priority 200 # 当前物理节点在虚拟路由中的优先级; | |
advert_int 3 # vrrp 通告时间间隔,默认 1s; | |
#preempt_delay 10s # 延迟 10s 后抢占 | |
nopreempt | |
authentication { | |
auth_type PASS # 密码类型,简单密码; | |
auth_pass 1111 # 密码不超过 8 位字符; | |
} | |
virtual_ipaddress { | |
192.168.40.100 # VIP 地址 | |
} | |
} | |
#2. Backup 配置 | |
[root@proxy02 ~]# cat /etc/keepalived/keepalived.conf | |
global_defs { | |
router_id lb02 # 当前物理设备的标识名称 | |
vrrp_mcast_group4 224.0.0.18 # 组播地址,default 224.0.0.18 | |
} | |
vrrp_instance VI_1 { | |
state BACKUP # 角色状态; | |
interface eth0 # 绑定当前虚拟路由使用的物理接口; | |
virtual_router_id 50 # 当前虚拟路由标识,VRID; | |
priority 100 # 当前物理节点在虚拟路由中的优先级; | |
advert_int 3 # vrrp 通告时间间隔,默认 1s; | |
#preempt_delay 10s # 延迟 10s 后抢占 | |
nopreempt | |
authentication { | |
auth_type PASS # 密码类型,简单密码; | |
auth_pass 1111 # 密码不超过 8 位字符; | |
} | |
virtual_ipaddress { | |
192.168.40.100 # VIP 地址 | |
} | |
} |
# 2.7 Keeplaived 邮件通知
1. 配置邮箱(所有节点都需要配置)
#1. 生成证书 | |
sudo mkdir -p /root/.certs | |
sudo bash -c "echo -n | openssl s_client -connect smtp.qq.com:465 | sed -ne '/-BEGIN CERTIFICATE-/,/-END CERTIFICATE-/p' > /root/.certs/qq.crt" | |
sudo chmod +x /root/.certs/qq.crt | |
sudo bash -c 'certutil -A -n "GeoTrust Global CA" -t "C,," -d /root/.certs -i /root/.certs/qq.crt' | |
sudo bash -c 'certutil -A -n "GeoTrust SSL CA" -t "C,," -d /root/.certs -i /root/.certs/qq.crt' | |
sudo bash -c 'certutil -A -n "GeoTrust SSL CA - G3" -t "Pu,Pu,Pu" -d /root/.certs -i /root/.certs/qq.crt' | |
#2. 配置 mailx | |
[root@proxy01 ~]# # yum install mailx -y | |
[root@proxy01 ~]# cat >> /etc/mail.rc <<EOF | |
set from=373370405@qq.com | |
set smtp=smtp.qq.com:587 | |
set smtp-auth=login | |
set smtp-auth-user=373370405@qq.com | |
set smtp-auth-password=zmuthwvermvrbjgg | |
set smtp-use-starttls | |
set ssl-verify=ignore | |
set nss-config-dir=/root/.certs | |
EOF | |
#3. 邮箱测试 | |
[root@proxy01 ~]# echo "这是邮件内容" | mailx -s "邮件主题" 373370405@qq.com | |
[root@proxy01 ~]# mail -s "test" "373370405@qq.com" < /etc/hosts |
2. 通知脚本(所有节点都需要配置)
[root@proxy01 ~]# cat /etc/keepalived/notify.sh | |
#!/usr/bin/bash | |
# Author: Oldxu(E-mail: xuy@nf-leasing.com) | |
##Keepalived 故障切换邮件通知 | |
# 定义收件人 | |
Email='373370405@qq.com' | |
# 定义主机名称 | |
Host=$(hostname) | |
Addr=$(ifconfig eth0|awk 'NR==2 {print $2}') | |
# 定义时间变量 | |
Date=$(date +'%F %T') | |
#定义发送的消息 | |
Message() { | |
subject="${Host}-${Addr} 切换为 $1 状态" | |
submsg="${Date}: ${Host}-${Addr} 成功切换为 $1 状态" | |
echo "${submsg}" | mail -s "${subject}" "${Email}" | |
} | |
case $1 in | |
master) | |
Message master | |
;; | |
backup) | |
Message backup | |
;; | |
fault) | |
Message fault | |
;; | |
*) | |
echo "Usage: $0 { master | backup | fault }" | |
exit | |
esac | |
[root@proxy01 ~]# chmod +x /etc/keepalived/notify.sh |
3. 修改配置 (Master)
[root@proxy01 ~]# cat /etc/keepalived/keepalived.conf | |
global_defs { | |
router_id lb01 # 当前物理设备的标识名称 | |
vrrp_mcast_group4 224.0.0.18 # 组播地址,default 224.0.0.18 | |
} | |
vrrp_instance VI_1 { | |
state MASTER # 角色状态; | |
interface eth0 # 绑定当前虚拟路由使用的物理接口; | |
virtual_router_id 50 # 当前虚拟路由标识,VRID; | |
priority 200 # 当前物理节点在虚拟路由中的优先级; | |
advert_int 3 # vrrp 通告时间间隔,默认 1s; | |
#preempt_delay 10s # 延迟 10s 后抢占 | |
#nopreempt | |
authentication { | |
auth_type PASS # 密码类型,简单密码; | |
auth_pass 1111 # 密码不超过 8 位字符; | |
} | |
virtual_ipaddress { | |
192.168.40.100 # VIP 地址 | |
} | |
notify_master "/etc/keepalived/notify.sh master" # 当前节点成为主节点时触发的脚本 | |
notify_backup "/etc/keepalived/notify.sh backup" # 当前节点转为备节点时触发的脚本 | |
notify_fault "/etc/keepalived/notify.sh fault" # 当前节点转为 “失败” 状态时触发的脚本 | |
} |
4. 修改配置 (Backup)
[root@proxy02 ~]# cat /etc/keepalived/keepalived.conf | |
global_defs { | |
router_id lb02 # 当前物理设备的标识名称 | |
vrrp_mcast_group4 224.0.0.18 # 组播地址,default 224.0.0.18 | |
} | |
vrrp_instance VI_1 { | |
state BACKUP # 角色状态; | |
interface eth0 # 绑定当前虚拟路由使用的物理接口; | |
virtual_router_id 50 # 当前虚拟路由标识,VRID; | |
priority 100 # 当前物理节点在虚拟路由中的优先级; | |
advert_int 3 # vrrp 通告时间间隔,默认 1s; | |
#preempt_delay 10s # 延迟 10s 后抢占 | |
#nopreempt | |
authentication { | |
auth_type PASS # 密码类型,简单密码; | |
auth_pass 1111 # 密码不超过 8 位字符; | |
} | |
virtual_ipaddress { | |
192.168.40.100 # VIP 地址 | |
} | |
notify_master "/etc/keepalived/notify.sh master" # 当前节点成为主节点时触发的脚本 | |
notify_backup "/etc/keepalived/notify.sh backup" # 当前节点转为备节点时触发的脚本 | |
notify_fault "/etc/keepalived/notify.sh fault" # 当前节点转为 “失败” 状态时触发的脚本 | |
} |
5. 停止所有节点的 Keepalived,先启动 Backup 节点,然后启动 Master 节点;
# Backup
[root@proxy02 ~]# systemctl restart keepalived

# 等待邮件发送成功在启动 Master

# Master
[root@proxy01 ~]# systemctl start keepalived
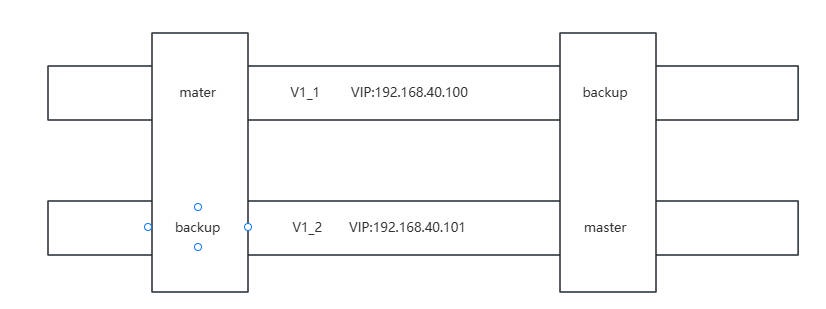
# 2.8 Keepalived 双主模式
两个或以上 VIP 分别运行在不同的 keepalived 服务器;实现服务器并行访问 web 应用,提高服务器资源利用率。
# proxy01 配置 | |
[root@proxy01 ~]# cat /etc/keepalived/keepalived.conf | |
global_defs { | |
router_id lb01 # 当前物理设备的标识名称 | |
vrrp_mcast_group4 224.0.0.18 # 组播地址,default 224.0.0.18 | |
} | |
vrrp_instance VI_1 { | |
state MASTER # 角色状态; | |
interface eth0 # 绑定当前虚拟路由使用的物理接口; | |
virtual_router_id 50 # 当前虚拟路由标识,VRID; | |
priority 200 # 当前物理节点在虚拟路由中的优先级; | |
advert_int 3 # vrrp 通告时间间隔,默认 1s; | |
#preempt_delay 10s # 延迟 10s 后抢占 | |
#nopreempt | |
authentication { | |
auth_type PASS # 密码类型,简单密码; | |
auth_pass 1111 # 密码不超过 8 位字符; | |
} | |
virtual_ipaddress { | |
192.168.40.100 # VIP 地址 | |
} | |
notify_master "/etc/keepalived/notify.sh master" # 当前节点成为主节点时触发的脚本 | |
notify_backup "/etc/keepalived/notify.sh backup" # 当前节点转为备节点时触发的脚本 | |
notify_fault "/etc/keepalived/notify.sh fault" # 当前节点转为 “失败” 状态时触发的脚本 | |
} | |
vrrp_instance VI_2 { | |
state BACKUP # 角色状态; | |
interface eth0 # 绑定当前虚拟路由使用的物理接口; | |
virtual_router_id 55 # 当前虚拟路由标识,VRID; | |
priority 100 # 当前物理节点在虚拟路由中的优先级; | |
advert_int 3 # vrrp 通告时间间隔,默认 1s; | |
#preempt_delay 10s # 延迟 10s 后抢占 | |
#nopreempt | |
authentication { | |
auth_type PASS # 密码类型,简单密码; | |
auth_pass 1111 # 密码不超过 8 位字符; | |
} | |
virtual_ipaddress { | |
192.168.40.101 # VIP 地址 | |
} | |
notify_master "/etc/keepalived/notify.sh master" # 当前节点成为主节点时触发的脚本 | |
notify_backup "/etc/keepalived/notify.sh backup" # 当前节点转为备节点时触发的脚本 | |
notify_fault "/etc/keepalived/notify.sh fault" # 当前节点转为 “失败” 状态时触发的脚本 | |
} | |
# proxy02 | |
[root@proxy02 ~]# cat /etc/keepalived/keepalived.conf | |
global_defs { | |
router_id lb02 # 当前物理设备的标识名称 | |
vrrp_mcast_group4 224.0.0.18 # 组播地址,default 224.0.0.18 | |
} | |
vrrp_instance VI_1 { | |
state BACKUP # 角色状态; | |
interface eth0 # 绑定当前虚拟路由使用的物理接口; | |
virtual_router_id 50 # 当前虚拟路由标识,VRID; | |
priority 100 # 当前物理节点在虚拟路由中的优先级; | |
advert_int 3 # vrrp 通告时间间隔,默认 1s; | |
#preempt_delay 10s # 延迟 10s 后抢占 | |
#nopreempt | |
authentication { | |
auth_type PASS # 密码类型,简单密码; | |
auth_pass 1111 # 密码不超过 8 位字符; | |
} | |
virtual_ipaddress { | |
192.168.40.100 # VIP 地址 | |
} | |
notify_master "/etc/keepalived/notify.sh master" # 当前节点成为主节点时触发的脚本 | |
notify_backup "/etc/keepalived/notify.sh backup" # 当前节点转为备节点时触发的脚本 | |
notify_fault "/etc/keepalived/notify.sh fault" # 当前节点转为 “失败” 状态时触发的脚本 | |
} | |
vrrp_instance VI_2 { | |
state MASTER # 角色状态; | |
interface eth0 # 绑定当前虚拟路由使用的物理接口; | |
virtual_router_id 55 # 当前虚拟路由标识,VRID; | |
priority 200 # 当前物理节点在虚拟路由中的优先级; | |
advert_int 3 # vrrp 通告时间间隔,默认 1s; | |
#preempt_delay 10s # 延迟 10s 后抢占 | |
#nopreempt | |
authentication { | |
auth_type PASS # 密码类型,简单密码; | |
auth_pass 1111 # 密码不超过 8 位字符; | |
} | |
virtual_ipaddress { | |
192.168.40.101 # VIP 地址 | |
} | |
notify_master "/etc/keepalived/notify.sh master" # 当前节点成为主节点时触发的脚本 | |
notify_backup "/etc/keepalived/notify.sh backup" # 当前节点转为备节点时触发的脚本 | |
notify_fault "/etc/keepalived/notify.sh fault" # 当前节点转为 “失败” 状态时触发的脚本 | |
} | |
#验证测试 | |
[root@proxy01 ~]# ip addr|grep 192.168.40.100 | |
inet 192.168.40.100/32 scope global eth0 | |
[root@proxy02 ~]# ip addr|grep 192.168.40.101 | |
inet 192.168.40.101/32 scope global eth0 | |
[root@proxy01 ~]# systemctl stop keepalived | |
[root@proxy02 ~]# ip addr|grep 192.168.40.101 | |
inet 192.168.40.101/32 scope global eth0 | |
[root@proxy02 ~]# ip addr|grep 192.168.40.100 | |
inet 192.168.40.100/32 scope global eth0 |
# 3. 高可用 Nginx 实践
# 3.1 高可用 Nginx
1.Nginx 与 Keepalived 之间是什么关系?
没关系。Nginx 仅借助 Keepalived 的 VIP 地址漂移技术,从而实现的高可用;
2. 如果 Nginx 无法访问,keepalived 的 VIP 会自动漂移至 Backup 节点吗?
不能,因为 Keepalived 与 Nginx 之间没有关系;当 Nginx 不存活时,会导致用户请求失败,但 Keepalived 虚拟地址并不会进行漂移,所以需要编写一个 keepalived 辅助脚本,监 nginx;
- 1. 当监控到 Nginx 处于非活动状态,则动态调整优先级状态,确保备节点能正常接管 VIP;
- 2. 当监控到 Nginx 处于活动状,则重新抢占 VIP 地址
# 3.2 高可用 Nginx 实战
# 3.2.1 web01 配置
[root@web01 conf.d]# cat s.hmallleasing.com.conf | |
server { | |
listen 80; | |
server_name s.hmallleasing.com; | |
root /code; | |
location / { | |
index index.html; | |
} | |
} | |
[root@web01 conf.d]# cat /code/index.html | |
web01-https... |
# 3.2.2 web02 配置
[root@web02 conf.d]# cat s.hmallleasing.com.conf | |
server { | |
listen 80; | |
server_name s.hmallleasing.com; | |
root /code; | |
location / { | |
index index.html; | |
} | |
} | |
[root@web02 conf.d]# cat /code/index.html | |
web02-https... |
# 3.2.3 proxy01 配置
[root@proxy01 conf.d]# cat /etc/nginx/conf.d/s.hmallleasing.com.conf | |
upstream site { | |
keepalive 32; #最大的空闲连接数 | |
keepalive_timeout 100s; #空闲连接的超时时间 | |
server 192.168.40.7:80 max_fails=2 fail_timeout=10s; | |
server 192.168.40.8:80 max_fails=2 fail_timeout=10s; | |
} | |
# https 站点配置信息 | |
server { | |
listen 443 ssl; | |
server_name s.hmallleasing.com; | |
ssl_prefer_server_ciphers on; | |
ssl_protocols TLSv1.2; | |
ssl_certificate ssl_key/hmallleasing.com.pem; | |
ssl_certificate_key ssl_key/hmallleasing.com.key; | |
ssl_session_cache shared:SSL:10m; | |
ssl_session_timeout 1440m; | |
location / { | |
proxy_pass http://site; | |
include proxy_params; | |
#当其中一台返回错误 500,502,503,504 时,分配下一台服务器程序处理,提高平台访问成功率 | |
proxy_next_upstream error timeout http_500 http_502 http_503 http_504; | |
proxy_next_upstream_tries 2; | |
proxy_next_upstream_timeout 3s; | |
} | |
} | |
# 用户请求 http 协议,强制跳转至 https 协议 | |
server { | |
listen 80; | |
server_name s.hmallleasing.com; | |
return 302 https://$server_name$request_uri; | |
} | |
[root@proxy01 conf.d]# cat /etc/nginx/proxy_params | |
proxy_http_version 1.1; | |
proxy_set_header Connectin ""; | |
proxy_set_header Host $http_host; | |
proxy_set_header X-Real-IP $remote_addr; | |
proxy_set_header X-Forwarded-For $proxy_add_x_forwarded_for; | |
proxy_connect_timeout 60; | |
proxy_send_timeout 60; | |
proxy_read_timeout 120; | |
proxy_buffering on; | |
proxy_buffer_size 32k; | |
proxy_buffers 4 128k; | |
proxy_temp_file_write_size 10240k; | |
proxy_max_temp_file_size 10240k; | |
[root@proxy01 conf.d]# mkdir /etc/nginx/ssl_key | |
[root@proxy01 conf.d]# ll /etc/nginx/ssl_key | |
-rw-r--r-- 1 root root 1675 Sep 8 17:43 hmallleasing.com.key | |
-rw-r--r-- 1 root root 4784 Sep 8 17:43 hmallleasing.com.pem | |
[root@proxy01 conf.d]# nginx -t | |
[root@proxy01 conf.d]# systemctl reload nginx |
# 3.2.4 proxy01 配置
[root@proxy02 ~]# cat /etc/nginx/conf.d/s.hmallleasing.com.conf | |
upstream site { | |
keepalive 32; #最大的空闲连接数 | |
keepalive_timeout 100s; #空闲连接的超时时间 | |
server 192.168.40.7:80 max_fails=2 fail_timeout=10s; | |
server 192.168.40.8:80 max_fails=2 fail_timeout=10s; | |
} | |
# https 站点配置信息 | |
server { | |
listen 443 ssl; | |
server_name s.hmallleasing.com; | |
ssl_prefer_server_ciphers on; | |
ssl_protocols TLSv1.2; | |
ssl_certificate ssl_key/hmallleasing.com.pem; | |
ssl_certificate_key ssl_key/hmallleasing.com.key; | |
ssl_session_cache shared:SSL:10m; | |
ssl_session_timeout 1440m; | |
location / { | |
proxy_pass http://site; | |
include proxy_params; | |
#当其中一台返回错误 500,502,503,504 时,分配下一台服务器程序处理,提高平台访问成功率 | |
proxy_next_upstream error timeout http_500 http_502 http_503 http_504; | |
proxy_next_upstream_tries 2; | |
proxy_next_upstream_timeout 3s; | |
} | |
} | |
# 用户请求 http 协议,强制跳转至 https 协议 | |
server { | |
listen 80; | |
server_name s.hmallleasing.com; | |
return 302 https://$server_name$request_uri; | |
} | |
[root@proxy02 ~]# cat /etc/nginx/proxy_params | |
proxy_http_version 1.1; | |
proxy_set_header Connectin ""; | |
proxy_set_header Host $http_host; | |
proxy_set_header X-Real-IP $remote_addr; | |
proxy_set_header X-Forwarded-For $proxy_add_x_forwarded_for; | |
proxy_connect_timeout 60; | |
proxy_send_timeout 60; | |
proxy_read_timeout 120; | |
proxy_buffering on; | |
proxy_buffer_size 32k; | |
proxy_buffers 4 128k; | |
proxy_temp_file_write_size 10240k; | |
proxy_max_temp_file_size 10240k; | |
[root@proxy02 ~]# mkdir /etc/nginx/ssl_key | |
[root@proxy02 ~]# ll /etc/nginx/ssl_key | |
-rw-r--r-- 1 root root 1675 Sep 8 17:44 hmallleasing.com.key | |
-rw-r--r-- 1 root root 4784 Sep 8 17:44 hmallleasing.com.pem | |
[root@proxy02 ~]# nginx -t. | |
[root@proxy02 ~]# systemctl reload nginx |
# 3.2.5 proxy01 配置 keepalived
[root@proxy01 ~]# cat /etc/keepalived/keepalived.conf | |
global_defs { | |
router_id lb01 # 当前物理设备的标识名称 | |
} | |
vrrp_script check_nginx { | |
# 一条指令或者一个脚本文件,需返回 0 (成功) 或非 0 (失败),keepalived 以此为依据判断其监控的服务状态 | |
script "/usr/bin/killall -0 nginx &>/dev/null && exit 0 || exit 1" | |
interval 3 # 指定脚本执行的间隔 | |
timeout 2 # 指定脚本执行的超时时间 | |
weight -150 # 当监控服务不存活则动态降权,确保 Backup 能接管成功 | |
fall 2 # 判定服务异常的检查次数 | |
rise 3 # 判定服务正常的检查次数 | |
} | |
vrrp_instance VI_1 { | |
state MASTER # 角色状态; | |
interface eth0 # 绑定当前虚拟路由使用的物理接口; | |
virtual_router_id 50 # 当前虚拟路由标识,VRID; | |
priority 200 # 当前物理节点在虚拟路由中的优先级; | |
advert_int 3 # vrrp 通告时间间隔,默认 1s; | |
#nopreempt | |
authentication { | |
auth_type PASS # 密码类型,简单密码; | |
auth_pass 1111 # 密码不超过 8 位字符; | |
} | |
virtual_ipaddress { | |
192.168.40.100 # VIP 地址 | |
} | |
track_script { | |
check_nginx | |
} | |
notify_master "/etc/keepalived/notify.sh master" # 当前节点成为主节点时触发的脚本 | |
notify_backup "/etc/keepalived/notify.sh backup" # 当前节点转为备节点时触发的脚本 | |
notify_fault "/etc/keepalived/notify.sh fault" # 当前节点转为 “失败” 状态时触发的脚本 | |
} | |
[root@proxy01 ~]# systemctl restart keepalived | |
[root@proxy01 ~]# systemctl enable keepalived | |
[root@proxy01 ~]# ip addr |grep 192.168.40.100 | |
inet 192.168.40.100/32 scope global eth0 |
# 3.2.6 proxy02 配置 keepalived
[root@proxy02 ~]# cat /etc/keepalived/keepalived.conf | |
global_defs { | |
router_id lb02 # 当前物理设备的标识名称 | |
} | |
vrrp_instance VI_1 { | |
state BACKUP # 角色状态; | |
interface eth0 # 绑定当前虚拟路由使用的物理接口; | |
virtual_router_id 50 # 当前虚拟路由标识,VRID; | |
priority 100 # 当前物理节点在虚拟路由中的优先级; | |
advert_int 3 # vrrp 通告时间间隔,默认 1s; | |
#nopreempt | |
authentication { | |
auth_type PASS # 密码类型,简单密码; | |
auth_pass 1111 # 密码不超过 8 位字符; | |
} | |
virtual_ipaddress { | |
192.168.40.100 # VIP 地址 | |
} | |
notify_master "/etc/keepalived/notify.sh master" # 当前节点成为主节点时触发的脚本 | |
notify_backup "/etc/keepalived/notify.sh backup" # 当前节点转为备节点时触发的脚本 | |
notify_fault "/etc/keepalived/notify.sh fault" # 当前节点转为 “失败” 状态时触发的脚本 | |
} |
# **3.2.7 ** 抓包验证结果
1. 停止 Master 节点的 Nginx,然后抓包分析
[root@web01 conf.d]# tcpdump -i eth0 -nn host 224.0.0.18 | |
tcpdump: verbose output suppressed, use -v or -vv for full protocol decode | |
listening on eth0, link-type EN10MB (Ethernet), capture size 262144 bytes | |
18:07:36.633242 IP 192.168.40.5 > 224.0.0.18: VRRPv2, Advertisement, vrid 50, prio 200, authtype simple, intvl 3s, length 20 | |
18:07:39.634496 IP 192.168.40.5 > 224.0.0.18: VRRPv2, Advertisement, vrid 50, prio 200, authtype simple, intvl 3s, length 20 | |
18:07:42.635348 IP 192.168.40.5 > 224.0.0.18: VRRPv2, Advertisement, vrid 50, prio 200, authtype simple, intvl 3s, length 20 | |
18:07:45.636681 IP 192.168.40.5 > 224.0.0.18: VRRPv2, Advertisement, vrid 50, prio 200, authtype simple, intvl 3s, length 20 | |
18:07:48.638104 IP 192.168.40.5 > 224.0.0.18: VRRPv2, Advertisement, vrid 50, prio 200, authtype simple, intvl 3s, length 20 | |
18:07:51.639280 IP 192.168.40.5 > 224.0.0.18: VRRPv2, Advertisement, vrid 50, prio 50, authtype simple, intvl 3s, length 20 #master 优先级降为 50 | |
18:07:51.639458 IP 192.168.40.6 > 224.0.0.18: VRRPv2, Advertisement, vrid 50, prio 100, authtype simple, intvl 3s, length 20 | |
18:07:54.640243 IP 192.168.40.6 > 224.0.0.18: VRRPv2, Advertisement, vrid 50, prio 100, authtype simple, intvl 3s, length 20 | |
18:07:5 |
2. 恢复 Master 节点的 Nginx 服务,然后抓包分析
[root@web01 conf.d]# tcpdump -i eth0 -nn host 224.0.0.18 | |
tcpdump: verbose output suppressed, use -v or -vv for full protocol decode | |
listening on eth0, link-type EN10MB (Ethernet), capture size 262144 bytes | |
18:08:45.661885 IP 192.168.40.6 > 224.0.0.18: VRRPv2, Advertisement, vrid 50, prio 100, authtype simple, intvl 3s, length 20 | |
18:08:48.662970 IP 192.168.40.6 > 224.0.0.18: VRRPv2, Advertisement, vrid 50, prio 100, authtype simple, intvl 3s, length 20 | |
18:08:51.665076 IP 192.168.40.6 > 224.0.0.18: VRRPv2, Advertisement, vrid 50, prio 100, authtype simple, intvl 3s, length 20 | |
18:08:54.665205 IP 192.168.40.6 > 224.0.0.18: VRRPv2, Advertisement, vrid 50, prio 100, authtype simple, intvl 3s, length 20 | |
18:08:57.667054 IP 192.168.40.6 > 224.0.0.18: VRRPv2, Advertisement, vrid 50, prio 100, authtype simple, intvl 3s, length 20 | |
18:09:00.668761 IP 192.168.40.6 > 224.0.0.18: VRRPv2, Advertisement, vrid 50, prio 100, authtype simple, intvl 3s, length 20 | |
18:09:00.668923 IP 192.168.40.5 > 224.0.0.18: VRRPv2, Advertisement, vrid 50, prio 200, authtype simple, intvl 3s, length 20 #master 优先升降为 200 | |
18:09:03.669999 IP 192.168.40.5 > 224.0.0.18: VRRPv2, Advertisement, vrid 50, prio 200, authtype simple, intvl 3s, length 20 |