
# 1、分布式版本控制系统 Git
# 1.1 Git 快速⼊⻔
# 1.1.1 什么是 Git
Git 是⼀个分布式的版本控制软件。
- 1、软件,类似于 QQ、office、 等安装到电脑上才能使⽤的⼯具。
- 2、分布式版本控制,类似于毕业论⽂、写⽂案、视频剪辑等,需要反复修改和保留原历史数据。
为什么要做版本控制?
要保留之前所有的版本,以便回滚和修改。
# 1.1.2 安装 Git
1、windows 系统下载地址: https://git-scm.com/install/windows
Administrator@Oldxu MINGW64 ~ | |
$ git --version | |
git version 2.34.1.windows.1 |
2、linux 系统
[root@gitlab ~]# yum install git -y | |
[root@gitlab ~]# git --version | |
git version 1.8.3.1 |
3、MacOS 系统下载地址: https://git-scm.com/download/mac
# 1.2 Git 基本应⽤
# 1.2.1 创建抖⾳项⽬
想要让 git 对⼀个⽬录进⾏版本控制需要以下步骤:
1、个⼈信息配置
[root@gitlab douyin]# git config --global user.name "xuyong" | |
[root@gitlab douyin]# git config --global user.email "373370405@qq.com" | |
[root@gitlab douyin]# git config --global color.ui true |
2、进⼊要管理的⽂件夹,执⾏初始化命令
[root@gitlab ~]# mkdir douyin | |
[root@gitlab ~]# cd douyin/ | |
[root@gitlab douyin]# git init |
# 1.2.2 开发新功能
#1.V1 版本 | |
[root@gitlab douyin]# cat project.py | |
#1. 短视频功能已开发 50%--c1 | |
[root@gitlab douyin]# git add . | |
[root@gitlab douyin]# git rm --cached project.py #将文件从 git 暂存区域的追踪列表移除 | |
[root@gitlab douyin]# git commit -m "短视频功能已开发 50%--c1" | |
#2.V2 版本 | |
[root@gitlab douyin]# cat project.py | |
#1. 短视频功能已开发 50%--c1 | |
#2. 短视频功能已开发 80%--c2 | |
[root@gitlab douyin]# git add . | |
[root@gitlab douyin]# git commit -m "短视频功能已开发 80%--c2" | |
#3.V3 版本 | |
[root@gitlab douyin]# cat project.py | |
#1. 短视频功能已开发 50%--c1 | |
#2. 短视频功能已开发 80%--c2 | |
#3. 购物功能已开发 60%--c3 | |
[root@gitlab douyin]# git add . | |
[root@gitlab douyin]# git commit -m "购物功能已开发 60%--c3" |
# 1.2.3 版本回退
#1. 回退至 v2 版本 | |
[root@gitlab douyin]# git log | |
commit 9f137f1f167ee9edd087783c2a73d2a4d06d6a4f | |
Author: xuyong <373370405@qq.com> | |
Date: Sun Nov 9 16:19:34 2025 +0800 | |
购物功能已开发60%--c3 | |
commit a1a6590357fc815aacdd4118c4ad8670cc881c31 | |
Author: xuyong <373370405@qq.com> | |
Date: Sun Nov 9 16:17:41 2025 +0800 | |
短视频功能已开发80%--c2 | |
commit 45fe880ba556b8233c3a934e61536971ef717ca5 | |
Author: xuyong <373370405@qq.com> | |
Date: Sun Nov 9 16:14:57 2025 +0800 | |
短视频功能已开发50%--c1 | |
[root@gitlab douyin]# git reset --hard a1a6590 | |
[root@gitlab douyin]# cat project.py | |
#1. 短视频功能已开发 50%--c1 | |
#2. 短视频功能已开发 80%--c2 | |
#2. 回滚至 v3 版本 | |
[root@gitlab douyin]# git reflog | |
a1a6590 HEAD@{0}: reset: moving to a1a6590 | |
9f137f1 HEAD@{1}: commit: 购物功能已开发60%--c3 | |
a1a6590 HEAD@{2}: commit: 短视频功能已开发80%--c2 | |
45fe880 HEAD@{3}: commit (initial): 短视频功能已开发50%--c1 | |
[root@gitlab douyin]# git reset --hard 9f137f1 | |
HEAD is now at 9f137f1 购物功能已开发60%--c3 | |
[root@gitlab douyin]# cat project.py | |
#1. 短视频功能已开发 50%--c1 | |
#2. 短视频功能已开发 80%--c2 | |
#3. 购物功能已开发 60%--c3 |
# 1.2.4 Git 命令总结
git init #初始化⼀个⽬录为版本库 | |
git add #将没有被管理的⽂件,加⼊ git 进⾏管理 | |
git commit #将内容提交到版本库中 | |
git log #查看提交的历史记录 | |
git reflog #查看所有的历史提交记录 | |
git reset --hard 版本号 #回退到指定的提交版本记录 |
# 1.2.5 Git 分⽀应⽤
分⽀可以给使⽤者提供多个环境的可以,意味着你可以把你的⼯作从开发主线上分离开来,以免影响开发主线。
#1. 创建分支 | |
[root@gitlab douyin]# git branch dev | |
[root@gitlab douyin]# git branch | |
dev | |
* master | |
#2. 切换分支 | |
[root@gitlab douyin]# git checkout dev | |
[root@gitlab douyin]# cat shop.py | |
#1. 商城项目 50%--c4 | |
[root@gitlab douyin]# ll | |
total 8 | |
-rw-r--r-- 1 root root 102 Nov 9 16:59 project.py | |
-rw-r--r-- 1 root root 23 Nov 9 17:10 shop.py | |
[root@gitlab douyin]# git add . | |
[root@gitlab douyin]# git commit -m "商城项目 50%--c4" | |
#3. 修复项目 bug | |
[root@gitlab douyin]# git checkout master | |
[root@gitlab douyin]# git branch bug | |
[root@gitlab douyin]# git checkout bug | |
[root@gitlab douyin]# cat project.py | |
#1. 短视频功能已开发 50%--c1 | |
#2. 短视频功能已开发 80%--c2 | |
#3. 购物功能已开发 60%--c3 | |
#4. 修复 bug | |
[root@gitlab douyin]# git add . | |
[root@gitlab douyin]# git commit -m "修复 bug" | |
#4. 合并 bug 分支至 master | |
[root@gitlab douyin]# git checkout master | |
[root@gitlab douyin]# git merge bug | |
[root@gitlab douyin]# cat project.py | |
#1. 短视频功能已开发 50%--c1 | |
#2. 短视频功能已开发 80%--c2 | |
#3. 购物功能已开发 60%--c3 | |
#4. 修复 bug | |
#5. 合并 master 分支至 dev | |
[root@gitlab douyin]# git checkout dev | |
[root@gitlab douyin]# git merge master | |
[root@gitlab douyin]# ls | |
project.py shop.py | |
[root@gitlab douyin]# cat project.py | |
#1. 短视频功能已开发 50%--c1 | |
#2. 短视频功能已开发 80%--c2 | |
#3. 购物功能已开发 60%--c3 | |
#4. 修复 bug | |
#6. 合并 dev 分支至 master | |
[root@gitlab douyin]# git checkout master | |
[root@gitlab douyin]# git merge dev | |
[root@gitlab douyin]# ls | |
project.py shop.py | |
[root@gitlab douyin]# cat project.py | |
#1. 短视频功能已开发 50%--c1 | |
#2. 短视频功能已开发 80%--c2 | |
#3. 购物功能已开发 60%--c3 | |
#4. 修复 bug |
# 1.2.6 Git 远程仓库
#1. 添加远程仓库 | |
[root@gitlab douyin]# git remote add origin https://gitee.com/xyapples/douyin.git | |
#2. 查看远程仓库 | |
[root@gitlab douyin]# git remote -v | |
#3. 移除远程仓库 | |
[root@gitlab douyin]# git remote remove origin | |
#4. 向远程 master 分支推送代码 | |
[root@gitlab douyin]# git push origin master | |
#5.windows 克隆远程仓库代码 | |
$ git clone https://gitee.com/xyapples/douyin.git | |
$ git checkout dev | |
$ touch window.txt | |
$ git add . | |
$ git commmit -m "windows" | |
$ git push origin dev | |
#6. 拉取远程仓库代码 | |
[root@gitlab douyin]# git pull origin dev |
# 1.2.7 Git 管理标签
git 标签就是对 commit 的⼀次快照,便于后续将特定时期的代码快速取出。在代码发布时可以使⽤标签发布。
[root@gitlab douyin]# git tag v1.0 # 当前提交内容打一个标签 (方便快速回滚) | |
[root@gitlab douyin]# git tag # 查看当前所有的标签 | |
[root@gitlab douyin]# git show v1.0 #查看当前 1.0 版本的详细信息 | |
[root@gitlab douyin]# git tag -a v1.1 6710e07 -m "V1.1" #创建标签,指定 commitID | |
[root@gitlab douyin]# git tag -a v1.2 -m "version 1.2 release" #创建带有说明的标签,-a 指定标签名字,-m 指定说明文字 | |
[root@gitlab douyin]# git tag -d v1.0 # 我们为同一个提交版本设置了两次标签,删除之前的 v1.0 | |
[root@gitlab douyin]# git tag #再次查看,v1.0 已经被删除 | |
[root@gitlab douyin]# git push --tags #标签推送到远程仓库 |
# 1.2.8 免密码登录
1、URL 中体现
$ git remote add origin https://⽤户名:密码@gitee.com/xyapples/douyin.git | |
$ git push origin master |
2、SSH 实现
#1. ⽣成公钥和私钥 (默认放在~/.ssh ⽬录下,id_rsa.pub 公钥、id_rsa 私钥) | |
$ ssh-keygen | |
#2. 拷⻉公钥的内容,并设置到 github 中。 | |
$ cat /c/Users/Administrator/.ssh/id_rsa | |
#3. 在 git 本地中配置 ssh 地址 | |
$ git remote add git@gitee.com:xyapples/douyin.git | |
#4. 以后使⽤ | |
$ git push origin master |
# 1.2.9 Git 忽略⽂件
让 Git 不再管理当前⽬录下的某些⽂件。 .gitignore
[root@gitlab douyin]# cat .gitignore | |
*.h | |
!a.h | |
files/ | |
*.py[c|a|d] |
# 2、Gitlab 版本控制系统实战
# 2.1 Gitlab 基本概述
Gitlab 是一个开源分布式的版本控制系统。 Ruby 语言开发完成。
Gitlab 主要实现的功能:
- 1. 管理项目源代码。
- 2. 对源代码进行版本控制。
Gitlab 的优势:
- 1. 开源免费,搭建简单、维护成本较低、适合中小型公司。
- 2. 权限管理,能实现代码对部分人可见,确保项目的安全性。
- 3. 离线同步,保证我们不在实时依赖网络环境进行代码提交。
# 2.2 Gitlab 安装配置
1、安装 gitlab 所需依赖软件
[root@gitlab ~]# yum install -y curl openssh-server postfix wget |
2、下载 Gitlab
[root@gitlab ~]# wget https://mirror.tuna.tsinghua.edu.cn/gitlab-ce/yum/el7/gitlab-ce-16.9.5-ce.0.el7.x86_64.rpm |
3、使用 yum 安装 Gitlab
[root@gitlab ~]# yum localinstall gitlab-ce-16.9.5-ce.0.el7.x86_64.rpm |
4、 配置 Gitlab 域名
[root@gitlab ~]# vim /etc/gitlab/gitlab.rb | |
#1.Gitlab Url | |
external_url 'http://gitlab.hmallleasing.com' |
# 2.3 配置 Gitlab 邮箱
1、在创建新账号时,需要使用邮件验证。
2、后期账户修改密码时,需要通过邮件修改。
# 设定发件人 | |
### Email Settings | |
gitlab_rails['gitlab_email_enabled'] = true | |
gitlab_rails['gitlab_email_from'] = '373370405@qq.com' #发件邮箱 | |
gitlab_rails['gitlab_email_display_name'] = 'Gitlab-System #发件人显示名称 | |
# 具体发件人邮箱信息 | |
### GitLab email server settings | |
gitlab_rails['smtp_enable'] = true | |
gitlab_rails['smtp_address'] = "smtp.qq.com" | |
gitlab_rails['smtp_port'] = 465 | |
gitlab_rails['smtp_user_name'] = "373370405@qq.com" | |
gitlab_rails['smtp_password'] = "********" | |
gitlab_rails['smtp_domain'] = "qq.com" | |
gitlab_rails['smtp_authentication'] = "login" | |
# gitlab_rails['smtp_enable_starttls_auto'] = true | |
gitlab_rails['smtp_tls'] = true |
# 2.4 配置 GitLab 密码
早期 Gitlab 的超级管理员密码,会在第一次登陆时提示设定,新版本通过如下参数控制。
# 在首次安装 GitLab 时,可以使用此选项为 root 用户设置一个自定义密码。如果未设置此参数,GitLab 将自动生成一个随机的 root 密码。 | |
# gitlab_rails['initial_root_password'] = "password" | |
# 此参数决定是否将初始 root 密码存储在 /etc/gitlab/initial_root_password 文件中。 | |
gitlab_rails['store_initial_root_password'] = true |
# 2.5 关闭 Gitlab 监控
由于 Gitlab 核心功能是代码托管,所以有些额外的组件比较浪费资源,所以可以考虑关闭。
#将不需要使用的组件都设定为 false | |
2279 prometheus['enable'] = false | |
2280 prometheus['monitor_kubernetes'] = false | |
2363 alertmanager['enable'] = false | |
2387 node_exporter['enable'] = false | |
2412 redis_exporter['enable'] = false | |
2436 postgres_exporter['enable'] = false | |
2476 gitlab_exporter['enable'] = false | |
2515 prometheus_monitoring['enable'] = false |
# 2.6 初始化 Gitlab 组件
第一次需要初始化 gitlab 服务,后续如果对 gitlab 配置文件进行修改,也需要执行初始化进行重新配置。
[root@gitlab ~]# gitlab-ctl reconfigure # 重新生成配置文件 | |
[root@gitlab ~]# gitlab-ctl status | |
[root@gitlab ~]# gitlab-ctl stop | |
[root@gitlab ~]# gitlab-ctl start | |
[root@gitlab ~]# gitlab-ctl reconfigure && gitlab-ctl restart |
# 2.7 验证 Gitlab 组件
1、检查 gitlab 邮箱是否可正常使用。
[root@gitlab ~]# gitlab-rails console | |
Notify.test_email('接收方邮件地址','邮件标题','邮件内容').deliver_now | |
# 邮件发送示例: | |
Notify.test_email('373370405@qq.com','Gitlab邮件测试','hello world').deliver_now |
2、获取 gitlab 超级管理员 root 的登陆密码
[root@gitlab ~]# cat /etc/gitlab/initial_root_password | |
Password: j6tfUQ8UNyW2UXDsoRDhtrGXalINWkM9+hx93F6OD+k= |
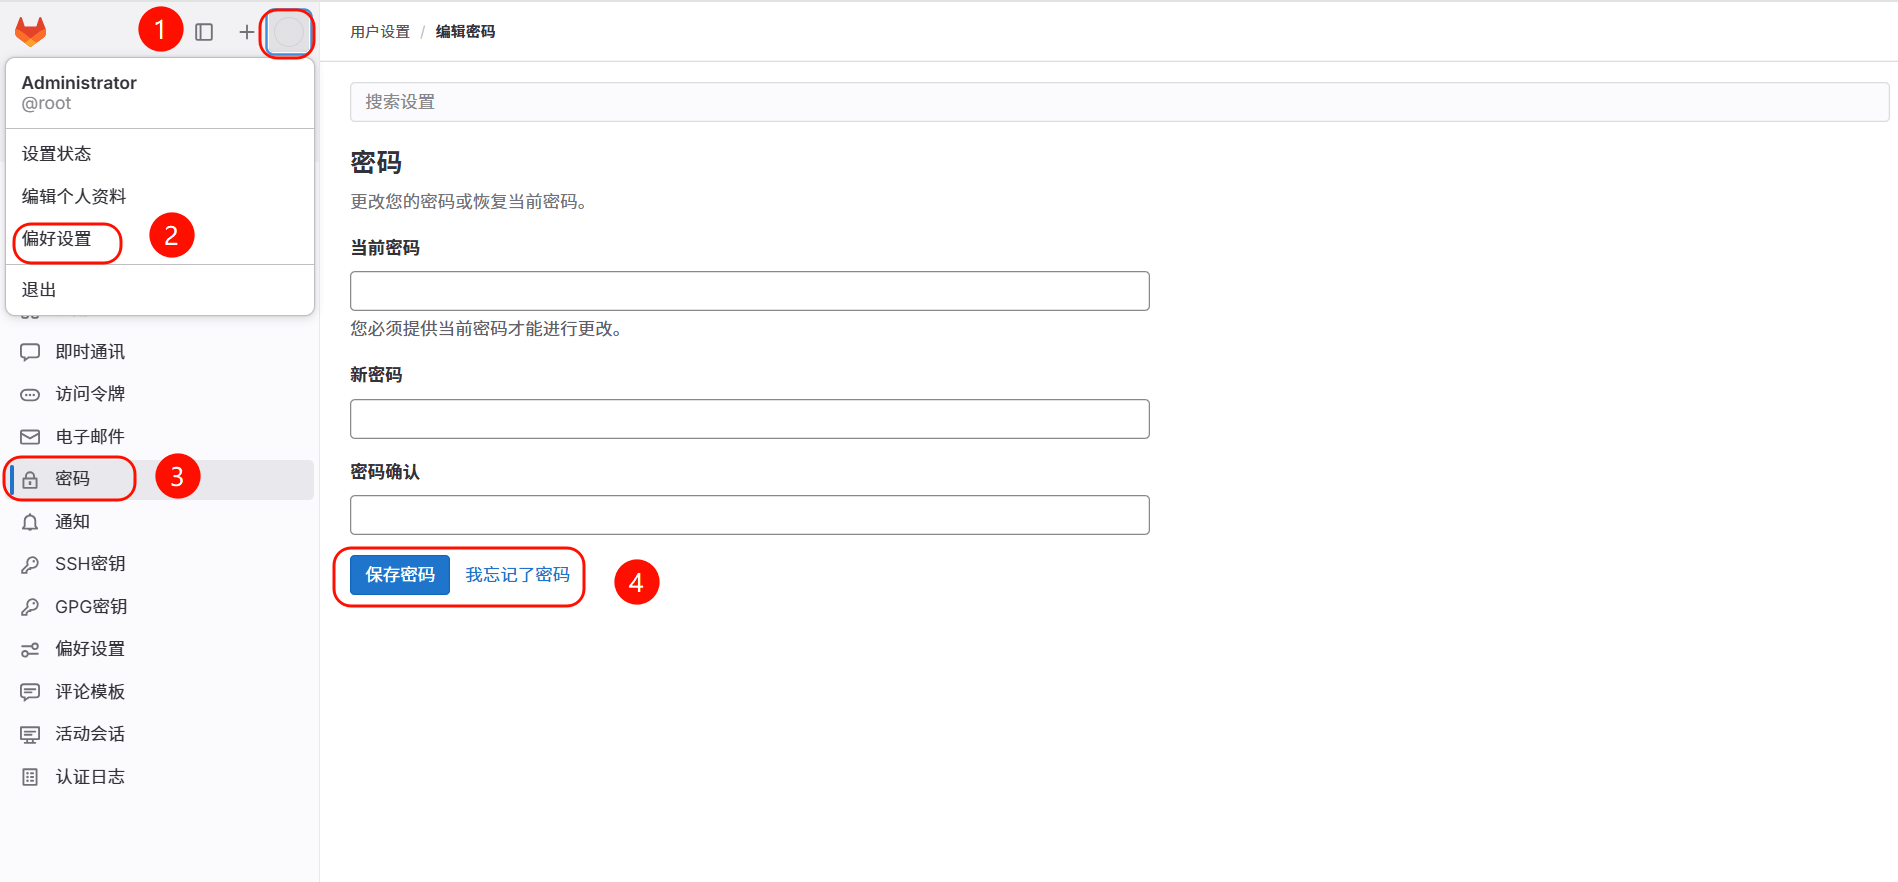
# 2.8 登录 gitlab
1、修改默认的 root 超级管理员密码
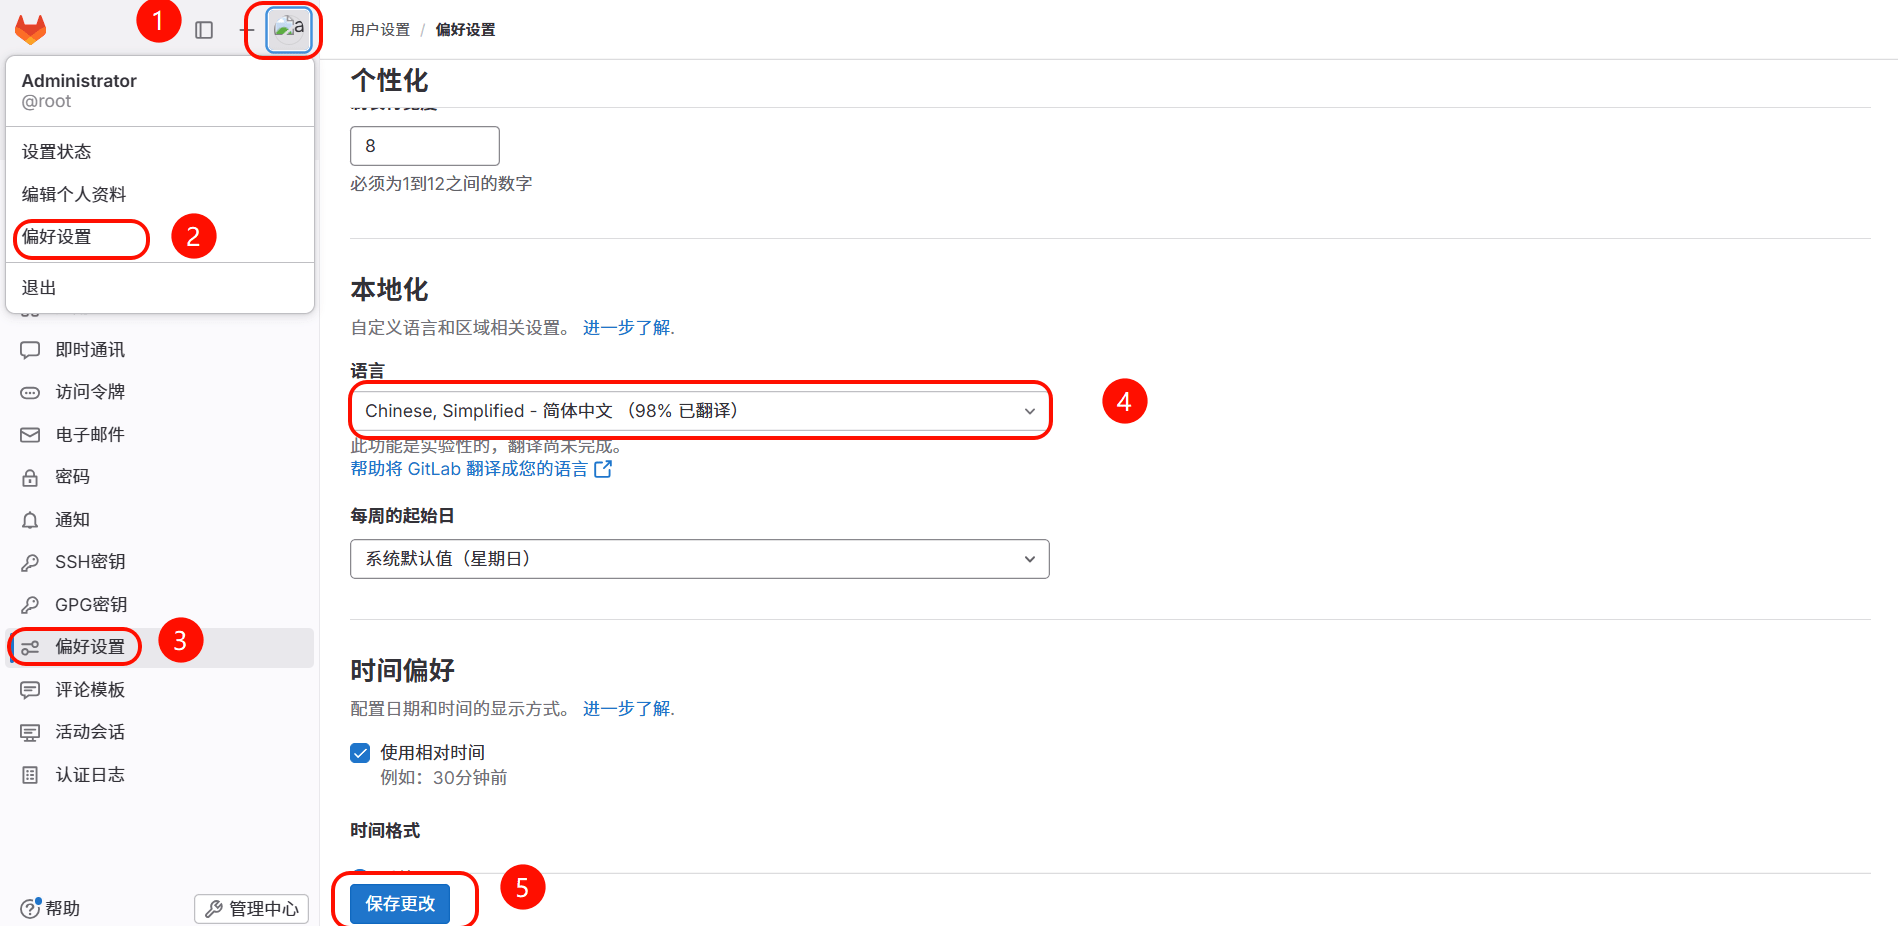
2、修改语言
# 2.9 Gitlab 用户与组
案例 1:验证项目是不是隶属于该组的成员才可以看见
1、首先创建 dev、ops 两个组
2、然后基于组创建两个项目项目
3、最后创建用户、为用户分配组、以及组中的权限
案例 2:验证主程序员和开发者身份的权限
1、主程序员:能够对 master、dev 分支进行操作;
2、开发者:仅能对非 master 分支进行操作;
案例 3:模拟日常开发者如何更新代码至 master 分支
1、首先创建一个 dev 分支,然后编写代码提交至远程 gitlab
2、登陆 gitlab 服务端,像主程序员申请合并请求,请求 dev 合并 master
3、登陆主程序员账户查看合并信息,并确认合并操作
4、登陆 gitlab 查看该项目是否已经是 master 与 dev 分支合并后的效果
# 2.10 Gitlab 日常运维
# 2.10.1 Gitlab 备份
1、修改默认存放备份站点目录,然后进行重新加载配置文件
[root@gitlab ~]# vim /etc/gitlab/gitlab.rb | |
... | |
gitlab_rails['manage_backup_path'] = true # 备份的目录是否可以自定义 | |
gitlab_rails['backup_path'] = "/var/opt/gitlab/backups" # 备份路径,可以指定到 /data/gitlab/backups | |
gitlab_rails['backup_archive_permissions'] = 0644 # 备份的压缩包权限 | |
gitlab_rails['backup_keep_time'] = 604800 # 备份保留 7 天 | |
... | |
[root@gitlab ~]# gitlab-ctl reconfigure |
2、手动执行备份命令,会将备份的结果存储至 /data/gitlab/backups 目录中
- GitLab 版本大于 12.2(新版本): gitlab-backup create
- GitLab 版本小于 12.1(旧版本): gitlab-rake gitlab:backup:create
[root@gitlab ~]# gitlab-backup create | |
[root@gitlab ~]# ll /var/opt/gitlab/backups | |
-rw-r--r-- 1 git git 542720 Nov 11 16:44 1762850669_2025_11_11_16.9.5_gitlab_backup.tar |
3、当然也可以将备份命令写入定时任务每天进行自动备份
[root@gitlab ~]# crontab -l | |
00 02 * * * /usr/bin/gitlab-backup create |
# 2.10.2 Gitlab 恢复
1、停止数据写入服务
[root@gitlab ~]# gitlab-ctl stop unicorn | |
[root@gitlab ~]# gitlab-ctl stop sidekiq |
2、恢复 gitlab 此前备份的数据,指定恢复的文件名称。(但不需要 gitlab_backup.tar 后缀)
GitLab 版本大于 12.2(新版本): gitlab-backup restore BACKUP=1762850669_2025_11_11_16.9.5
GitLab 版本小于 12.1(旧版本): gitlab-rake gitlab:backup:restore BACKUP=1762850669_2025_11_11_16.9.5
[root@gitlab ~]# gitlab-backup restore BACKUP=1762850669_2025_11_11_16.9.5 | |
2025-11-11 08:49:13 UTC -- Unpacking backup ... | |
2025-11-11 08:49:13 UTC -- Unpacking backup ... done | |
2025-11-11 08:49:13 UTC -- Restoring database ... | |
2025-11-11 08:49:13 UTC -- Be sure to stop Puma, Sidekiq, and any other process that | |
connects to the database before proceeding. For Omnibus | |
installs, see the following link for more information: | |
http://hmallleasing.com/help/raketasks/backup_restore.html#restore-for-omnibus-gitlab-installations | |
# 在恢复数据库之前,我们将删除所有现有的表,以避免将来的升级问题。 | |
Before restoring the database, we will remove all existing | |
tables to avoid future upgrade problems. Be aware that if you have | |
custom tables in the GitLab database these tables and all data will be | |
removed. | |
Do you want to continue (yes/no)? yes |
3、重启 gitlab,检测是否 gitlab 对应的备份数据是否恢复成功。
gitlab-ctl restart |
# 2.11 Gitlab 升级
gitlab 升级不能跨版本升级,只能一个个版本逐次升级,也就是无法直接从 gitlab12 升级到 gitlab14,具体升级的方案,参考官方给出的升级路线: https://gitlab-com.gitlab.io/support/toolbox/upgrade-path/
升级示例(由于没有跨大版本可以直接进行升级):
- 目前安装的 gitlab-ce-16.9.5-ce.0.el7.x86_64.rpm
- 期望升级到 gitlab-ce-16.9.9-ce.0.el7.x86_64.rpm
1. 下载 gitlab-ce-16.9.5 版本,而后进行升级操作,它会自动进行一次备份操作。
[root@gitlab ~]# yum install gitlab-ce-16.9.9-ce.0.el7.x86_64.rpm -y |
2. 如果升级时碰到错误,根据错误提示,对配置配置文件进行修复,再次进行初始化动作
[root@gitlab ~]# gitlab-ctl reconfigure |
3、最后重启 gitlab 服务
[root@gitlab ~]# gitlab-ctl restart |
# 2.12 Gitlab 迁移
- A 主机: 16 版本 备份(数据文件,/etc/gitlab.rb)
- B 主机: 16 版本 恢复,恢复后,如果需要升级,在进行升级操作。
# 2.13 Gitlab 安全
将访问网页的 HTTP 协议升级到 HTTPS 协议,保证数据安全;
1、修改 Gitlab 配置文件
[root@gitlab ~]# vim /etc/gitlab/gitlab.rb | |
external_url = "https://gitlab.oldxu.net" # 将地址修改为 https | |
nginx['enable'] = true | |
nginx['client_max_body_size'] = '1000m' | |
nginx['redirect_http_to_https'] = true | |
nginx['redirect_http_to_https_port'] = 443 | |
nginx['ssl_certificate'] = "/ssl_key/server.crt" | |
nginx['ssl_certificate_key'] = "/ssl_key/server.key" | |
nginx['ssl_ciphers'] = "ECDHE-RSA-AES256-GCM-SHA384:ECDHE-RSA-AES128-GCM-SHA256" | |
nginx['ssl_prefer_server_ciphers'] = "on" | |
nginx['ssl_protocols'] = "TLSv1.2" | |
nginx['ssl_session_cache'] = "builtin:1000 shared:SSL:10m" | |
nginx['ssl_session_timeout'] = "1440m" |
2、重新初始化 Gitlab
[root@gitlab ~]# gitlab-ctl reconfigure |
# 2.14 Gitlab 忘记密码
如何重置 GitLab 的 root 密码
1、在 root 用户下执行
[root@gitlab ~]# gitlab-rails console -e production |
2、获得用户数据,修改用户密码
irb(main):001:0> user = User.where(id: 1).first | |
#更改密码并确认密码 | |
irb(main):002:0> user.password="Superman*2021" | |
irb(main):003:0> user.password_confirmation="Superman*2021" | |
#保存退出 | |
irb(main):004:0> user.save! | |
irb(main):005:0> quit |