
# Jenkins FreeStyle 实践
# 1. Jenkins 实现 CI 实践
# 1.1 实现 CI 架构图
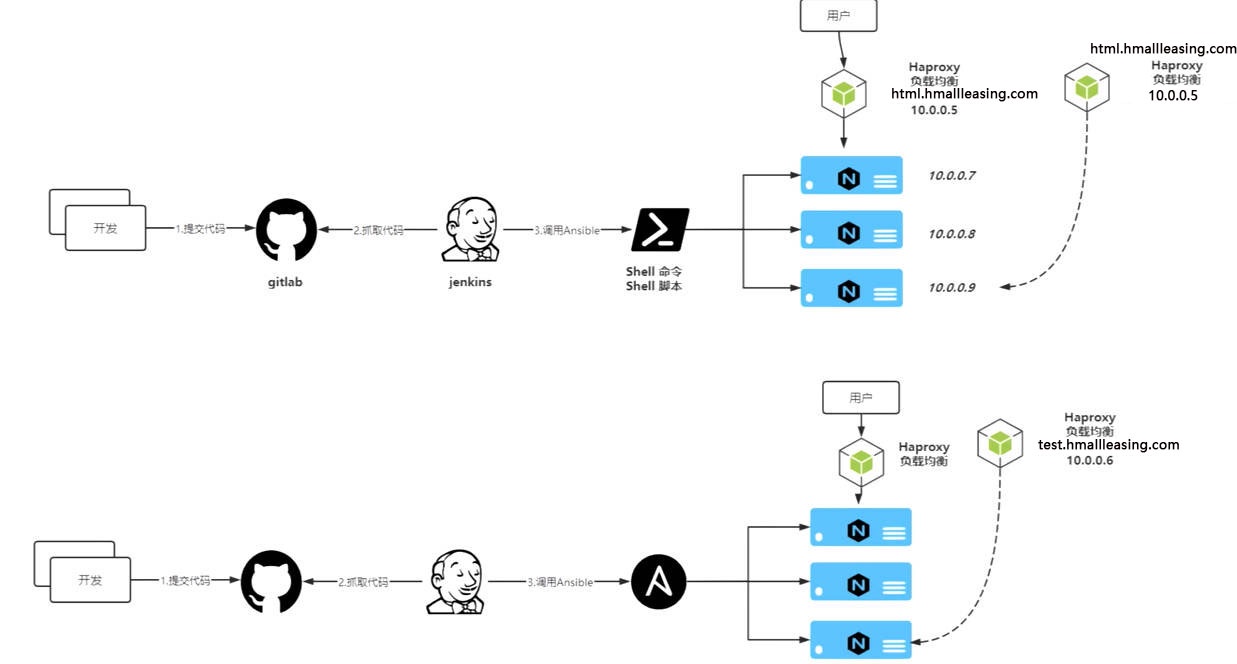
# 1.2 实现 CI 整体思路
- 1. 搭建 web 集群架构环境;
- 2. 模拟开发提交代码⾄ gitlab 、
- 3. 模拟运维拉取代码,并推送⾄ web 服务器组;
- 4. 将⼿动发布的操作编写为 Shell|Ansible 脚本,由 Jenkins 调⽤;
# 2. ⼿动实现 CI 流程
# 2.1 负载均衡配置
1. 安装 Haproxy
[root@proxy01 ~]# yum install socat haproxy -y |
2、配置 Haproxy
[root@proxy01 ~]# cat /etc/haproxy/haproxy.cfg | |
#--------------------------------------------------------------------- | |
# Global settings | |
#--------------------------------------------------------------------- | |
global | |
log 127.0.0.1 local2 | |
chroot /var/lib/haproxy | |
pidfile /var/run/haproxy.pid | |
maxconn 4000 | |
user haproxy | |
group haproxy | |
daemon | |
# turn on stats unix socket | |
stats socket /var/lib/haproxy/stats level admin | |
#nbproc 4 | |
nbthread 8 | |
cpu-map 1 0 | |
cpu-map 2 1 | |
cpu-map 3 2 | |
cpu-map 4 3 | |
defaults | |
mode http | |
log global | |
option httplog | |
option dontlognull | |
option http-server-close | |
option forwardfor except 127.0.0.0/8 | |
option redispatch | |
retries 3 | |
timeout http-request 10s | |
timeout queue 1m | |
timeout connect 10s | |
timeout client 1m | |
timeout server 1m | |
timeout http-keep-alive 10s | |
timeout check 10s | |
maxconn 3000 | |
##listen | |
listen stats | |
mode http | |
bind 0.0.0.0:9999 | |
stats enable | |
log global | |
stats uri /haproxy-status | |
stats auth xuyong:123456 | |
stats admin if TRUE | |
#--------------------------------------------------------------------- | |
# main frontend which proxys to the backends | |
#--------------------------------------------------------------------- | |
frontend www | |
bind *:80 | |
mode http | |
acl html_web hdr_reg(host) -i html.hmallleasing.com | |
use_backend web_cluster if html_web | |
backend web_cluster | |
balance roundrobin | |
option httpchk HEAD / HTTP/1.1\r\nHost:\ html.hmallleasing.com | |
server 172.16.1.7 172.16.1.7:80 check port 80 inter 3s rise 2 fall 3 | |
server 172.16.1.8 172.16.1.8:80 check port 80 inter 3s rise 2 fall 3 |
3. 启动 Haproxy
[root@proxy01 ~]# systemctl start haproxy | |
[root@proxy01 ~]# systemctl enable haproxy |
# 2.2 web 集群配置
#web01 | |
[root@web01 ~]# yum install nginx -y | |
[root@web01 ~]# cat /etc/nginx/conf.d/html.hmallleasing.com.conf | |
server { | |
listen 80; | |
server_name html.hmallleasing.com; | |
root /opt/web; | |
location / { | |
index index.html; | |
} | |
} | |
#web02 | |
[root@web02 ~]# yum install nginx -y | |
[root@web02 ~]# cat /etc/nginx/conf.d/html.hmallleasing.com.conf | |
server { | |
listen 80; | |
server_name html.hmallleasing.com; | |
root /opt/web; | |
location / { | |
index index.html; | |
} | |
} |
# 2.3 ⼿动发布步骤
1. 使⽤ tar 命令打包代码;
[root@jenkins monitor]# tar czvf /opt/web_$(date +%Y_%m_%d_%H_%M).tar.gz ./* |
2. 使⽤ scp 推送代码⾄⽬标集群;
[root@jenkins monitor]# scp /opt/web_2025_11_16_16_06.tar.gz root@172.16.1.7:/opt/ | |
[root@jenkins monitor]# scp /opt/web_2025_11_16_16_06.tar.gz root@172.16.1.8:/opt/ |
3. 从负载均衡摘掉节点;
echo 'enable server web_cluster/172.16.1.7' | socat stdio /var/lib/haproxy/stats |
4. 对代码进⾏更新,重启服务,测试站点;
[root@web01 opt]# tar xf web_2025_11_16_16_06.tar.gz -C /opt/web_2025_11_16_16_06 | |
[root@web02 opt]# tar xf web_2025_11_16_16_06.tar.gz -C /opt/web_2025_11_16_16_06 | |
[root@web01 opt]# ln -s /opt/web_2025_11_16_16_06 /opt/web | |
[root@web02 opt]# ln -s /opt/web_2025_11_16_16_06 /opt/web |
5. 将节点加⼊负载均衡,对外提供;
# 3. Jenkins 实现 CI 实践
# 3.1 Jenkins 调⽤ Shell 实现 CI
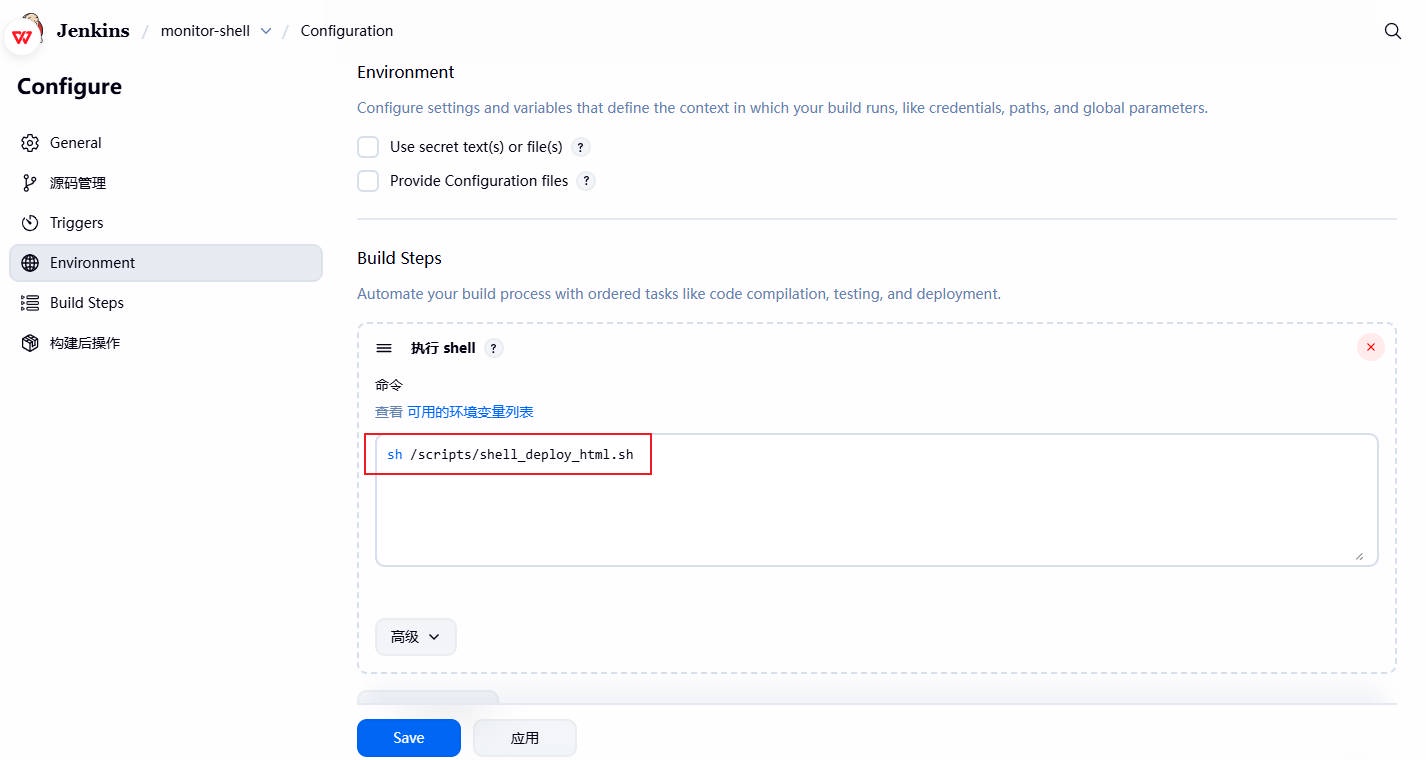
1、为 jenkins 的项⽬增加构建步骤,选择执⾏ Shell ,整体实现脚本思路如下:
- 1、在 Jenkins 服务器上,切换到代码⽬录,然后对代码进⾏打包。
- 2、将打包好的代码,推送到⽬标集群节点。
- 3、将⽬标集群节点从负载均衡中下线。
- 4、在⽬标集群节点上解压代码,创建软链接,并测试站点的可⽤性。
- 5、将⽬标集群节点重新加⼊负载均衡,对外提供服务。
[root@jenkins ~]# cat /scripts/shell_deploy_html.sh | |
#!/usr/bin/bash | |
#1. 定义变量 | |
app_name=web | |
app_dir=/opt | |
app_date=$(date +%Y_%m_%d_%H_%M) | |
#2. 进入到 jenkins 对应的项目目录中 | |
cd ${WORKSPACE} | |
tar czf ${app_dir}/${app_name}_${app_date}.tar.gz ./* | |
#3. 推送压缩包到目标集群 | |
for host in ${webservers} | |
do | |
scp ${app_dir}/${app_name}_${app_date}.tar.gz root@${host}:${app_dir} | |
done | |
#4.haproxy 的函数 | |
lb_server_disable(){ | |
for i in ${lbservers} | |
do | |
ssh root@${i} "echo 'disable server web_cluster/$1' | socat stdio /var/lib/haproxy/stats" | |
done | |
} | |
lb_server_enable(){ | |
for i in ${lbservers} | |
do | |
ssh root@${i} "echo 'enable server web_cluster/$1' | socat stdio /var/lib/haproxy/stats" | |
done | |
} | |
#5. 部署应用 | |
for host in ${webservers} | |
do | |
# 摘掉节点 | |
lb_server_disable ${host} | |
# 更新代码 | |
ssh root@${host} "mkdir -p ${app_dir}/${app_name}_${app_date} && \ | |
tar xf ${app_dir}/${app_name}_${app_date}.tar.gz -C ${app_dir}/${app_name}_${app_date} && \ | |
rm -f ${app_dir}/${app_name} && \ | |
ln -s ${app_dir}/${app_name}_${app_date} ${app_dir}/${app_name}" | |
# 上线节点 | |
lb_server_enable ${host} | |
sleep 5 | |
done |
2、为对应的项⽬,增加 Shell 脚本,然后执⾏如上脚本
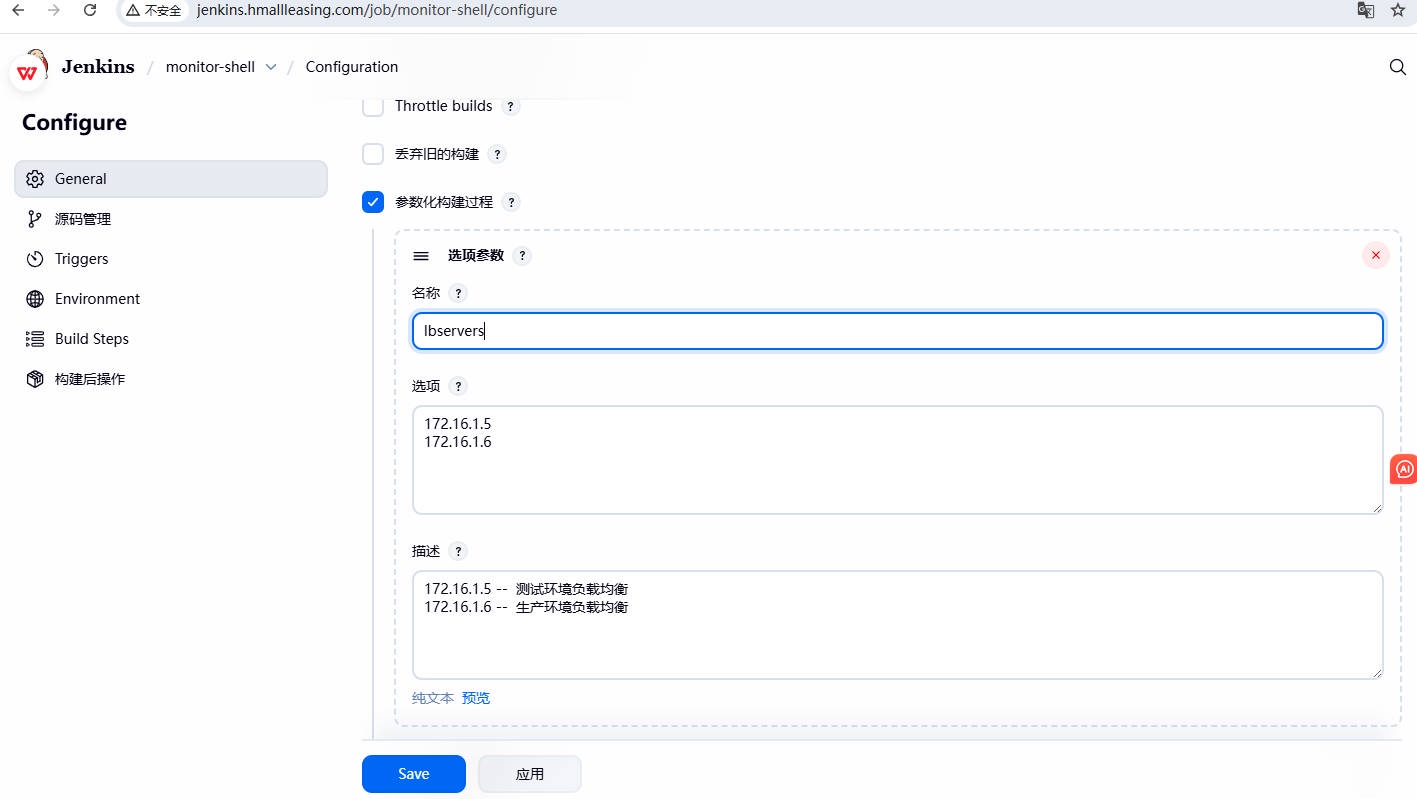
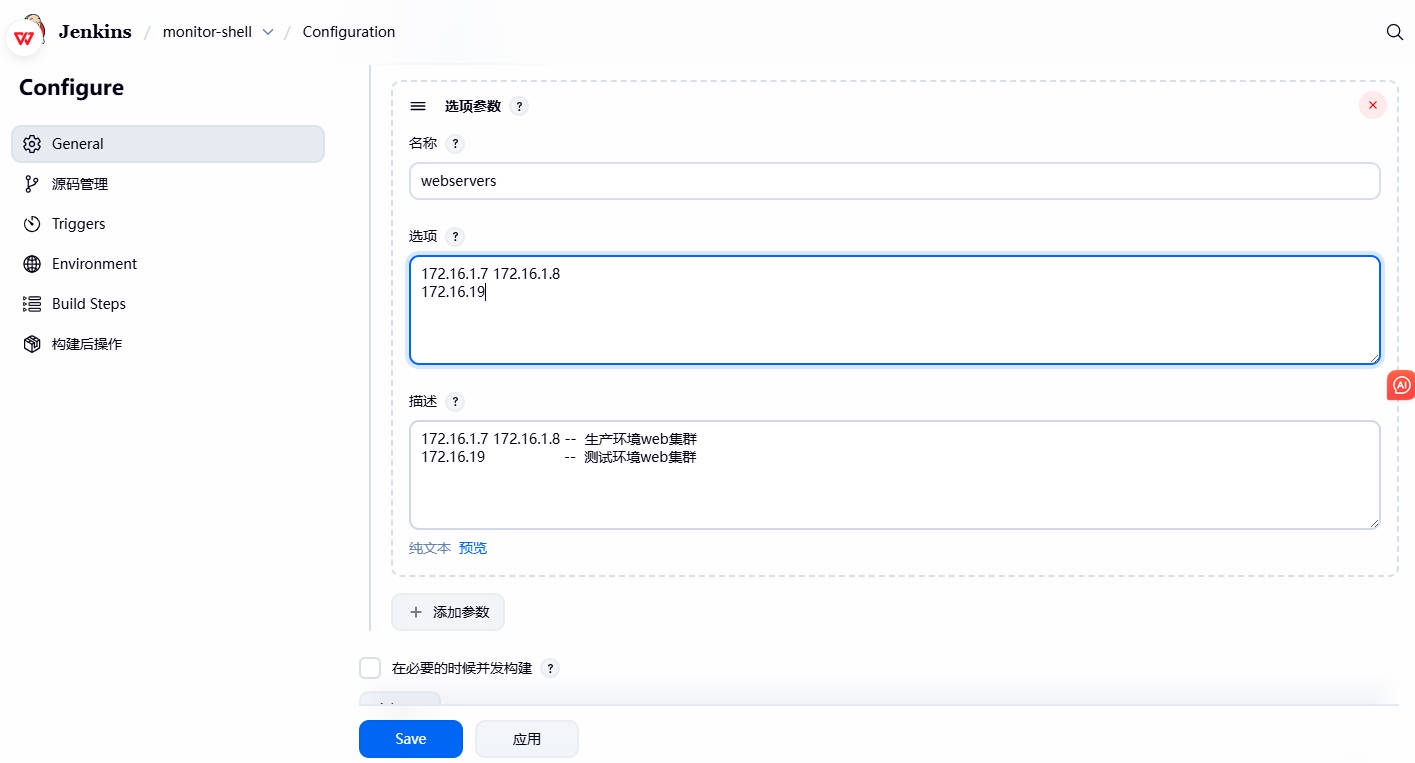
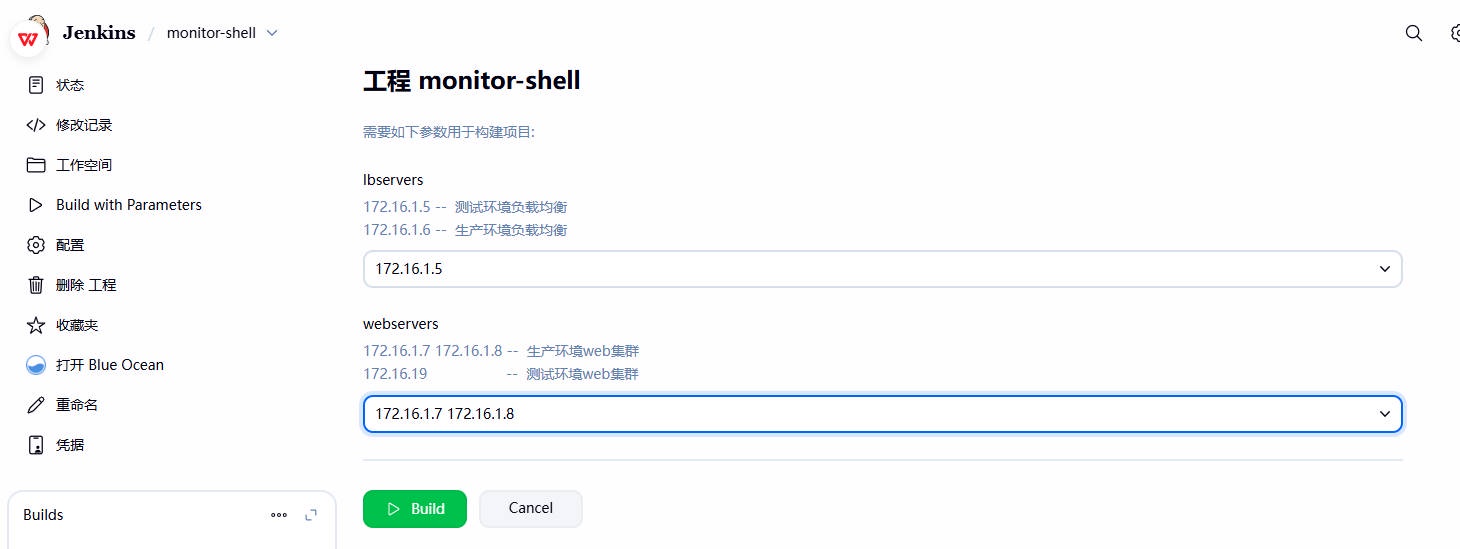
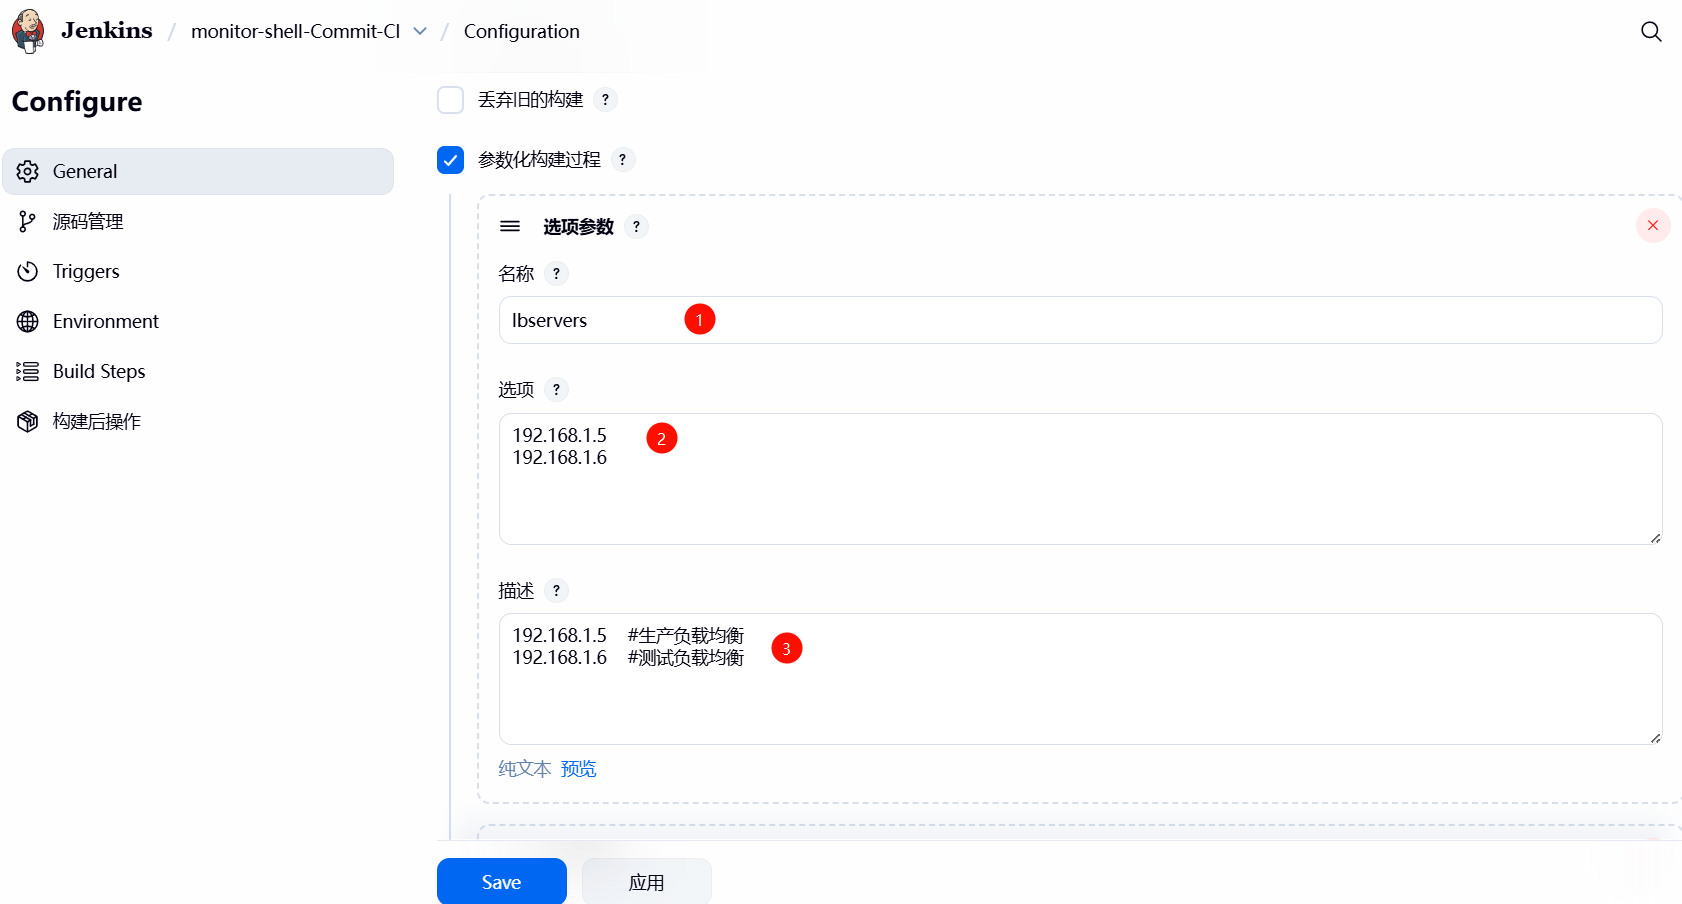
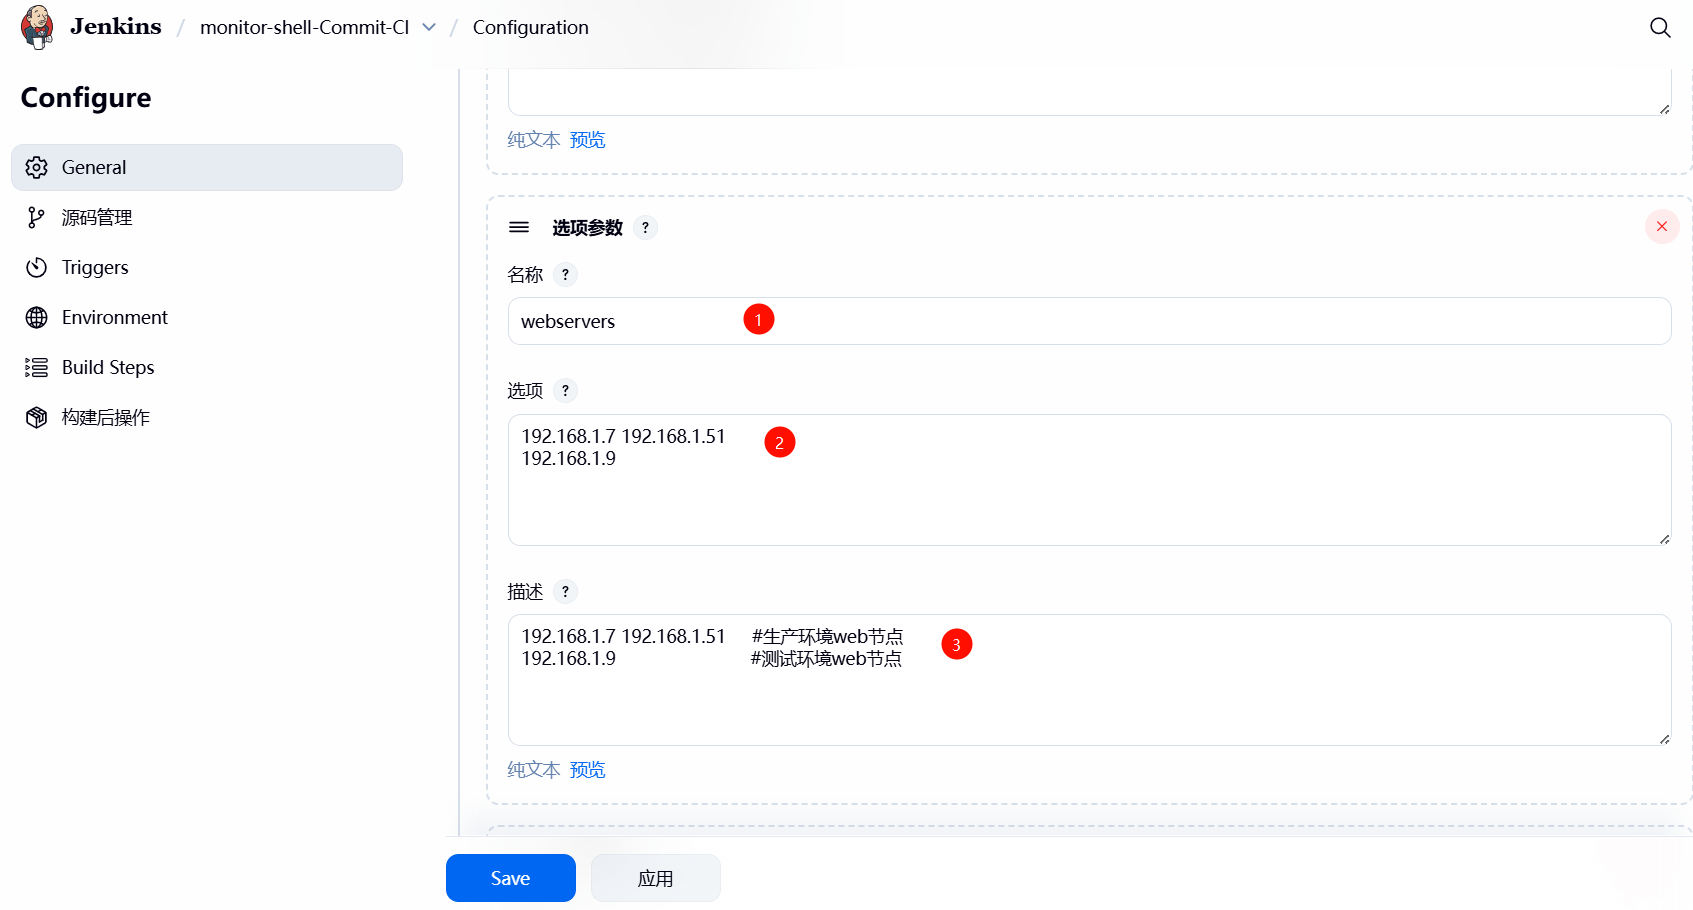
3、在 Shell 脚本中,使⽤到了 webservers、lbservers 两个变量,需要通过 jenkins 选项参数,进⾏动态传参;
lbservers 变量
webservers 变量
4. 检查参数化构建是否符合预期,⽽后点击构建测试;
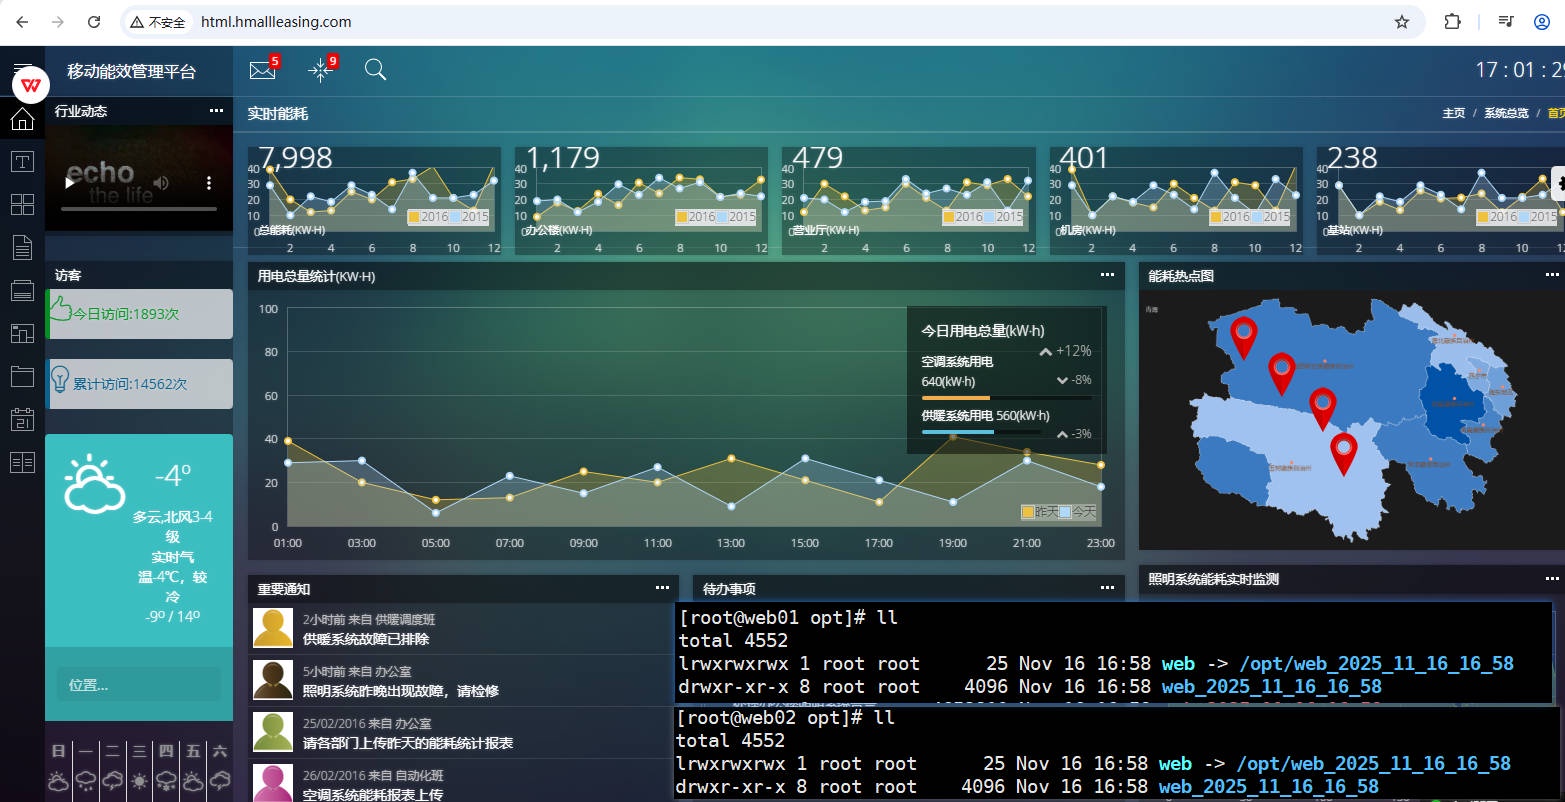
5、验证结果,检查 web 集群的站点⽬录结构,然后访问⽹站测试;
# 3.2 Jenkins 调⽤ Ansible 实现 CI
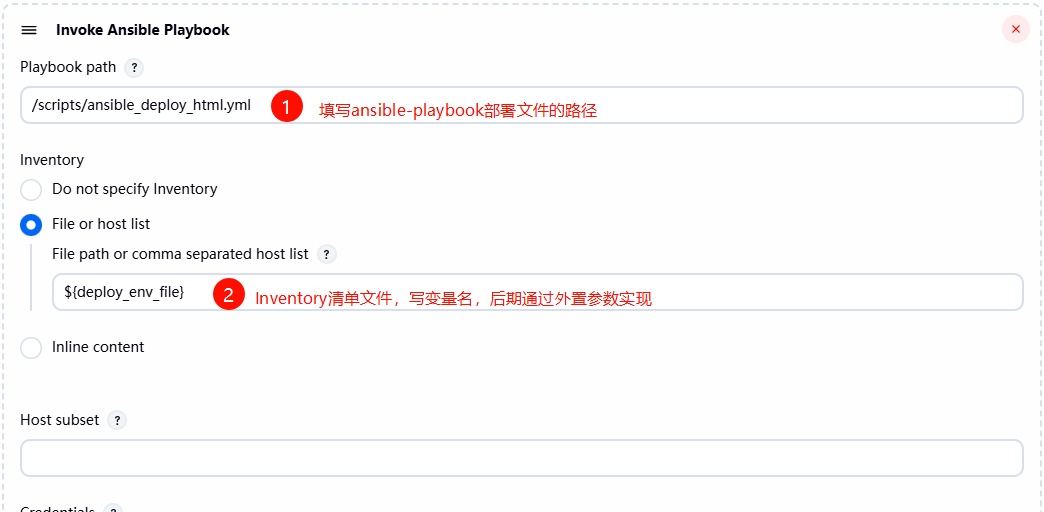
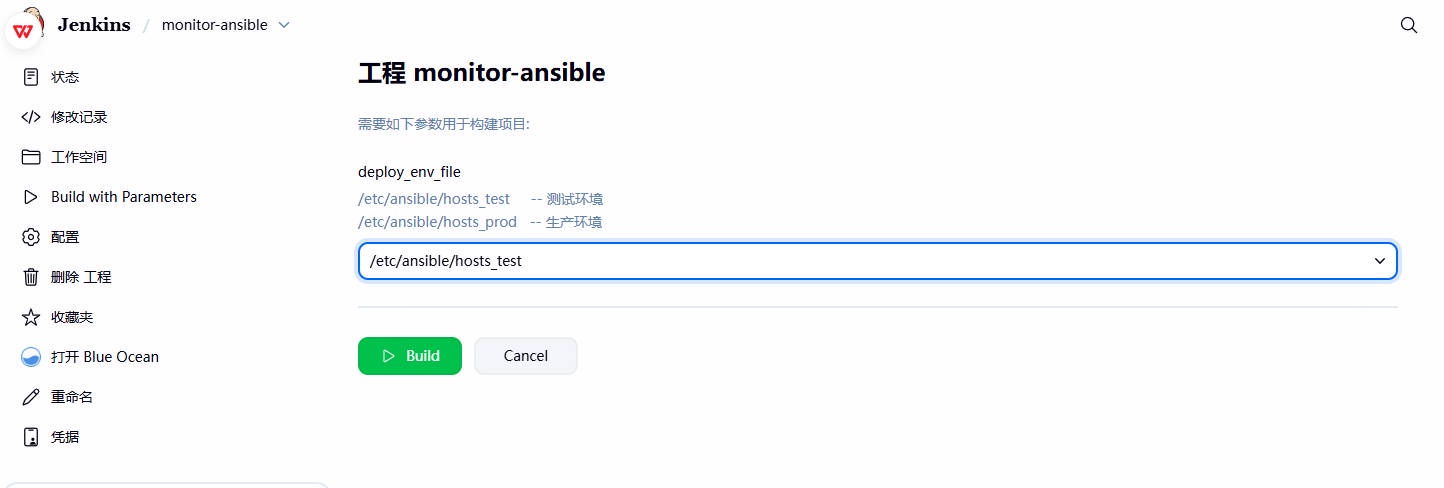
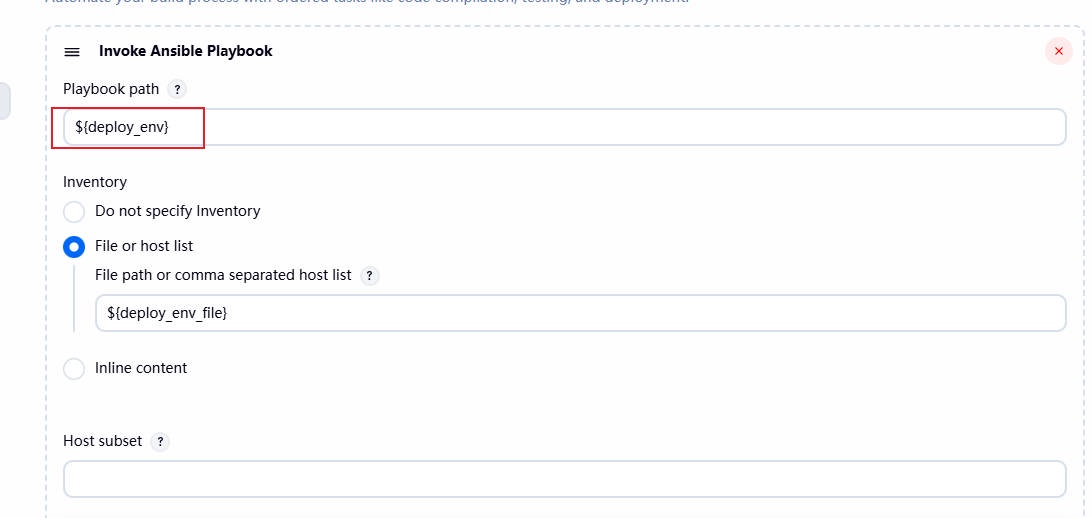
1、创建⼀个名为 monitor-Ansible 的项⽬,在执⾏构建阶段选择 Invoke Ansible Playbook 部署
- Playbook path :设置为 /scripts/ansible_deploy_html.yml (部署的清单⽂件)
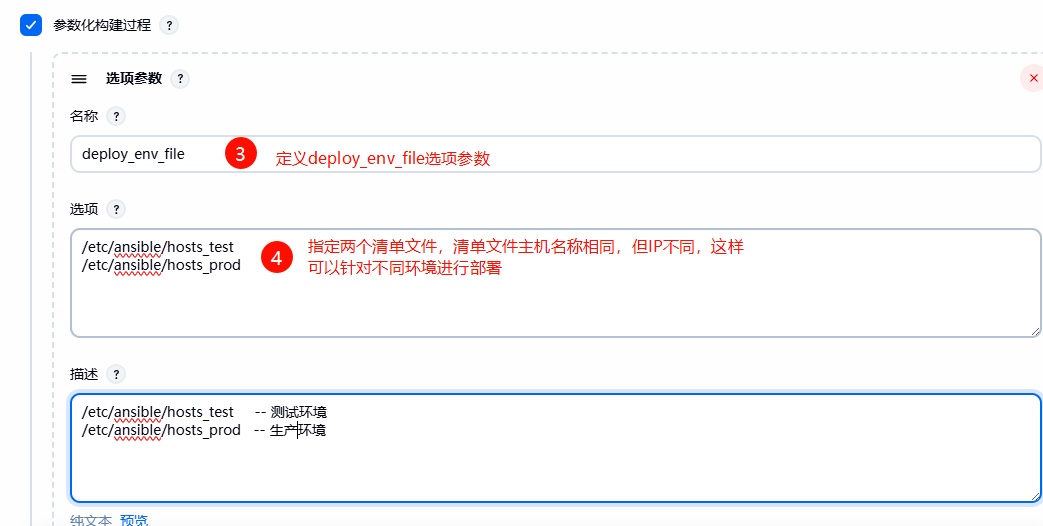
- Inventory :选择 File or host list ,清单⽂件,使⽤ ${deploy_env_file} 外部传参,后期可以让⽤户在前端进⾏选择;
2、使⽤ Jenkins 结合 Ansible 实现⾃动化部署整体思路;
- 建⽴两个清单⽂件,⽤来区分环境
- 设定时间变量,设定 WorkSpace 路径,代码进⾏打包;委派给 Jenkins 执⾏;
- 当 web 节点代码需要更新时,先下线节点,将任务委派给 Haproxy;
- 关闭被控端的 Nginx 服务,然后检查服务是否真的关闭;
- 为 web 节点创建站点⽬录,并将代码解压到对应的⽬录中;
- 删除软连接,重新创建软连接;
- 当 web 节点代码更新成功后,需要上线节点,将任务委派给 Haproxy
- 然后依次循环,直到完成所有节点的代码更新与替换
1. 定义主机清单⽂件
# ⽣产环境 | |
[root@ansible ~]# cat /etc/ansible/hosts_prod | |
[lbservers] | |
172.16.1.5 | |
[webservers] | |
172.16.1.7 | |
172.16.1.8 | |
# 测试环境 | |
[root@ansible ~]# cat /etc/ansible/hosts_test | |
[lbservers] | |
172.16.1.6 | |
[webservers] | |
172.16.1.9 |
2. 编写 ansible playbook ⽂件
[root@jenkins ~]# cat /scripts/ansible_deploy_html.yml | |
- hosts: webservers | |
serial: 1 # 控制每次仅针对一个主机执行 | |
vars: | |
- app_name: web | |
- app_dir: /opt | |
- app_port: 80 | |
tasks: | |
- name: "1、获取时间,时间格式:(年_月_日_时_分)" | |
shell: | |
cmd: "date +%Y_%m_%d_%H_%M" | |
register: date | |
delegate_to: 127.0.0.1 | |
- name: "2、获取项目的工作路径(workspace)" | |
shell: | |
cmd: "echo ${WORKSPACE}" | |
register: workspace | |
delegate_to: 127.0.0.1 | |
- name: "3、对代码进入打包操作,打包的名称格式: 项目名_时间" | |
archive: | |
path: "/*" | |
dest: "/_.tar.gz" | |
delegate_to: 127.0.0.1 | |
- name: "4、摘除需要更新的节点( ),将操作委派给Haproxy负载均衡" | |
haproxy: | |
socket: /var/lib/haproxy/stats | |
state: disabled | |
backend: "web_cluster" | |
host: '' | |
delegate_to: "" | |
loop: "" | |
- name: "5、停止节点 Nginx服务" | |
systemd: | |
name: nginx | |
state: stopped | |
- name: "6、检查节点 Nginx服务是否关闭成功" | |
wait_for: | |
port: "" | |
state: stopped | |
delay: 3 | |
- name: "7、创建站点目录,(格式:项目名称_时间)" | |
file: | |
path: "/_" | |
state: directory | |
- name: "8、将压缩包内容解压到 节点对应的目录中" | |
unarchive: | |
src: "/_.tar.gz" | |
dest: "/_" | |
- name: "9、删除软链接" | |
file: | |
path: "/" | |
state: absent | |
- name: "10、重建软链接" | |
file: | |
src: "/_" | |
dest: "/" | |
state: link | |
- name: "11、启动节点 Nginx服务" | |
systemd: | |
name: nginx | |
state: started | |
- name: "12、检查节点 Nginx服务是否启动成功" | |
wait_for: | |
port: "" | |
state: started | |
delay: 3 | |
- name: "13、上线节点( ),将操作委派给Haproxy负载均衡" | |
haproxy: | |
socket: /var/lib/haproxy/stats | |
state: enabled | |
backend: "web_cluster" | |
host: '' | |
delegate_to: "" | |
loop: "" |
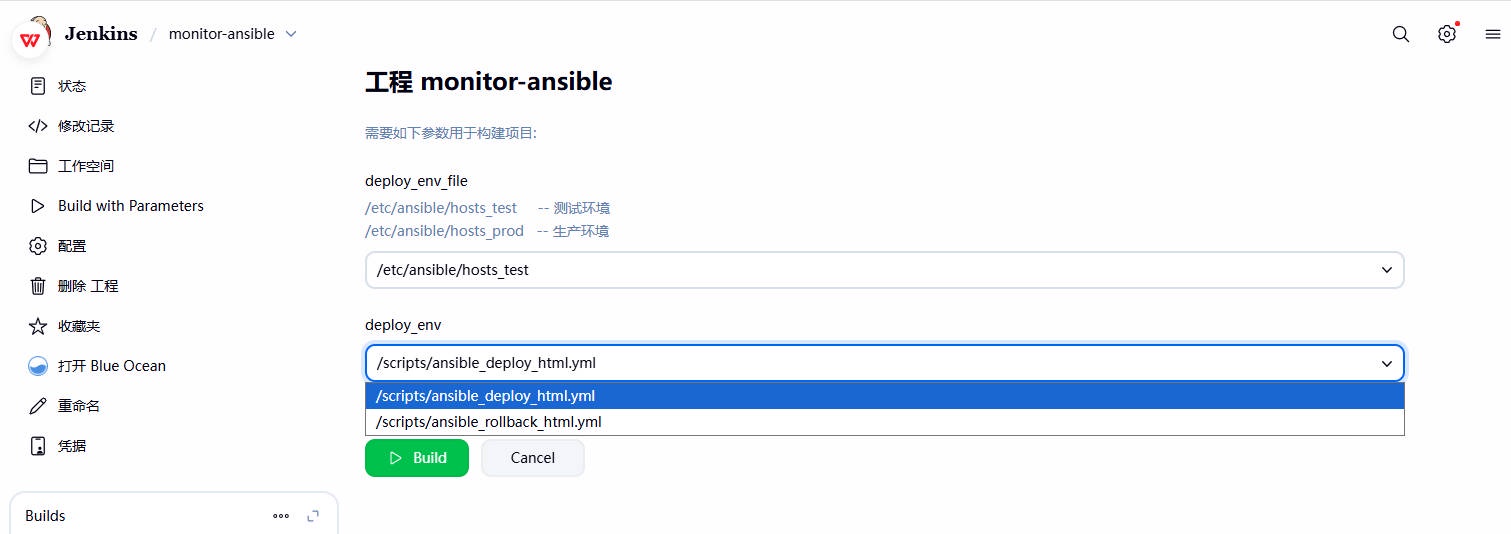
3、针对【⽣产或测试环境】执⾏构建操作,检查结果;
4、检查部署结果。
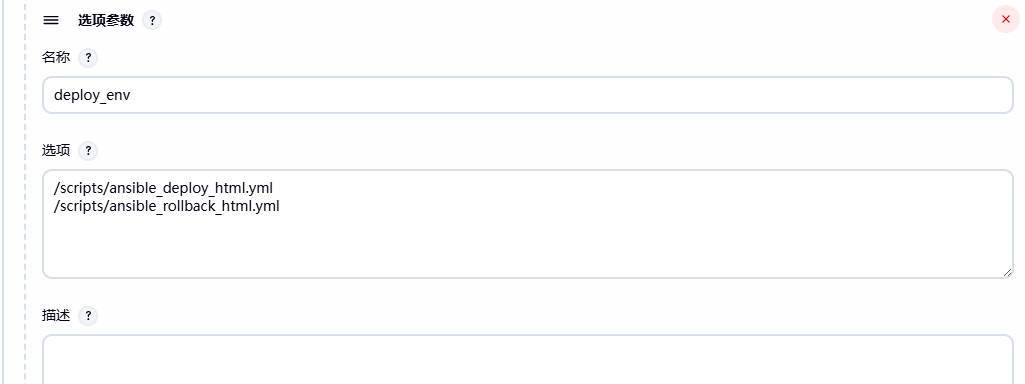
5、尽管部署已经成功,但是由于 Playbook 路径是硬编码的,这不利于灵活调整。为了解决这个问题,可以将 Playbook ⽂件路径设置为⼀个变量,这样就可以在后续步骤中通过参数选项轻松传递。
6、检查最终效果
# 3.3 测试 Jenkins ⾃动发布 CI
模拟开发身份:修改⽹站内容,然后提交代码⾄ gitlab 远程仓库;
模拟运维身份:登陆 Jenkins,选择对应项⽬,点击构建;
模拟客户身份:访问站点域名,检查代码是否更新成果;
# 4、Jenkins 实现全⾃动 CI
# 4.1 Jenkins 定时构建
定时构建,每间隔多久执⾏⼀次;⽆论代码是否更新,时间到了则会执⾏;类似于定时任务的功能;
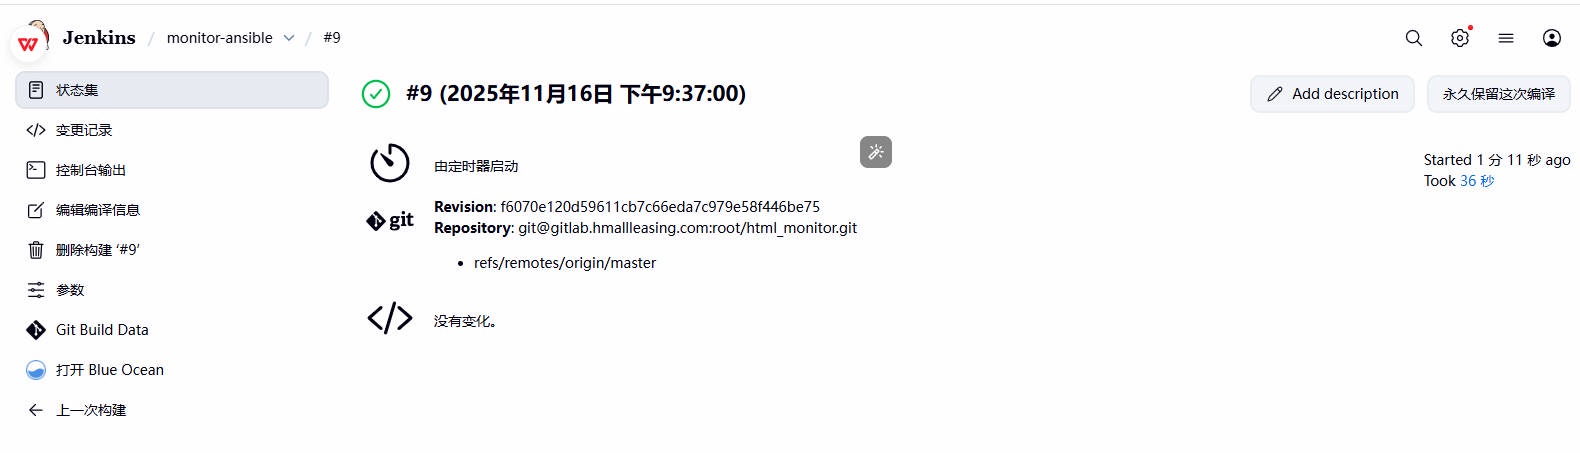
1、配置步骤(点击项⽬ --> 构建触发器,选择定时构建,写上定时构建的频次)
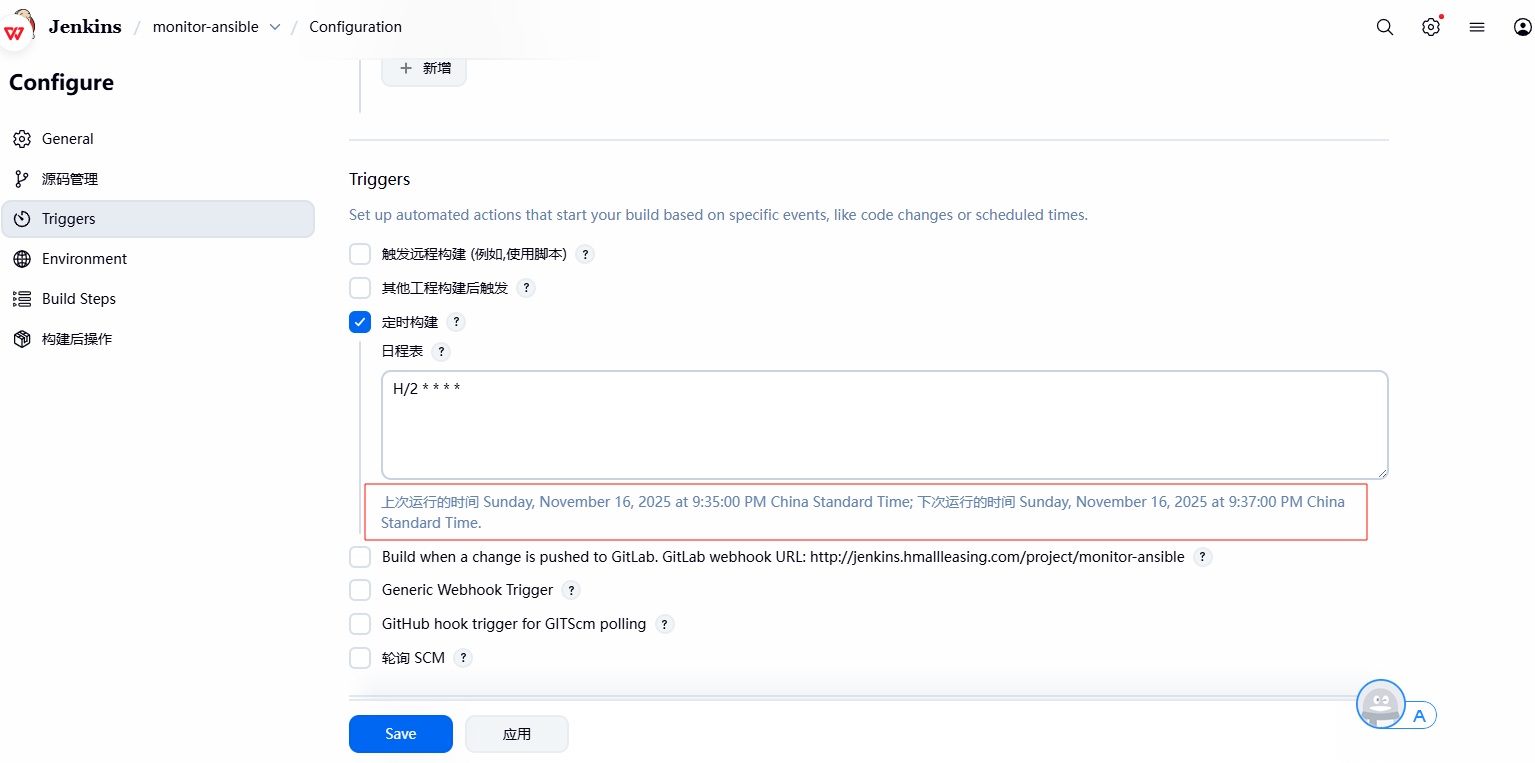
2、检查是否每两分钟触发⼀次构建。
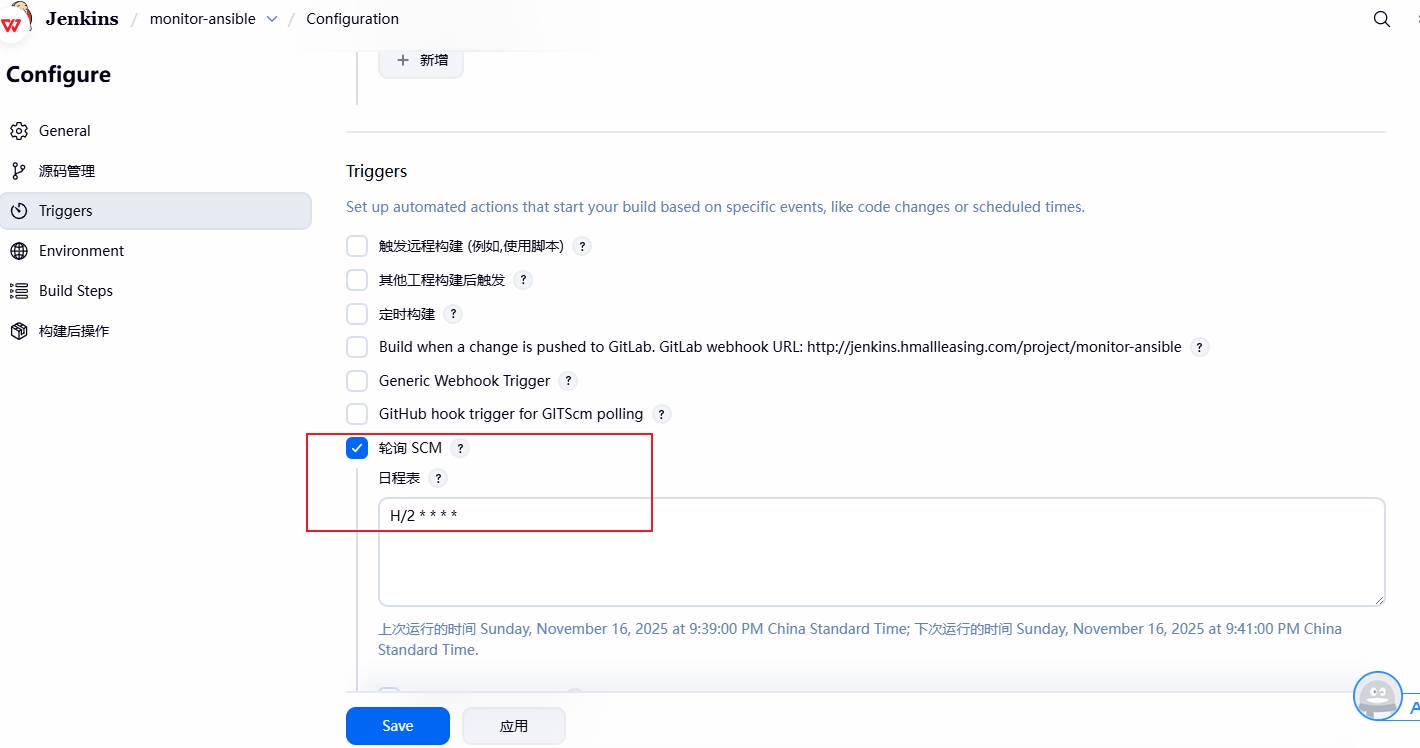
# 4.2 Jenkins SCM 轮询
1、设置每分钟检查代码是否更新,当检查到代码发⽣变更后,则触发构建,否则不执⾏;
建议使⽤ 2 分钟, */2 * * * *
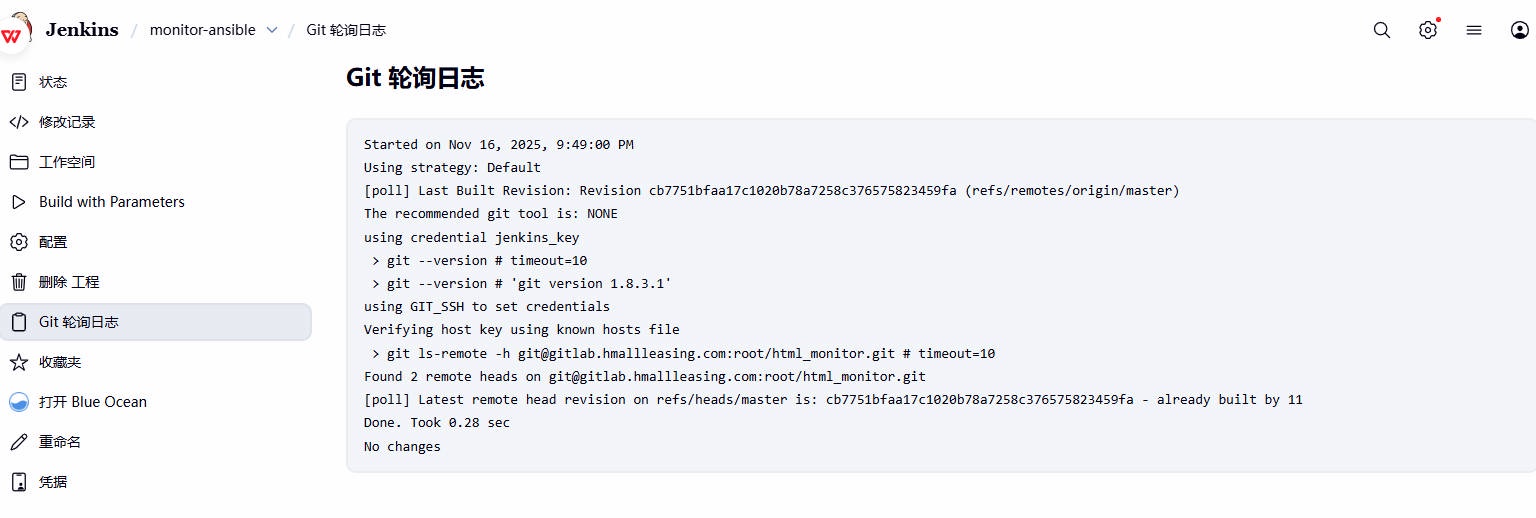
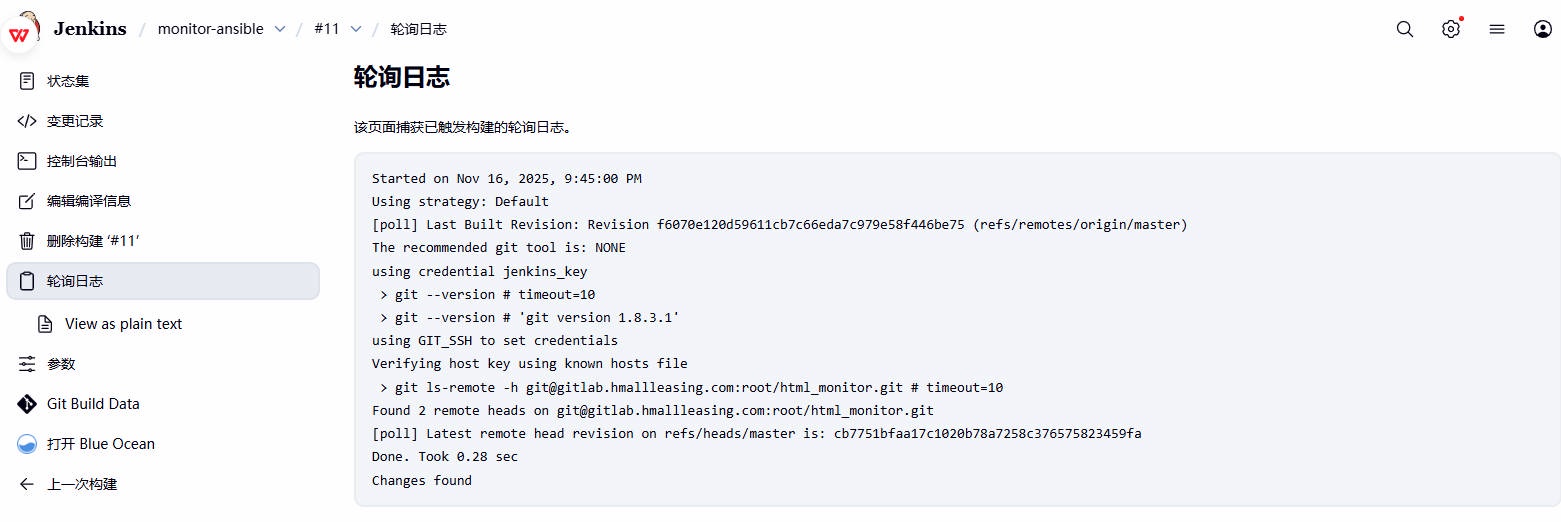
2、检查 Git 的轮询⽇志,如果代码没有变动,则不会发⽣改变
3、模拟修改代码,然后等待 2 分钟看是否会触发构建
# 4.3 Jenkins 基于 Webhook
webhook 就是当开发⼀提交代码⾄ gitlab,Jenkins 则⽴刻将代码拉取到本地,然后执⾏部署操作,部署代码⾄⽬标集群服务节点;
配置 Jenkins
- 1、点击 jenkins 对应的项⽬,构建触发器 -> build when a change is pushed to GitLab ;
- 2、找到⾼级,然后找到 Secret token ,点击 Generate ⽣成 token ;
- 3、这样外部程序就可以调⽤ Jenkins,进⽽触发构建项⽬的动作;
配置 Gitlab
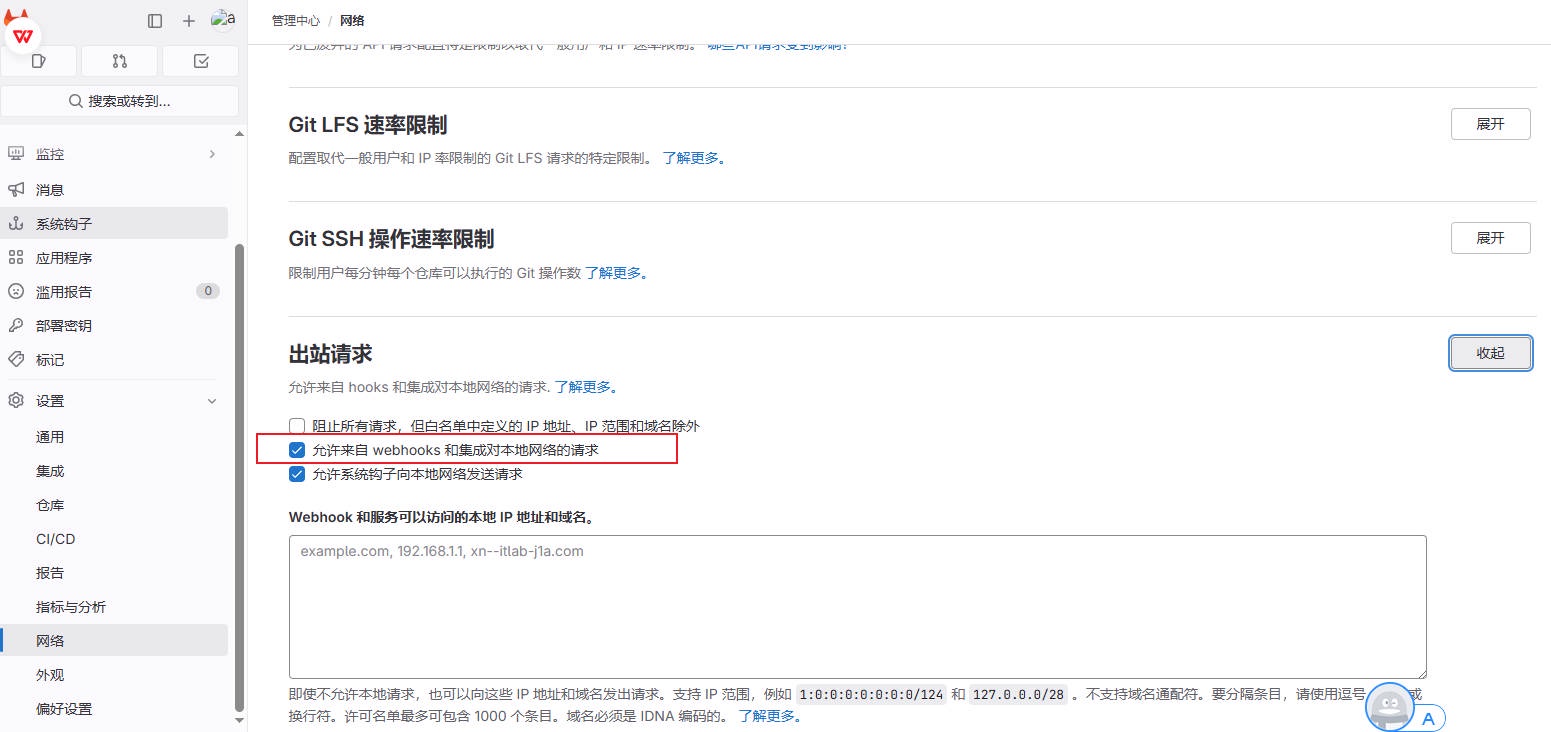
- 1、配置 gitlab , 管理中⼼ -> 设置 -> ⽹络 -> 出站请求 ->Allow requests to the local network from webhooks (勾选)
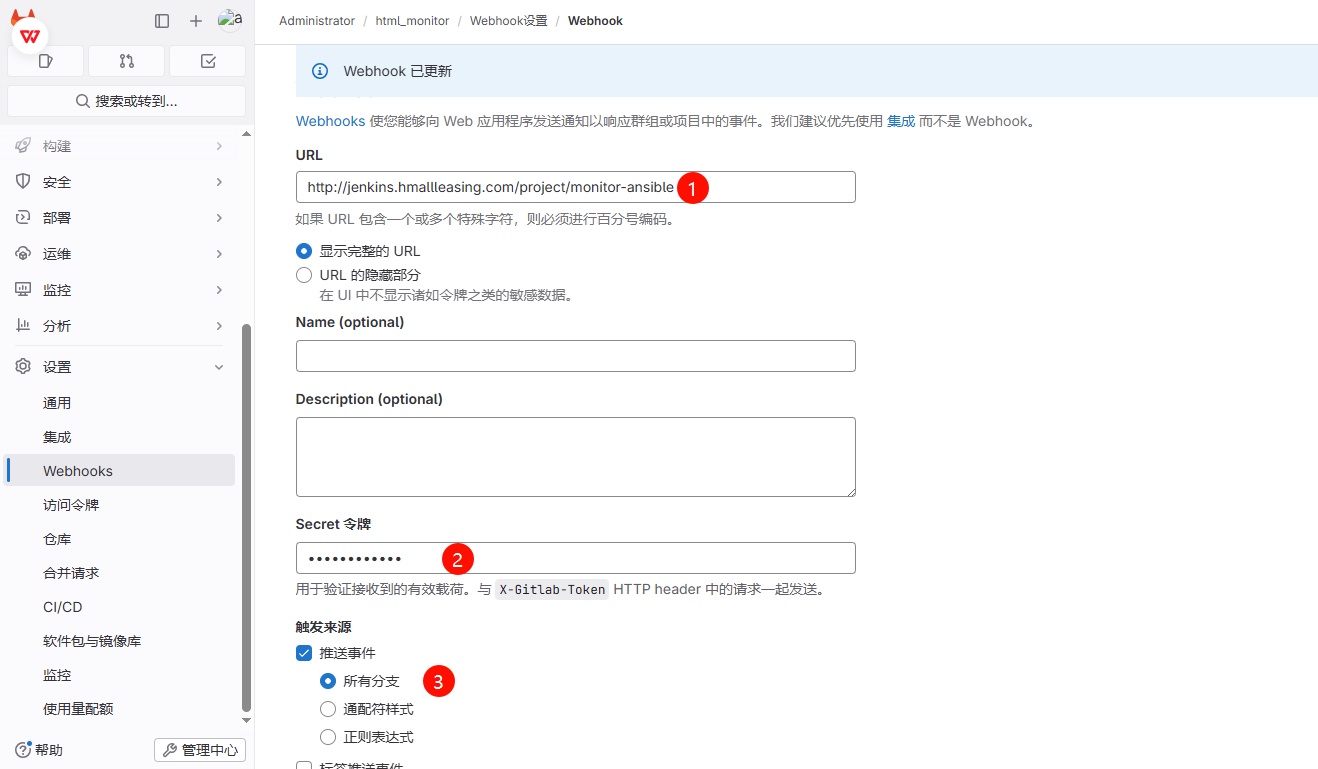
- 2、找到对应要实现⾃动化发布的 Monitor 项⽬, 点击设置 -->webhook-->URL 链接 --> 通知 jenkins 的哪个项⽬地址(从 Jenkins 中复制)Secret 令牌 --> jenkins 此前⽣成的 token 令牌触发来源 --> 推送事件 --> 所有分⽀
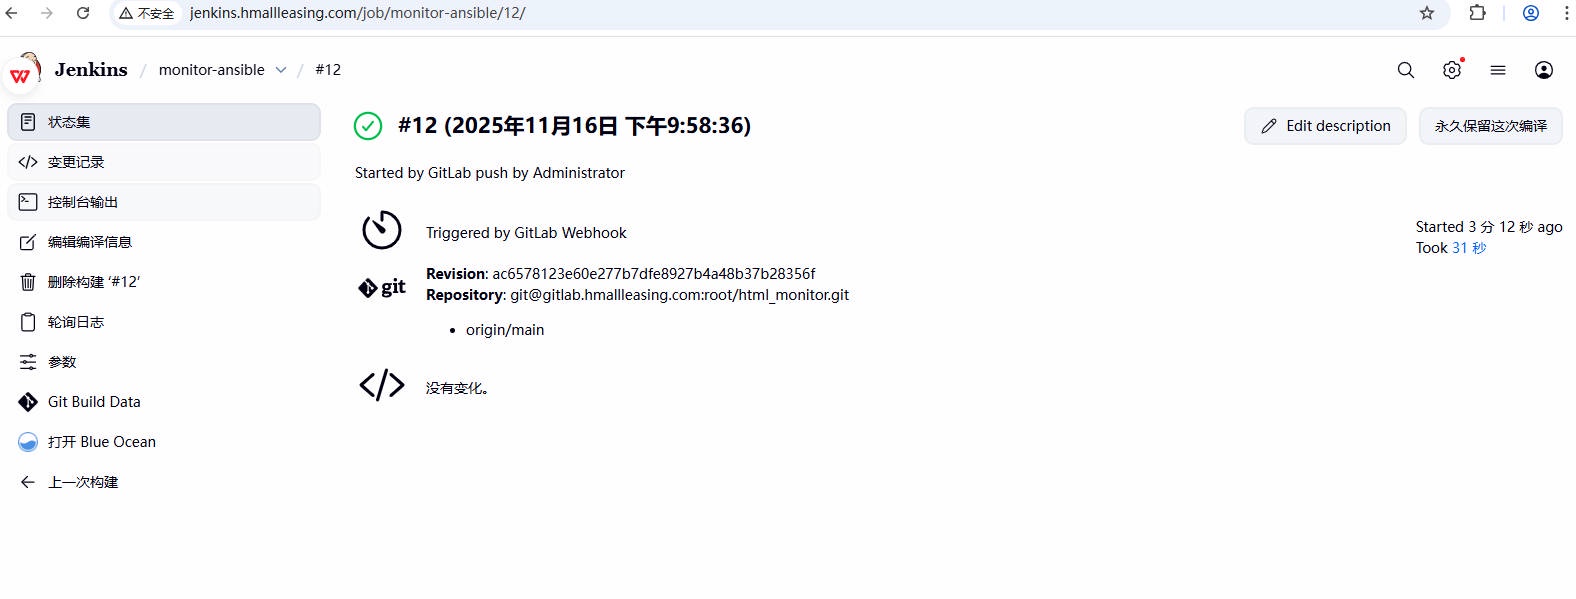
测试 webhook 实现全⾃动化 CI
- 1、模拟开发身份:更新代码,然后提交⾄版本库
- 2、模拟⽤户身份:访问⽹站,检测代码是否更新成功
# 5、Jenkins 基于 CommitID 实现 CI
默认情况下基于最新版本获取代码,但仅有时间戳⽆法区分出代码对应的版本;因此我们可以基于提交的 commitID 来实现代码的发布;
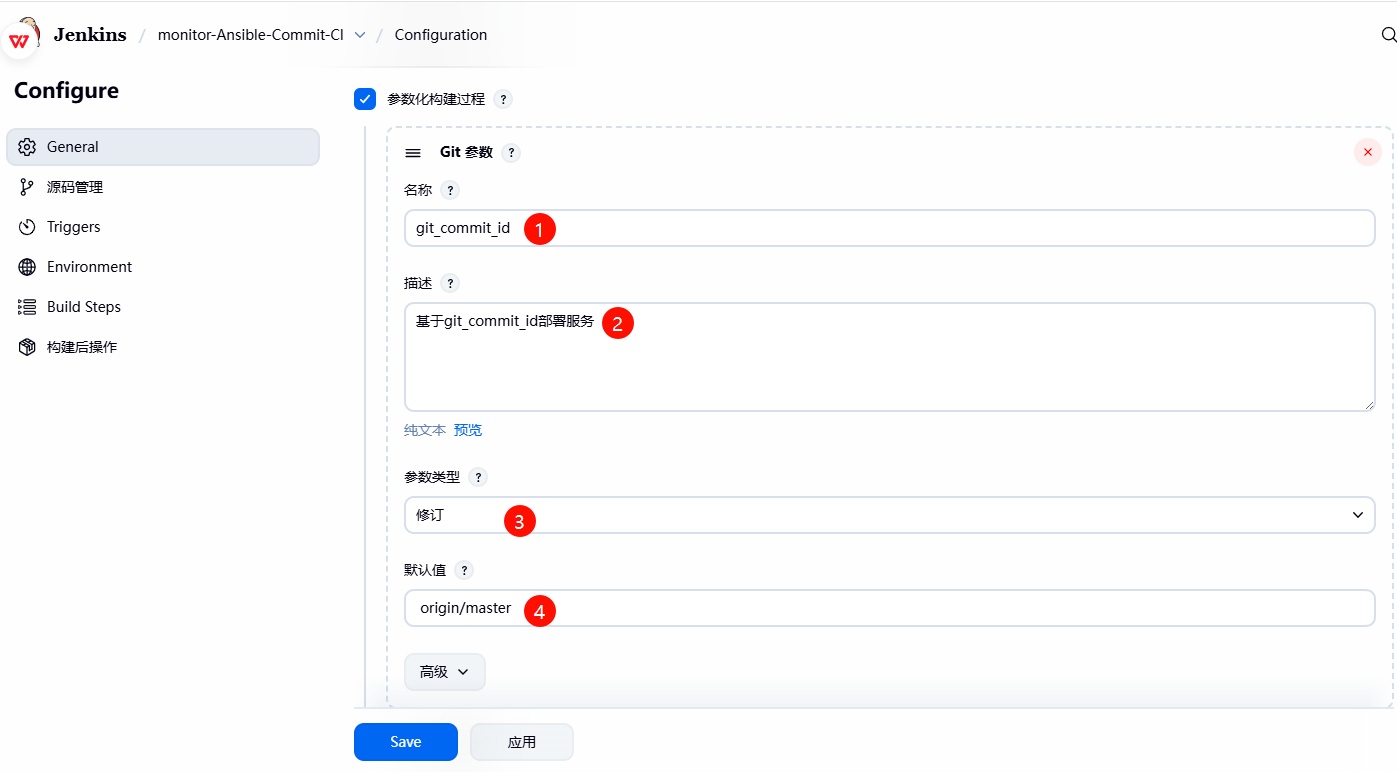
- 1、配置 Jenkins,添加 Git 参数,定义变量 git_commit_id ;
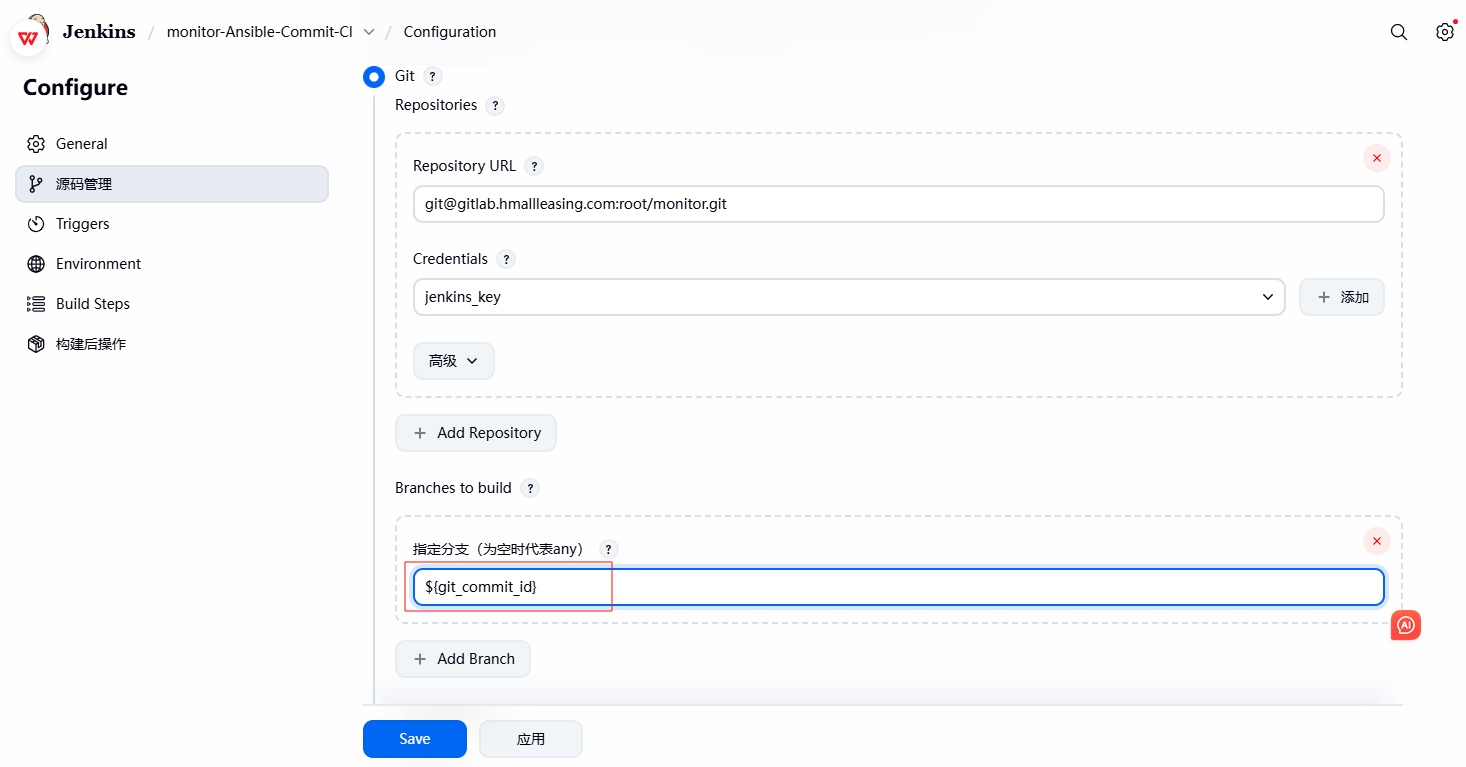
- 2、配置 Jenkins,修改源代码管理,将默认拉取 master 分⽀最新代码,修改为 ${git_commit_id} ,这样仅拉取指定 commit_id 的代码⾄本地;
- 3、修改 Ansible 部署脚本,将部署的代码⽬录由 /opt/web_时间 修改为 /opt/web_时间_${git_commitid} ;
# 5.1 Jenkins 配置
1、创建⼀个新的项⽬ monitor-Ansible-Commit-CI ,可以基于 monitor-Ansible-CI 克隆,然后再 Jenkins 中额外增加⼀个 git 参数 的变量;
- 名称: git_commit_id
- 描述: 基于 git_commit 进⾏发布
- 参数类型:修订
- 默认值: origin/main
2. 修改源码管理,将默认拉取 main 分⽀最新代码,替换为 ${git_commit_id} 变量获取指定的代码;
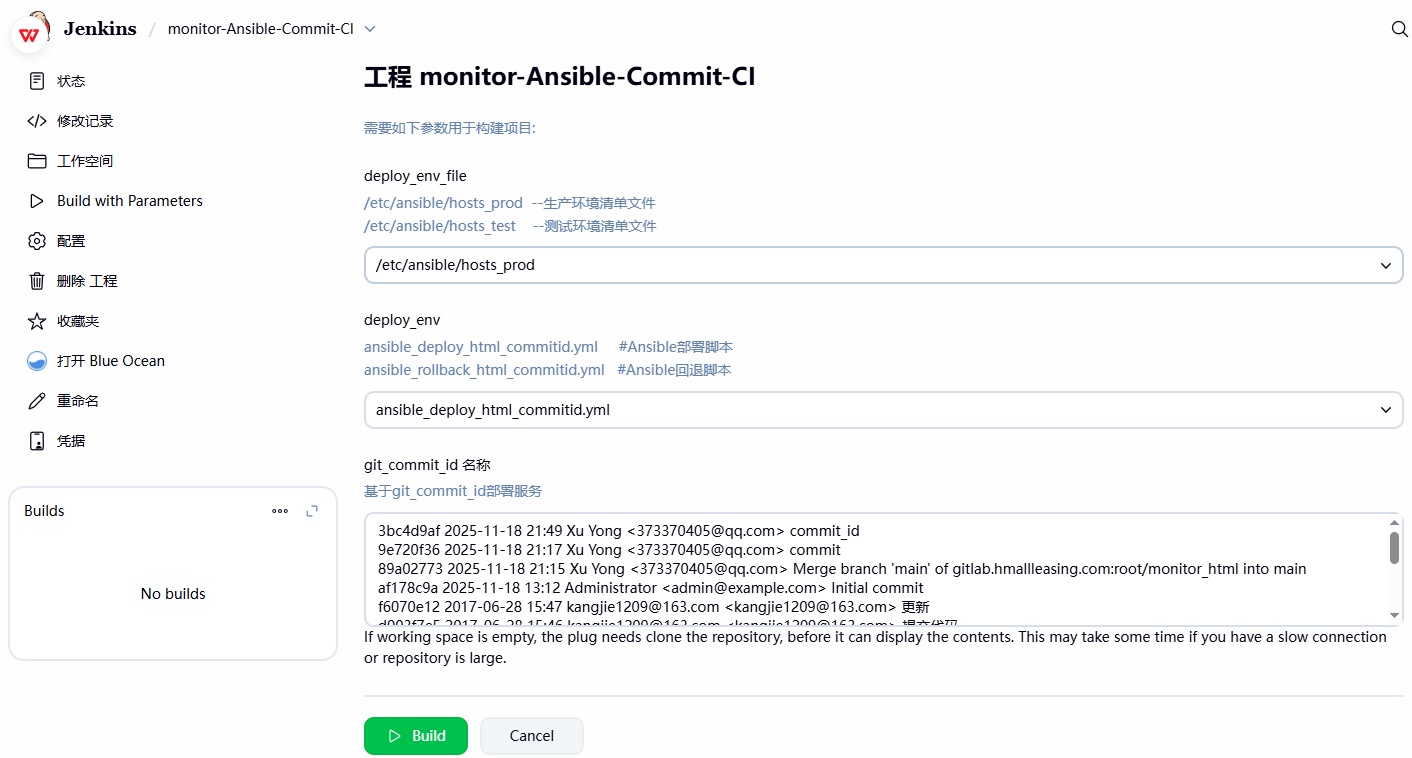
3. 检查前端展示的效果;
# 5.2 Ansible 配置
修改 Ansible 的发布脚本,⼤体思路如下:
- 1、获取到 Jenkins 中的 git_commit_id 系统环境变量所对应的 ID 值;
- 2、修改创建的⽬录名称,将原来的 web_时间时间 ,修改为 web_时间戳_${git_commit_ID} ;
- 3、这样发布到 web 应⽤服务器集群上后,通过代码的⽬录名称就能清楚的知道部署的代码,是哪个 CommitID ;
[root@jenkins ~]# cat /scripts/ansible_deploy_html_commitid.yml | |
- hosts: webservers | |
serial: 1 # 控制每次仅针对一个主机执行 | |
vars: | |
- app_name: web | |
- app_dir: /opt | |
- app_port: 80 | |
tasks: | |
- name: "1、获取时间,时间格式:(年_月_日_时_分)" | |
shell: | |
cmd: "date +%Y_%m_%d_%H_%M" | |
register: date | |
delegate_to: 127.0.0.1 | |
- name: "2、获取项目的工作路径(workspace)" | |
shell: | |
cmd: "echo ${WORKSPACE}" | |
register: workspace | |
delegate_to: 127.0.0.1 | |
# - name: "3、获取项目代码的 Git CommitID" | |
# shell: | |
# cmd: "echo ${git_commit_id} | cut -c 1-8" | |
# register: git_commit_id | |
# delegate_to: 127.0.0.1 | |
- name: "3、获取项目代码的Git CommitID额外增加判断逻辑,主要为gitlab的webhook提供使用" | |
shell: | |
cmd: if [[ "${git_commit_id}" =~ ^origin/.* ]];then | |
cd ${WORKSPACE} && echo $(git log | grep "commit" | awk 'NR==1 {print $NF}' | cut -c 1-8); | |
else | |
echo "${git_commit_id}" | cut -c 1-8; | |
fi | |
register: git_commit_id | |
delegate_to: 127.0.0.1 | |
- name: "3、对代码进行打包操作,打包的名称格式: 项目名_时间_commitID" | |
archive: | |
path: "/*" | |
dest: "/__.tar.gz" | |
delegate_to: 127.0.0.1 | |
- name: "4、摘除需要更新的节点( ),将操作委派给Haproxy负载均衡" | |
haproxy: | |
socket: /var/lib/haproxy/stats | |
state: disabled | |
backend: "web_cluster" | |
host: '' | |
delegate_to: "" | |
loop: "" | |
- name: "5、停止节点 Nginx服务" | |
systemd: | |
name: nginx | |
state: stopped | |
- name: "6、检查节点 Nginx服务是否关闭成功" | |
wait_for: | |
port: "" | |
state: stopped | |
delay: 3 | |
- name: "7、创建站点目录,(格式:项目名称_时间)" | |
file: | |
path: "/__" | |
state: directory | |
- name: "8、将压缩包内容解压到 节点对应的目录中" | |
unarchive: | |
src: "/__.tar.gz" | |
dest: "/__" | |
- name: "9、删除软链接" | |
file: | |
path: "/" | |
state: absent | |
- name: "10、重建软链接" | |
file: | |
src: "/__" | |
dest: "/" | |
state: link | |
- name: "11、启动节点 Nginx服务" | |
systemd: | |
name: nginx | |
state: started | |
- name: "12、检查节点 Nginx服务是否启动成功" | |
wait_for: | |
port: "" | |
state: started | |
delay: 3 | |
- name: "13、上线节点( ),将操作委派给Haproxy负载均衡" | |
haproxy: | |
socket: /var/lib/haproxy/stats | |
state: enabled | |
backend: "web_cluster" | |
host: '' | |
delegate_to: "" | |
loop: "" |
# 5.3 检测发布效果
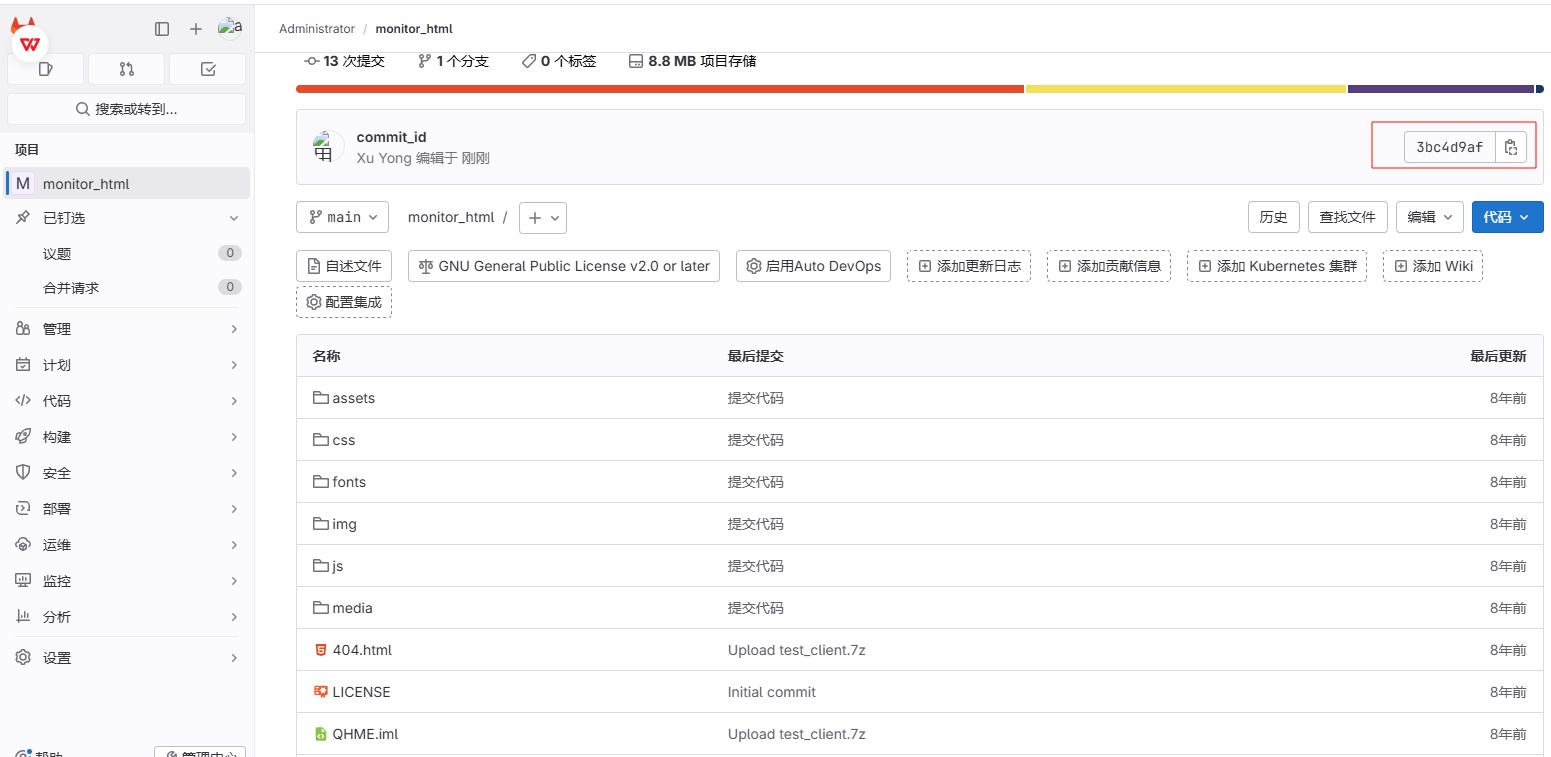
1、模拟开发提交代码⾄ Gitlab 服务器(最新的 CommitID 为 3bc4d9af );
2、登陆 Jenkins,选择部署的 Ansible 清单⽂件(记得修改⼀下部署脚本的路径),然后选择部署的环境,最后选择开发提交的那个 3bc4d9af commit_ID 进⾏部署
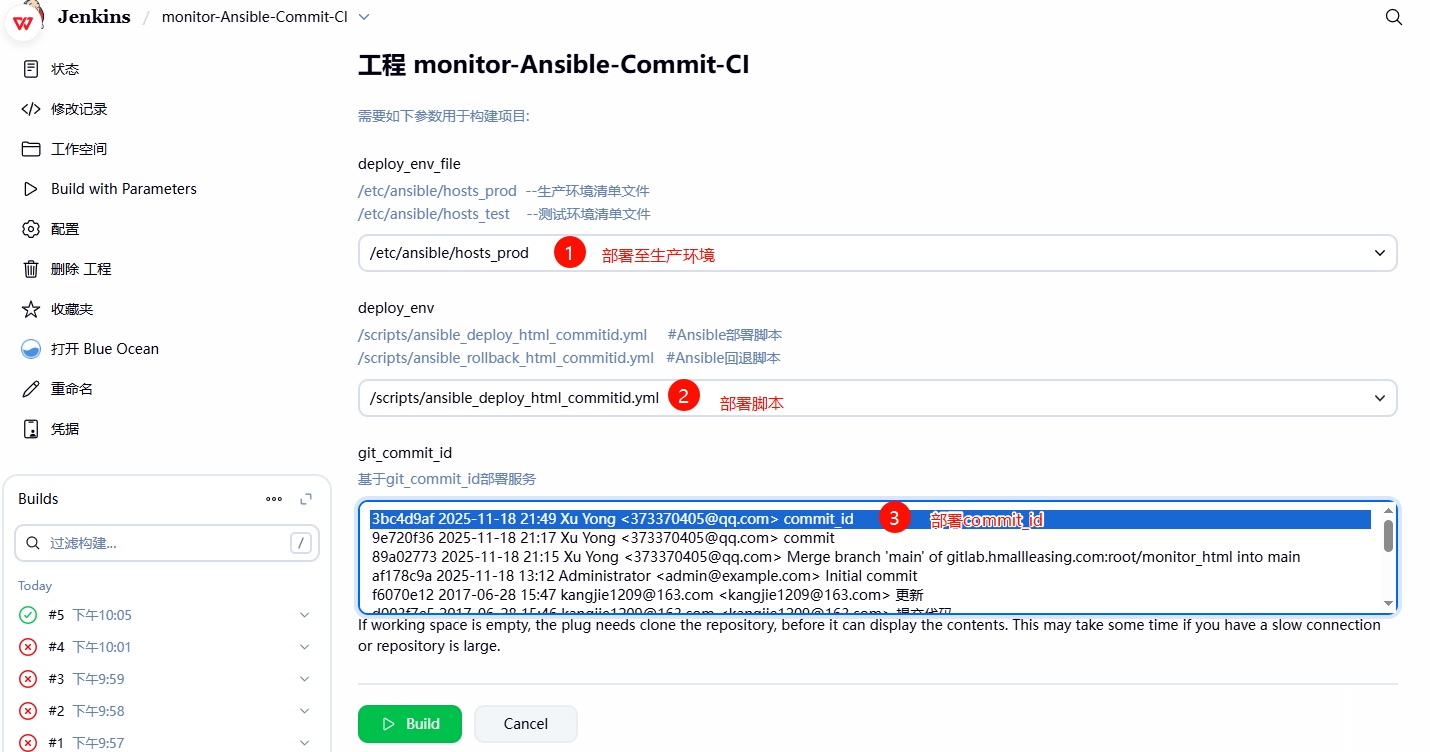
3、检查站点是否更新,然后检查 web 应⽤服务器端部署的结果
[root@web01 ~]# ll /opt/ | |
lrwxrwxrwx 1 root root 34 Nov 18 22:05 web -> /opt/web_2025_11_18_22_05_3bc4d9af | |
drwxr-xr-x 8 root root 4096 Nov 18 22:05 web_2025_11_18_22_05_3bc4d9af | |
[root@web02 ~]# ll /opt/ | |
lrwxrwxrwx 1 root root 34 Nov 18 22:05 web -> /opt/web_2025_11_18_22_05_3bc4d9af | |
drwxr-xr-x 8 root root 4096 Nov 18 22:05 web_2025_11_18_22_05_3bc4d9af |
# 6、Jenkins 基于 Ansible CommitID 实现回滚
在更新新版本可能会存在⼀些未知的 Bug,为了不影响⽤户的正常使⽤,需要先将代码回退⾄上⼀个可⽤的版本;所以需要我们代码的快速回退功能;
# 6.1 Ansible 回退脚本
- 1、获取需要回退到哪个 CommitID 版本上;
- 2、从负载均衡上摘掉对应的 web 节点;
- 3、提取节点上对应 commid 的完整路径【⾮常重要】;
- 4、删除节点上的软链接,然后重新创建新的软链接;
- 5、然后重新加⼊到负载均衡;
# 6.2 Jenkins 执⾏回滚测试
- 1、获取需要回退到哪个 CommitID 版本上;
- 2、从负载均衡上摘掉对应的 web 节点;
- 3、提取节点上对应 commid 的完整路径【⾮常重要】;
- 4、删除节点上的软链接,然后重新创建新的软链接;
- 5、然后重新加⼊到负载均衡;
[root@jenkins ~]# cat /scripts/ansible_rollback_html_commitid.yml | |
- hosts: webservers | |
serial: 1 | |
vars: | |
- app_name: web | |
- app_dir: /opt | |
- app_port: 80 | |
tasks: | |
- name: "1、获需要回退的commitID" | |
shell: | |
cmd: "echo ${git_commit_id} | cut -c 1-8" | |
register: git_commit_id | |
delegate_to: 127.0.0.1 | |
- name: "2、摘除需要更新的节点( ),将操作委派给Haproxy负载均衡" | |
haproxy: | |
socket: /var/lib/haproxy/stats | |
state: disabled | |
backend: "web_cluster" | |
host: '' | |
delegate_to: "" | |
loop: "" | |
- name: "3、停止节点 Nginx服务" | |
systemd: | |
name: nginx | |
state: stopped | |
- name: "4、检查节点 Nginx服务是否关闭成功" | |
wait_for: | |
port: "" | |
state: stopped | |
delay: 3 | |
- name: "5、删除软链接" | |
file: | |
path: "/" | |
state: absent | |
- name: "6、基于CommitID搜索对应的路径,注册为新的变量" | |
find: | |
paths: "" | |
patterns: "**" | |
file_type: directory | |
register: app_name_commit_id | |
- name: "7、基于搜索的结果过滤对应的路径,注册为新的变量" | |
debug: | |
msg: "" | |
register: app_name_commit_id_fullpath | |
- name: "8、重建软链接" | |
file: | |
src: "" | |
dest: "/" | |
state: link | |
- name: "9、启动节点 Nginx服务" | |
systemd: | |
name: nginx | |
state: started | |
- name: "10、检查节点 Nginx服务是否启动成功" | |
wait_for: | |
port: "" | |
state: started | |
delay: 3 | |
- name: "11、上线节点( ),将操作委派给Haproxy负载均衡" | |
haproxy: | |
socket: /var/lib/haproxy/stats | |
state: enabled | |
backend: "web_cluster" | |
host: '' | |
delegate_to: "" | |
loop: "" |
# 6.3 Jenkins 执⾏回滚测试
1、选择系统中已部署的 commitID 版本,然后进⾏回退操作;
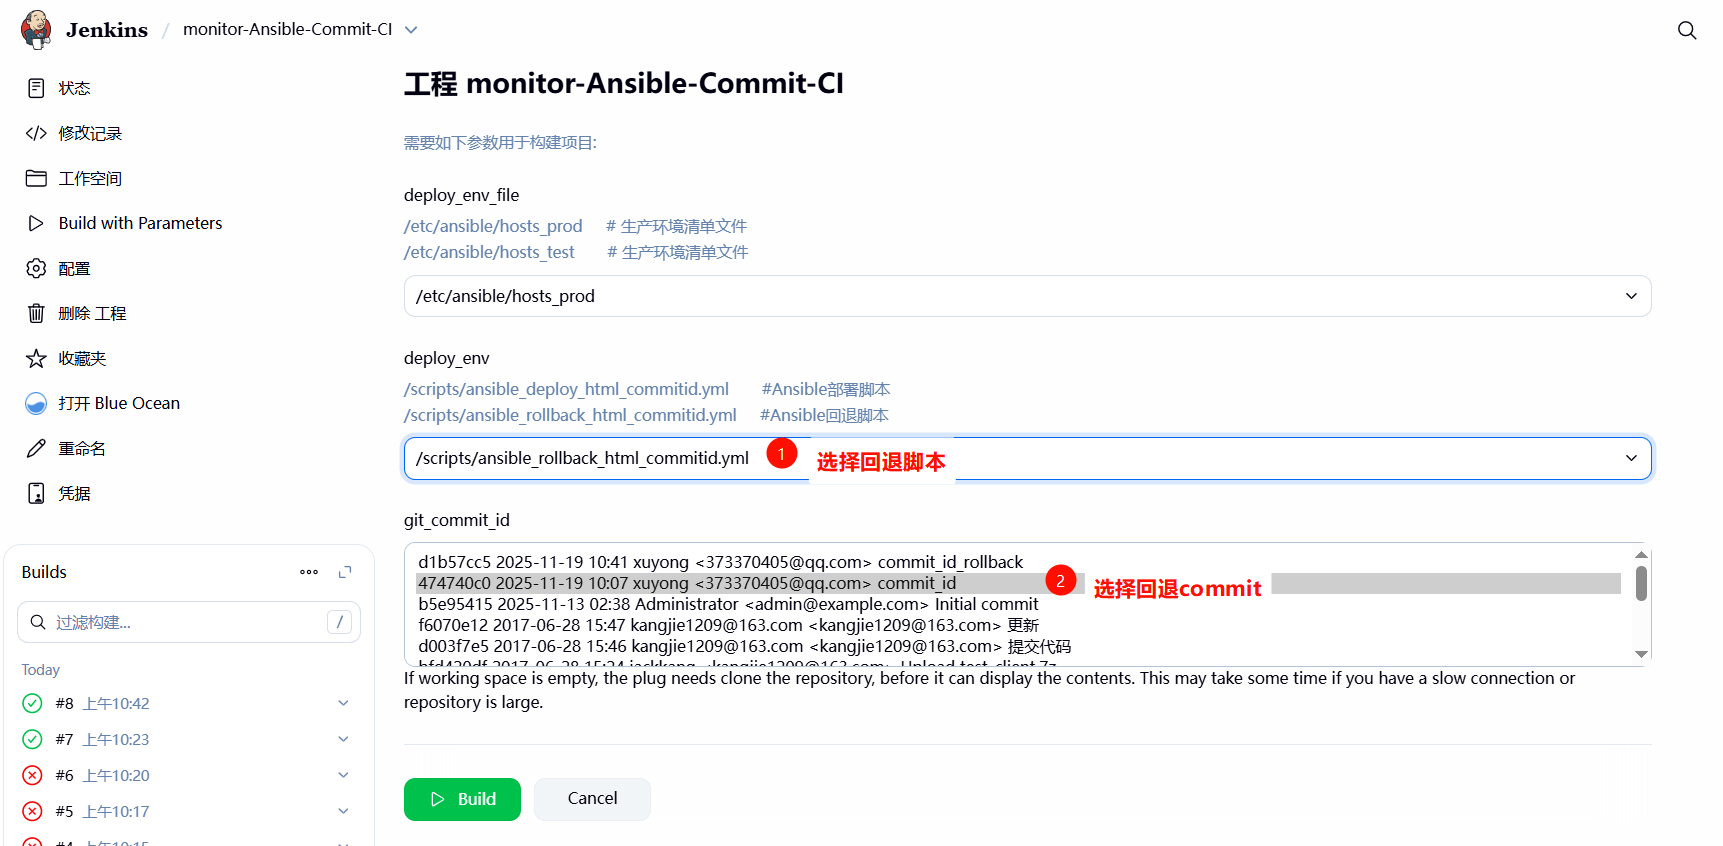
2、检查 web 集群是否回退成功
[root@web01 ~]# ll /opt/ | |
lrwxrwxrwx 1 root root 34 Nov 19 10:56 web -> /opt/web_2025_11_19_10_23_474740c0 | |
drwxr-xr-x 8 root root 4096 Nov 19 10:26 web_2025_11_19_10_23_474740c0 | |
drwxr-xr-x 8 root root 4096 Nov 19 10:42 web_2025_11_19_10_42_d1b57cc5 | |
[root@web02 ~]# ll /opt/ | |
lrwxrwxrwx 1 root root 34 Nov 19 10:57 web -> /opt/web_2025_11_19_10_23_474740c0 | |
drwxr-xr-x 8 root root 4096 Nov 19 10:26 web_2025_11_19_10_23_474740c0 | |
drwxr-xr-x 8 root root 4096 Nov 19 10:53 web_2025_11_19_10_42_d1b57cc5 |
# 7、Jenkins 基于 Shell CommitID 实现部署
# 7.1 Shell 部署脚本
- 1、获取需要发布到哪个 CommitID 版本;
- 2、从负载均衡上摘掉对应的 web 节点;
- 3、提取节点上对应 commid 的完整路径【⾮常重要】;
- 4、删除节点上的软链接,然后重新创建新的软链接;
- 5、然后重新加⼊到负载均衡;
[root@jenkins ~]# cat /scripts/shell_deploy_html_commid.sh | |
#!/usr/bin/bash | |
#1. 定义变量 | |
app_name=web | |
app_dir=/opt | |
app_date=$(date +%Y_%m_%d_%H_%M) | |
git_commit_id=$(echo ${git_commit_id} | cut -c 1-8) | |
#2. 进入到 jenkins 对应的项目目录中 | |
cd ${WORKSPACE} | |
tar czf ${app_dir}/${app_name}_${app_date}_${git_commit_id}.tar.gz ./* | |
#3. 推送压缩包到目标集群 | |
for host in ${webservers} | |
do | |
scp ${app_dir}/${app_name}_${app_date}_${git_commit_id}.tar.gz root@${host}:${app_dir} | |
done | |
#4.haproxy 的函数 | |
lb_server_disable(){ | |
for i in ${lbservers} | |
do | |
ssh root@${i} "echo 'disable server web_cluster/$1' | socat stdio /var/lib/haproxy/stats" | |
done | |
} | |
lb_server_enable(){ | |
for i in ${lbservers} | |
do | |
ssh root@${i} "echo 'enable server web_cluster/$1' | socat stdio /var/lib/haproxy/stats" | |
done | |
} | |
#5. 部署应用 | |
for host in ${webservers} | |
do | |
# 摘掉节点 | |
lb_server_disable ${host} | |
# 更新代码 | |
ssh root@${host} "mkdir -p ${app_dir}/${app_name}_${app_date}_${git_commit_id} && \ | |
tar xf ${app_dir}/${app_name}_${app_date}_${git_commit_id}.tar.gz -C ${app_dir}/${app_name}_${app_date}_${git_commit_id} && \ | |
rm -f ${app_dir}/${app_name} && \ | |
ln -s ${app_dir}/${app_name}_${app_date}_${git_commit_id} ${app_dir}/${app_name}" | |
# 上线节点 | |
lb_server_enable ${host} | |
sleep 5 | |
done |
# 7.2 Jenkins 执⾏部署测试
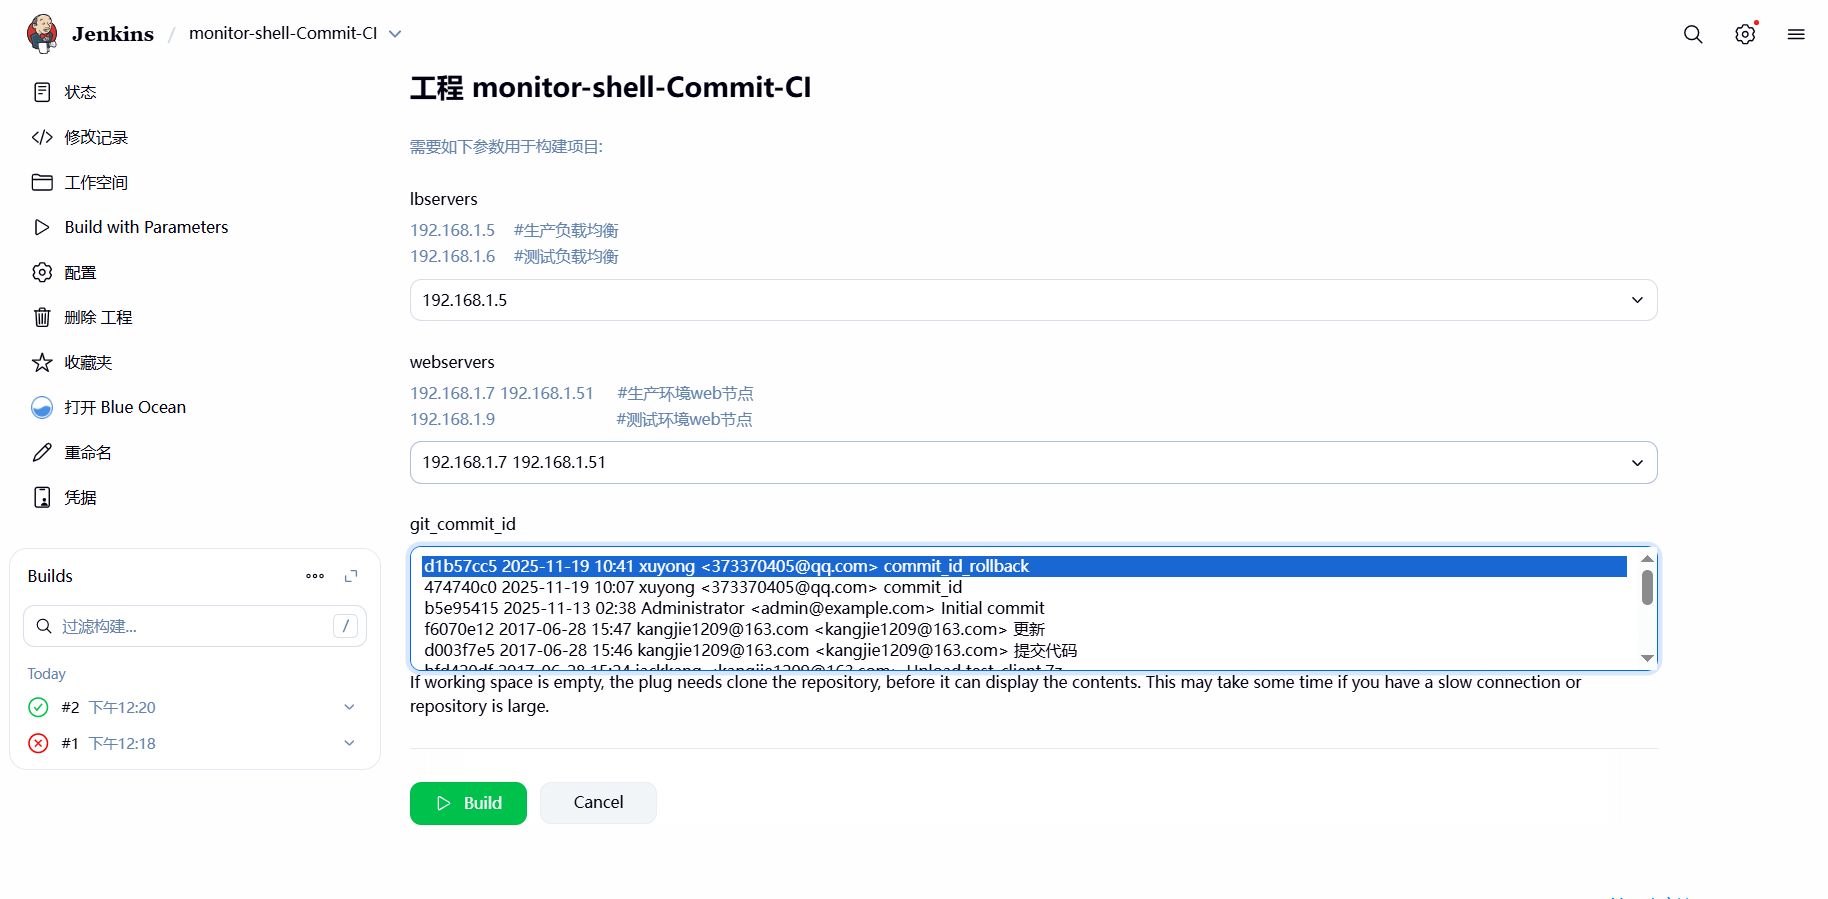
1、在 Shell 脚本中,使⽤到了 webservers、lbservers 、git_commit_id 三个变量,需要通过 jenkins 选项参数,进⾏动态传参;
lbservers 变量
webservers 变量
git_commit_id

2. 获取项目源代码;

3、为对应的项⽬,增加 Shell 脚本,然后执⾏如上脚本
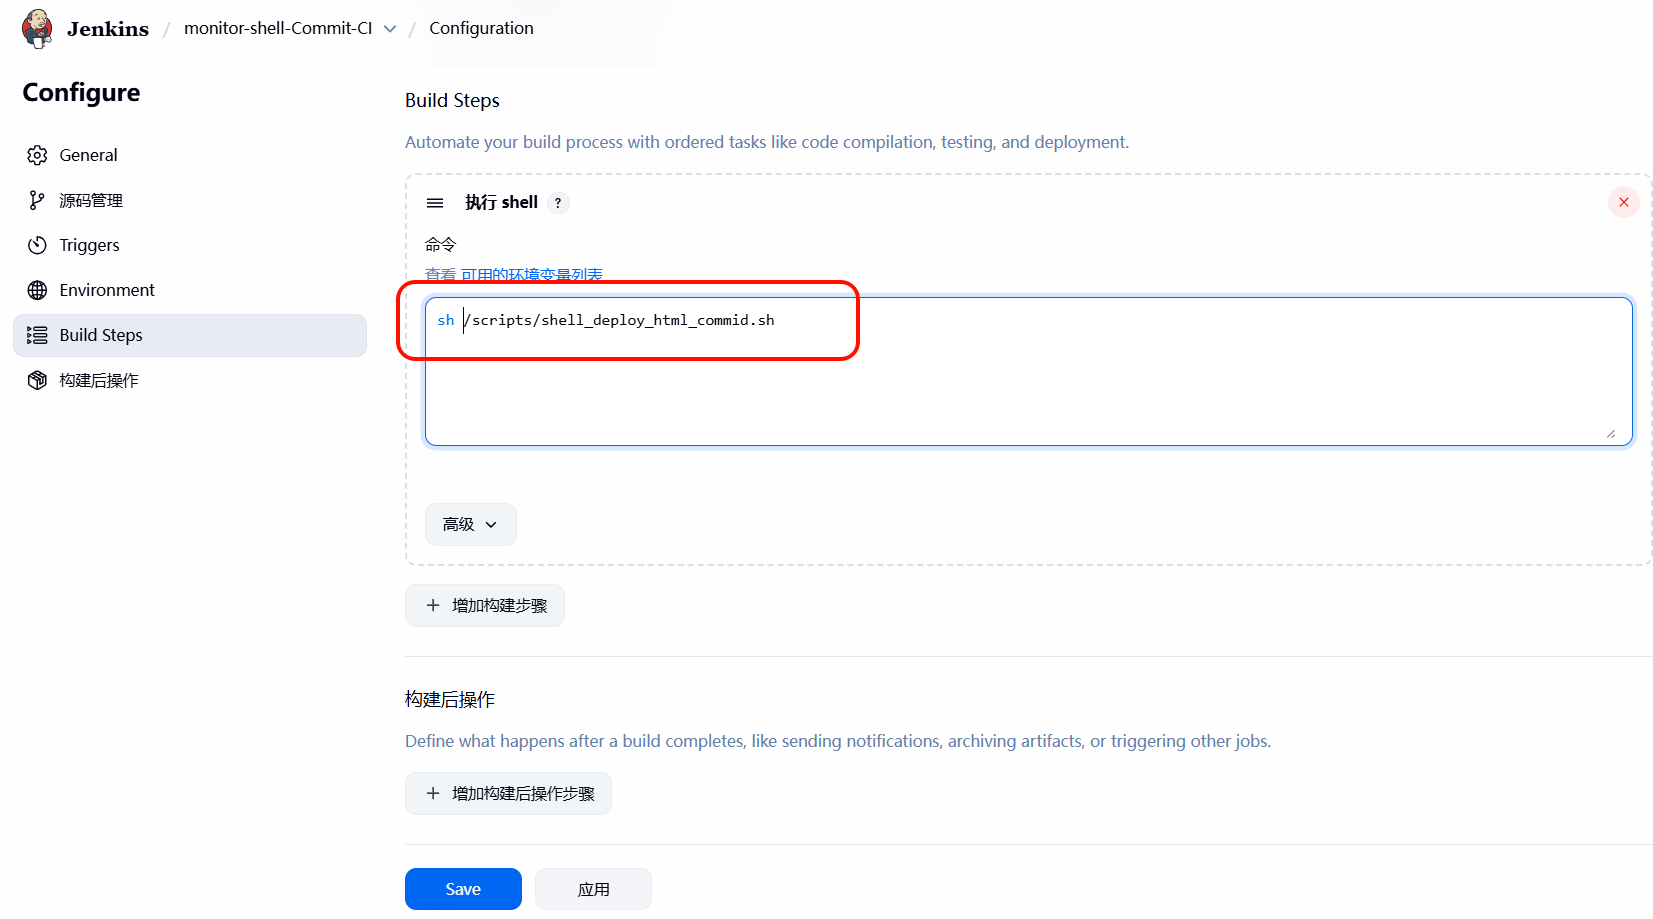
4、Jenkins 执⾏部署测试
5、检查 web 集群是否回退成功
[root@web01 ~]# ll /opt/ | |
lrwxrwxrwx 1 root root 34 Nov 19 12:20 web -> /opt/web_2025_11_19_12_20_d1b57cc5 | |
drwxr-xr-x 8 root root 4096 Nov 19 12:20 web_2025_11_19_12_20_d1b57cc5 | |
-rw-r--r-- 1 root root 4653834 Nov 19 12:20 web_2025_11_19_12_20_d1b57cc5.tar.gz | |
[root@web02 ~]# ll /opt/ | |
lrwxrwxrwx 1 root root 34 Nov 19 12:20 web -> /opt/web_2025_11_19_12_20_d1b57cc5 | |
drwxr-xr-x 8 root root 4096 Nov 19 12:20 web_2025_11_19_12_20_d1b57cc5 | |
-rw-r--r-- 1 root root 4653834 Nov 19 12:20 web_2025_11_19_12_20_d1b57cc5.tar.gz |