# Tomcat 配置管理实践
# 一、OracleJdk 安装
OracleJdk 下载地址:https://www.oracle.com/java/technologies/downloads/#java8
[root@web01 ~]# tar xf jdk-8u451-linux-x64.tar.gz -C /usr/local | |
[root@web01 ~]# ln -s /usr/local/jdk1.8.0_451/ /usr/local/jdk | |
#添加环境变量 | |
[root@web01 ~]# cat /etc/profile.d/jdk.sh | |
export JAVA_HOME=/usr/local/jdk | |
export PATH=$PATH:$JAVA_HOME/bin | |
export JRE_HOME=$JAVA_HOME/jre | |
export CLASSPATH=$JAVA_HOME/lib/:$JRE_HOME/lib/ | |
[root@web01 ~]# source /etc/profile | |
[root@web01 ~]# java -version |
# 二、Tomcat 安装
[root@web01 ~]# mkdir /soft && cd /soft | |
[root@web01 soft]# wget https://dlcdn.apache.org/tomcat/tomcat-9/v9.0.106/bin/apache-tomcat-9.0.106.tar.gz | |
[root@web01 soft]# tar xf apache-tomcat-9.0.106.tar.gz -C /soft | |
[root@web01 soft]# ln -s /soft/apache-tomcat-9.0.106 /soft/tomcat | |
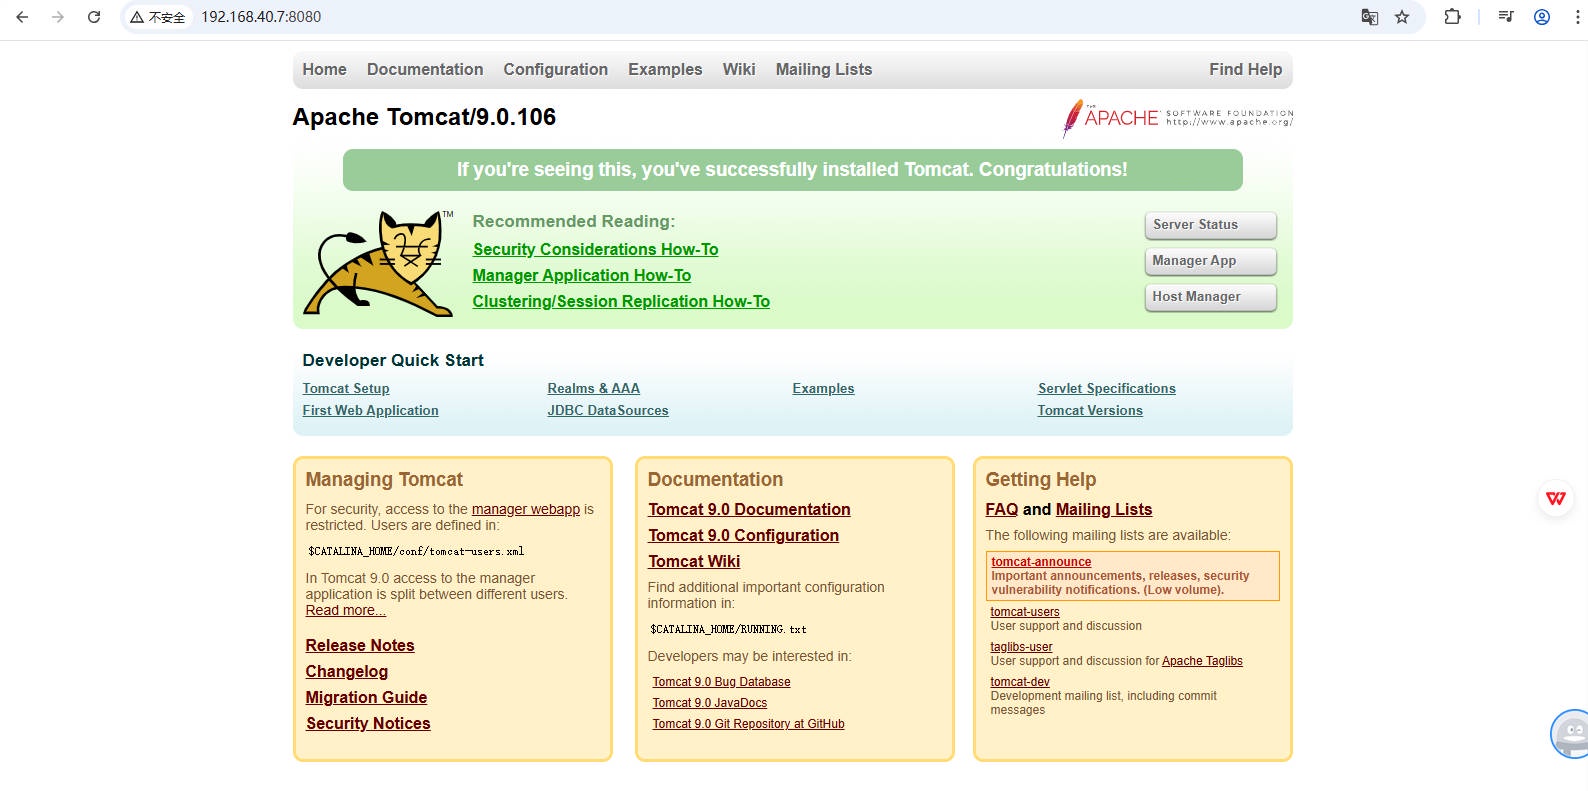
[root@web01 soft]# /soft/tomcat/bin/startup.sh | |
[root@web01 soft]# netstat -lntp|grep java | |
tcp6 0 0 :::8080 :::* LISTEN 1765/java | |
tcp6 0 0 127.0.0.1:8005 :::* LISTEN 1765/javaa | |
#Tomcat 启停配置文件 | |
[root@web01 soft]# cat /usr/lib/systemd/system/tomcat.service | |
# /usr/lib/systemd/system/tomcat.service | |
[Unit] | |
Description=Apache Tomcat | |
After=network.target | |
[Service] | |
Type=forking | |
Environment=JAVA_HOME=/usr/local/jdk | |
Environment=CATALINA_HOME=/soft/tomcat | |
Environment=CATALINA_BASE=/soft/tomcat | |
ExecStart=/soft/tomcat/bin/startup.sh | |
ExecStop=/soft/tomcat/bin/shutdown.sh | |
[Install] | |
WantedBy=multi-user.target | |
[root@web01 soft]# systemctl daemon-reload | |
[root@web01 soft]# systemctl stop tomcat | |
[root@web01 soft]# systemctl start tomcat | |
[root@web01 ~]# netstat -lntp|grep java | |
tcp6 0 0 :::8080 :::* LISTEN 1842/java | |
tcp6 0 0 127.0.0.1:8005 :::* LISTEN 1842/java |
# 三、Tomcat 配置
# 3.1 Tomcat 目录结构
bin : 二进制可执行(脚本文件 windwos版bat、linux版sh) | |
conf : 配置文件,主配置是server.xml | |
lib : 都是一些java语言编写的jar包,这些都需要被调用,才能执行; module (jar、war) | |
logs : tomcat的日志存放位置,可修改; | |
temp : tomcat的临时目录; | |
webapps : 相当于nginx中 root /soft/tomcat/webapps/ /soft/tomcat/webapps/ROOT | |
work : tomcat的一个缓存目录;(java代码,编译为class字节码对外提供;) |
# 3.2 Tomcat 配置文件说明
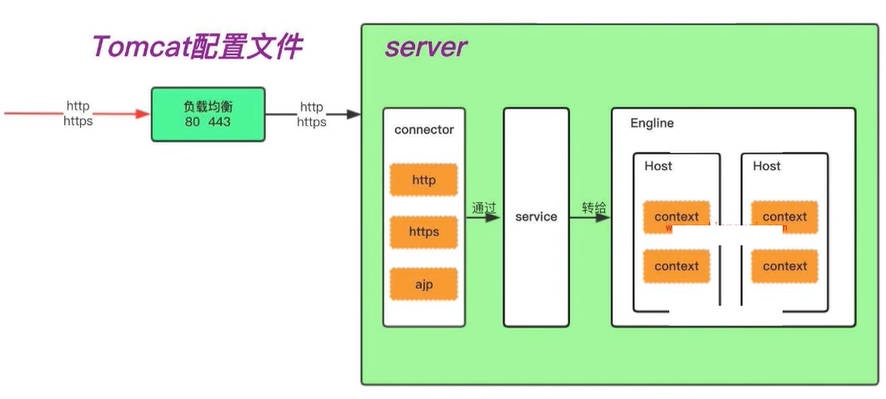
- server:表示一个 tomcat 实例;
- Listener:监听器;
- connector:连接器,支持 http、https、ajp 等协议请求;
- service:将 connector 与 engine 关联的组件;
- engine:具体 http、https 的请求与响应; (Nginx 中 http {})
- host:与用户请求的 Host 字段进行比对;哪个 Host 匹配则哪个处理,如没有符合的则交给默认的 defaultHost 处理
[root@web01 soft]# cat /soft/tomcat/conf/server.xml | |
<?xml version="1.0" encoding="UTF-8"?> | |
<!--关闭tomcat的端口--> | |
<Server port="8005" shutdown="SHUTDOWN"> | |
<!--监听器 --> | |
<Listener className="org.apache.catalina.startup.VersionLoggerListener" /> | |
<Listener className="org.apache.catalina.core.AprLifecycleListener" SSLEngine="on" /> | |
<Listener className="org.apache.catalina.core.JreMemoryLeakPreventionListener" /> | |
<Listener className="org.apache.catalina.mbeans.GlobalResourcesLifecycleListener" /> | |
<Listener className="org.apache.catalina.core.ThreadLocalLeakPreventionListener" /> | |
<!--全局资源限制--> | |
<GlobalNamingResources> | |
<Resource name="UserDatabase" auth="Container" | |
type="org.apache.catalina.UserDatabase" | |
description="User database that can be updated and saved" | |
factory="org.apache.catalina.users.MemoryUserDatabaseFactory" | |
pathname="conf/tomcat-users.xml" /> | |
</GlobalNamingResources> | |
<!--连接器--> | |
<Service name="Catalina"> | |
<Connector port="8080" protocol="HTTP/1.1" | |
connectionTimeout="20000" | |
redirectPort="8443" /> | |
<!--引擎--> | |
<Engine name="Catalina" defaultHost="localhost"> | |
<!--调用限制--> | |
<Realm className="org.apache.catalina.realm.LockOutRealm"> | |
<Realm className="org.apache.catalina.realm.UserDatabaseRealm" | |
resourceName="UserDatabase"/> | |
</Realm> | |
<!--虚拟主机--> | |
<Host name="localhost" appBase="webapps" | |
unpackWARs="true" autoDeploy="true"> | |
<Valve className="org.apache.catalina.valves.AccessLogValve" directory="logs" | |
prefix="localhost_access_log" suffix=".txt" | |
pattern="%h %l %u %t "%r" %s %b" /> | |
</Host> | |
</Engine> | |
</Service> | |
</Server> |
# 3.3Tomcat 请求流程
假设来自用户的请求为:http://tomcat.hmallleasing.com:8080/index.jsp
- 1. 服务端运行 Tomcat 应用,监听在本机的 8080 端口,等待连接;
- 2. 浏览器发送 http 请求,并且请求服务端的 8080 端口,也就是 Tomcat 进程;
- 3. 服务端通过 http connector 连接器获取请求,然后通过 service 将请求交给符合条件的 engine;
- 4.Engine 获得请求 tomcat.hmallleasing.com:8080/index.jsp,遍历它所有虚拟主机 Host;
- 5. 如果 Engine 匹配不到对应的 Host,就把请求交给 Engine 中的 defaultHost 处理;
- 6. 如果 Engine 匹配到对应的 Host, 则提取该 Host 中指定的 appBase(代码存储路径);
- 7. 最后 Engine 将解析后的结果返回给 connector,connector 返回给浏览器;
# 3.5 Tomcat 与 Nginx 对比
Nginx 中:
- http 层:只能有一个;
- server:可以有多个,多个表示多个站点;
- location:一个站点的多个 uri 的路径匹配
Tomcat 中:
- engine:只能有一个,也是负责请求与响应的;
- Host: 可以有多个,多个表示多个站点;
- context:用来定义用户请求的 uri,将其调度到指定的目录中提取代码;
# 3.6 Tomcat 虚拟主机 Host
- name: 主机名称
- appBase:网站代码存放路径
- unpackWARs:自动解压 war 包
- autoDeploy:自动部署
<!--tom1.hmallleasing.com--> | |
<Host name="tom1.hmallleasing.com" appBase="/code/tom1" | |
unpackWARs="true" autoDeploy="true"> | |
<Valve className="org.apache.catalina.valves.AccessLogValve" directory="logs" | |
prefix="tomcat_access_log" suffix=".txt" | |
pattern="%h %l %u %t "%r" %s %b" /> | |
</Host> |
创建网站代码存放路径,写入测试代码,并重启 Tomcat;
[root@web01 soft]# mkdir /code/tom1/ROOT -p | |
[root@web01 soft]# echo "Tomcat Test Page" > /code/tom1/ROOT/index.html | |
[root@web01 soft]# systemctl stop tomcat && systemctl start tomcat |

# 3.7 Tomcat 虚拟主机 Context
context 使用方式
- docBase: 站点存放的路径
- path: 访问站点的 URI 路径
- reloadable:修改了 jsp 文件,无需重启就可以实现显示的同步
访问 http:/tom2.hamllleasing.com/zh-> 映射 ->/code/zh
<!--tom1.hmallleasing.com--> | |
<Host name="tom1.hmallleasing.com" appBase="/code/tom1" | |
unpackWARs="true" autoDeploy="true"> | |
<Context docBase="/code/zh" path="/zh" reloadable="true"/> | |
<Valve className="org.apache.catalina.valves.AccessLogValve" directory="logs" | |
prefix="tomcat_access_log" suffix=".txt" | |
pattern="%h %l %u %t "%r" %s %b" /> | |
</Host> |
注意:如果设定了 context,没有创建对应目录则无法启动 Tomcat
[root@web01 tomcat]# tail -f /soft/tomcat/logs/catalina.out | |
... | |
Caused by: java.lang.IllegalArgumentException: The main resource set specified [/code/zh] is not a directory or war file, or is not readable (it does not exist or permissions to access it are missing) | |
at org.apache.catalina.webresources.StandardRoot.createMainResourceSet(StandardRoot.java:758) | |
at org.apache.catalina.webresources.StandardRoot.startInternal(StandardRoot.java:715) | |
at org.apache.catalina.util.LifecycleBase.start(LifecycleBase.java:164) | |
... |
创建对应目录,写入测试代码,并重启 Tomcat
[root@web01 tomcat]# mkdir /code/zh | |
[root@web01 tomcat]# echo "hello zh" > /code/zh/index.html | |
[root@web01 tomcat]# systemctl stop tomcat && systemctl start tomcat |

# 3.8 Tomcat 管理页面配置
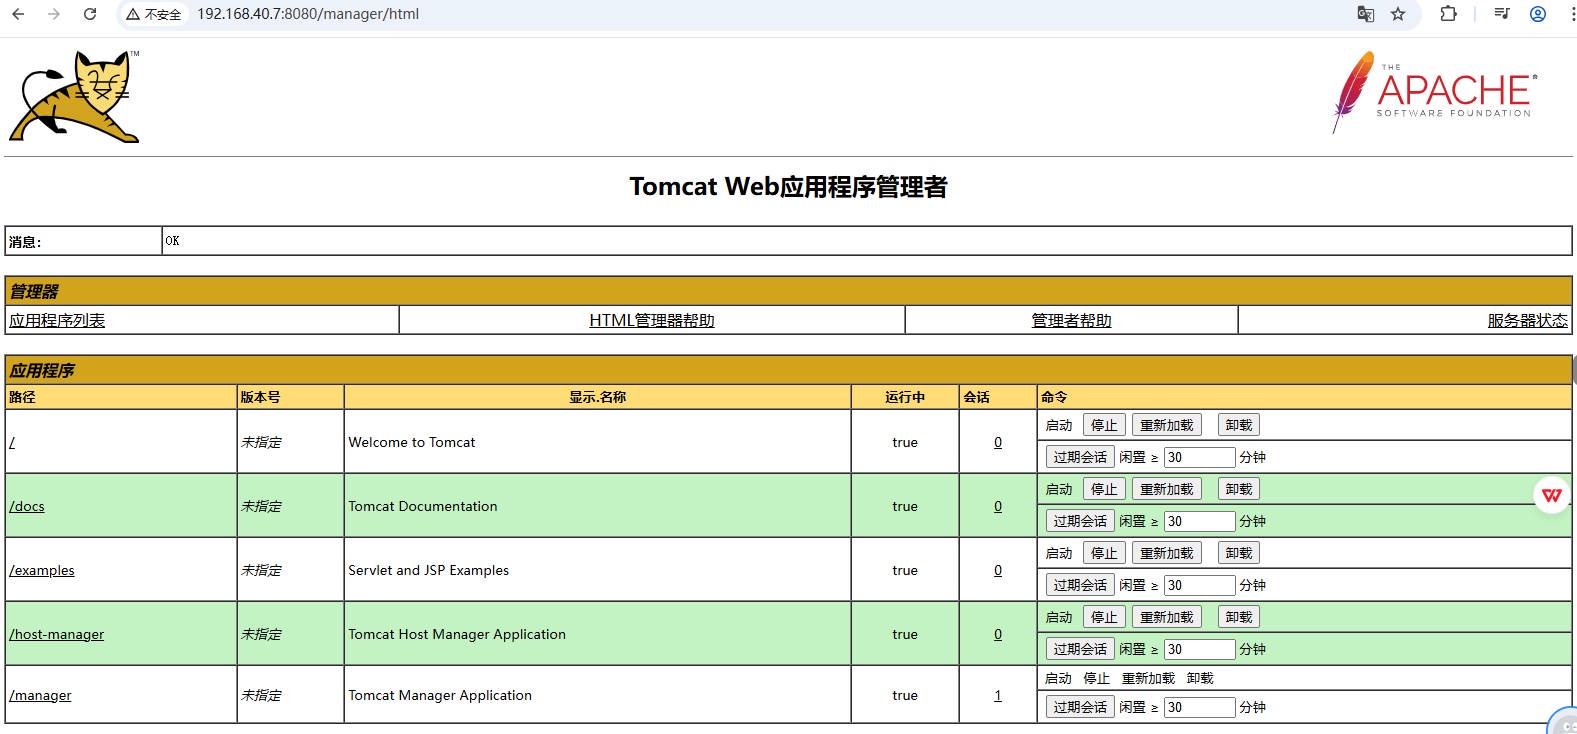
1、配置 Tomcat Bsic 认证,配置文件 /soft/tomcat/conf/tomcat-users.xml 最后添加用户,然后关联至对应资源的角色名称;
[root@web03 ~]# vim /soft/tomcat/conf/tomcat-users.xml | |
... | |
<role rolename="manager-gui,admin-gui"/> | |
<user username="tomcat" password="123456" roles="manager-gui,admin-gui"/> | |
</tomcat-users> |
2、由于 Tomcat 仅语序本地 127.0.0.1 进行 basic 认证,如果需要其他网段通过 basic 认证,还需配置允许访问规则。找到 webapps/ 项目 / META-INF/context.xml 配置;
#1. 修改第一个项目 | |
[root@web01 tomcat]# vim /soft/tomcat/webapps/host-manager/META-INF/context.xml | |
修改为: | |
allow="127\.\d+\.\d+\.\d+|::1|0:0:0:0:0:0:0:1|192\.168\.40\.\d+" /> | |
#2. 修改第二个项目 | |
[root@web01 tomcat]# vim /soft/tomcat/webapps/manager/META-INF/context.xml | |
修改后: | |
allow="127\.\d+\.\d+\.\d+|::1|0:0:0:0:0:0:0:1|192\.168\.40\.\d+" /> | |
#3. 重启 tomcat | |
[root@web01 ~]# systemctl stop tomcat && systemctl start tomcat |
# 四、Tomcat 部署 zrlog
# 4.1 zrlog 单节点部署
# 4.1.1 部署 MySQL
#1、关闭防火墙、selinux、环境配置 | |
[root@db01 ~]# hostnamectl set-hostname aizj_db01 | |
[root@db01 ~]# systemctl stop firewalld | |
[root@db01 ~]# systemctl disable firewalld | |
[root@db01 ~]# sed -i 's/^SELINUX=enforcing/SELINUX=disabled/g' /etc/sysconfig/selinux | |
[root@db01 ~]# sed -i 's/^SELINUX=enforcing/SELINUX=disabled/g' /etc/selinux/config | |
[root@db01 ~]# yum install net-tools vim tree lrzsz wget unzip dos2unix bash-completion lsof ntp ntpdate git -y | |
[root@db01 ~]# yum update -y --exclude=kernel* && reboot | |
[root@db01 ~]# echo 'Asia/Shanghai' >/etc/timezone | |
[root@db01 ~]# ntpdate time2.aliyun.com | |
[root@db01 ~]# crontab -e | |
*/5 * * * * /usr/sbin/ntpdate time2.aliyun.com &> /dev/nul | |
[root@db01 ~]# mkdir /soft /data /scripts /backup | |
#2、安装 Mysql5.7 | |
[root@db01 ~]# yum install -y mysql-community-server | |
[root@db01 ~]# systemctl start mysqld && systemctl enable mysqld | |
[root@aizj_db01 ~]# mysql -uroot -p$(awk '/temporary password/{print $NF}' /var/log/mysqld.log) | |
mysql> ALTER USER 'root'@'localhost' IDENTIFIED BY 'Superman*2023'; | |
mysql> grant all on *.* to 'zrlog'@'192.168.40.%' identified by 'Superman*2023'; | |
#3、允许 root 用户在任何地方进行远程登录,并具有所有库任何操作权限,具体操作如下: | |
mysql -u root -p"youpass" | |
mysql>GRANT ALL PRIVILEGES ON *.* TO 'root'@'%' IDENTIFIED BY 'Superman*2023' WITH GRANT OPTION; | |
FLUSH PRIVILEGES; | |
#4. 创建数据库 | |
mysql> create database zrlog; | |
Query OK, 1 row affected (0.00 sec) |
# 4.1.2 配置 Tomcat 虚拟主机
[root@web01 ~]# vim /soft/tomcat/conf/server.xml | |
... | |
<!--zrlog.hmallleasing.com--> | |
<Host name="zrlog.hmallleasing.com" appBase="/code/zrlog" | |
unpackWARs="true" autoDeploy="true"> | |
<Valve className="org.apache.catalina.valves.AccessLogValve" directory="logs" | |
prefix="zrlog_access_log" suffix=".txt" | |
pattern="%h %l %u %t "%r" %s %b" /> | |
</Host> | |
... |
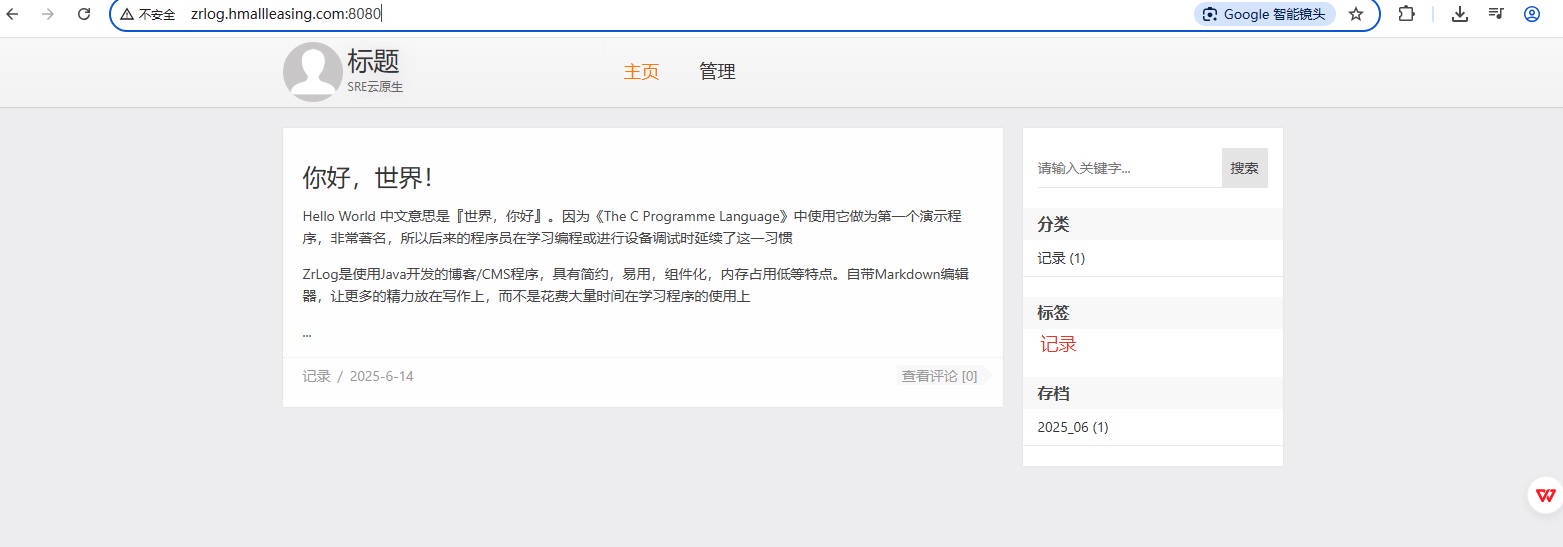
# 4.1.3 准备项目代码
[root@web01 ~]# mkdir -p /code/zrlog | |
[root@web01 ~]# mv zrlog-2.2.0-5e8a51f-release.war /code/zrlog/ROOT.war | |
[root@web01 ~]# ls /code/zrlog/ | |
ROOT.war | |
[root@web01 ~]# systemctl stop tomcat && systemctl start tomcat |
# 4.2 zrlog 集群部署
| 服务器名称 | 服务器 IP | 服务器角色 |
|---|---|---|
| lb01 | 192.168.40.150 | Nginx |
| web01 | 192.168.40.7 | Tomcat |
| web02 | 192.168.40.8 | Tomcat |
| NFS | 192.168.40.32 | NFS |
| db01 | 192.168.40.51 | MySQL |
| Redis | 192.168.40.41 | Redis |
# 4.2.1 安装 jdk
[root@web01 ~]# scp jdk-8u451-linux-x64.tar.gz root@192.168.40.8:/root | |
[root@web02 ~]# tar xf jdk-8u451-linux-x64.tar.gz -C /usr/local/ | |
[root@web02 ~]# ln -s /usr/local/jdk1.8.0_451/ /usr/local/jdk | |
#添加环境变量 | |
[root@web02 ~]# cat /etc/profile.d/jdk.sh | |
export JAVA_HOME=/usr/local/jdk | |
export PATH=$PATH:$JAVA_HOME/bin | |
export JRE_HOME=$JAVA_HOME/jre | |
export CLASSPATH=$JAVA_HOME/lib/:$JRE_HOME/lib/ | |
[root@web02 ~]# source /etc/profile | |
[root@web02 ~]# java -version |
# 4.2.2 安装 Tomcat
[root@web01 ~]# scp -rp /soft root@192.168.40.8:/ | |
[root@web02 ~]# rm -rf /soft/tomcat/ | |
[root@web02 soft]# ln -s /soft/apache-tomcat-9.0.106 /soft/tomcat | |
[root@web01 ~]# scp /usr/lib/systemd/system/tomcat.service root@192.168.40.8:/usr/lib/systemd/system/tomcat.service |
# 4.2.3 部署 zrlog
[root@web01 ~]# scp -rp /code/* root@192.168.40.8:/code/ | |
[root@web02 ~]# systemctl daemon-reload | |
[root@web02 ~]# systemctl stop tomcat && systemctl start tomcat | |
[root@web02 ~]# netstat -lntp|grep java | |
tcp6 0 0 :::8080 :::* LISTEN 1806/java | |
tcp6 0 0 127.0.0.1:8005 :::* LISTEN 1806/java |
# 4.2.4 接入 Nginx 负载均衡
[root@lb01 ~]# yum install nginx -y | |
[root@lb01 ~]# cat /etc/nginx/conf.d/zrlog.hmallleasing.com.conf | |
upstream zrlog { | |
server 192.168.40.7:8080; | |
server 192.168.40.8:8080; | |
} | |
server { | |
listen 80; | |
server_name zrlog.hmallleasing.com; | |
location / { | |
proxy_pass http://zrlog; | |
include proxy_params; | |
} | |
} | |
[root@lb01 ~]# cat /etc/nginx/proxy_params | |
proxy_set_header Host $http_host; | |
proxy_set_header X-Real-IP $remote_addr; | |
proxy_set_header X-Forwarded-For $proxy_add_x_forwarded_for; | |
proxy_connect_timeout 30; | |
proxy_send_timeout 60; | |
proxy_read_timeout 60; | |
proxy_buffering on; | |
proxy_buffer_size 32k; | |
proxy_buffers 4 128k; | |
[root@lb01 conf.d]# systemctl start nginx && systemctl enable nginx |
# 4.2.5 接入共享存储 Nfs
[root@nfs ~]# yum install nfs-utils -y | |
[root@nfs ~]# cat /etc/exports | |
/data/zrlog 192.168.40.0/24(rw,all_squash,anonuid=666,anongid=666) | |
[root@nfs ~]# groupadd -g 666 www | |
[root@nfs ~]# useradd -u 666 -g 666 www | |
[root@nfs ~]# mkdir /data/zrlog -p | |
[root@nfs ~]# chown -R www.www /data/zrlog/ | |
[root@nfs ~]# systemctl start nfs-server && systemctl enable nfs-server | |
#web01 挂载 nfs | |
[root@web01 ~]# yum install nfs-utils -y | |
[root@web01 ~]# mkdir /code/zrlog/ROOT/attached | |
[root@web01 ~]# mount -t nfs 192.168.40.32:/data/zrlog /code/zrlog/ROOT/attached/ | |
[root@web01 ~]# groupadd -g 666 www | |
[root@web01 ~]# useradd -u 666 -g 666 www | |
#web02 挂载 nfs, 由于 web02 节点没有该静态资源目录,所以自行创建 | |
[root@web02 ~]# yum install nfs-utils -y | |
[root@web02 ~]# mkdir /code/zrlog/ROOT/attached | |
[root@web02 ~]# mount -t nfs 192.168.40.32:/data/zrlog /code/zrlog/ROOT/attached/ | |
[root@web02 ~]# groupadd -g 666 www | |
[root@web02 ~]# useradd -u 666 -g 666 www |
# 4.2.6 集群配置 Https
[root@lb01 ssl_key]# [root@lb01 ~]# cat /etc/nginx/conf.d/zrlog.hmallleasing.com.conf | |
upstream zrlog { | |
server 192.168.40.7:8080; | |
server 192.168.40.8:8080; | |
} | |
server { | |
listen 443 ssl; | |
server_name zrlog.hmallleasing.com; | |
client_max_body_size 1G; | |
ssl_prefer_server_ciphers on; | |
ssl_certificate /etc/nginx/ssl_key/hmallleasing.com.pem; | |
ssl_certificate_key /etc/nginx/ssl_key/hmallleasing.com.key; | |
ssl_session_timeout 100m; #多长时间内如果再进行连接,则不需要进行握手过程 | |
ssl_session_cache shared:cache:10m; #建立会话的缓存 | |
location / { | |
proxy_pass http://zrlog; | |
include proxy_params; | |
} | |
} | |
server { | |
listen 80; | |
server_name zrlog.hmallleasing.com; | |
return 302 https://$server_name$request_uri; | |
} | |
#创建证书目录 | |
[root@lb01 ~]# mkdir /etc/nginx/ssl_key | |
[root@lb01 ssl_key]# nginx -t | |
[root@lb01 ~]# systemctl reload nginx |
# 4.2.7 Tomcat 会话保持 session
1、为 web01、web02 节点添加虚拟主机
[root@web01 ~]# vim /soft/tomcat/conf/server.xml | |
<!--session.hmallleasing.com--> | |
<Host name="session.hmallleasing.com" appBase="/code/session" | |
unpackWARs="true" autoDeploy="true"> | |
<Valve className="org.apache.catalina.valves.AccessLogValve" directory="logs" | |
prefix="zrlog_access_log" suffix=".txt" | |
pattern="%h %l %u %t "%r" %s %b" /> | |
</Host> |
2、为 web01、web02 配置 session 相关的网页
#1. 配置 web01 | |
[root@web01 ~]# mkdir /code/session/ROOT -p | |
[root@web01 ~]# cat /code/session/ROOT/index.jsp | |
<body> | |
<% | |
//HttpSession session = request.getSession(true); | |
System.out.println(session.getCreationTime()); | |
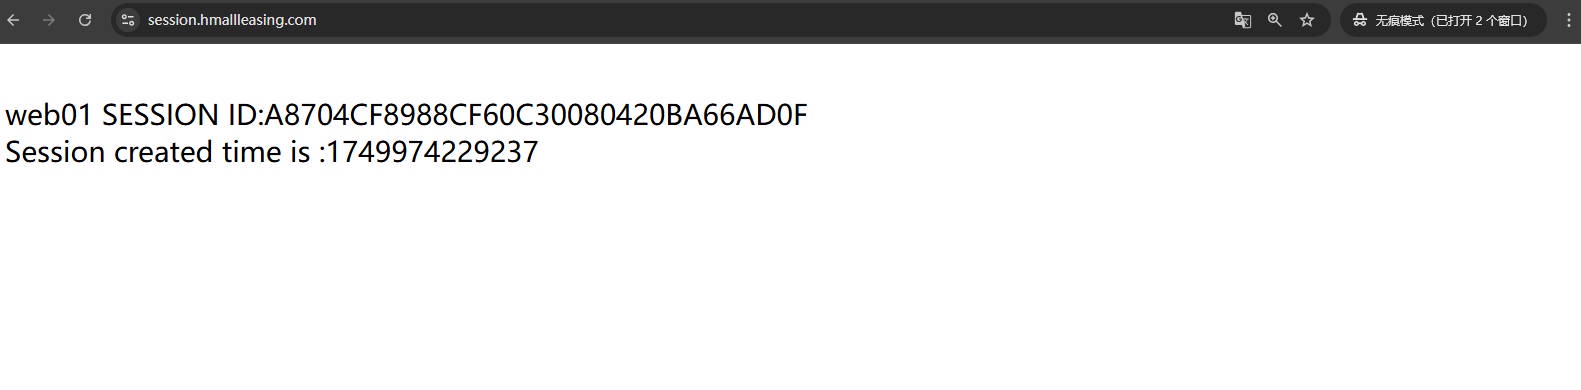
out.println("<br> web01 SESSION ID:" + session.getId() + "<br>"); | |
out.println("Session created time is :" + session.getCreationTime() | |
+ "<br>"); | |
%> | |
</body> | |
[root@web01 ~]# systemctl stop tomcat && systemctl start tomcat | |
[root@web01 ~]# curl -HHost:session.hmallleasing.com http://192.168.40.7:8080 | |
#2. 配置 web02 | |
[root@web02 ~]# mkdir /code/session/ROOT -p | |
[root@web02 ~]# cat /code/session/ROOT/index.jsp | |
<body> | |
<% | |
//HttpSession session = request.getSession(true); | |
System.out.println(session.getCreationTime()); | |
out.println("<br> web02 SESSION ID:" + session.getId() + "<br>"); | |
out.println("Session created time is :" + session.getCreationTime() | |
+ "<br>"); | |
%> | |
</body> | |
[root@web02 ~]# systemctl stop tomcat && systemctl start tomcat | |
[root@web02 ~]# curl -HHost:session.hmallleasing.com http://192.168.40.7:8080 |
3、接入负载均衡,测试检查,看看是否通过轮询调度,获取的 session 是不一致
[root@lb01 ~]# cat /etc/nginx/conf.d/session.hmallleasing.com.conf | |
upstream session { | |
server 192.168.40.7:8080; | |
server 192.168.40.8:8080; | |
} | |
server { | |
listen 443 ssl; | |
server_name session.hmallleasing.com; | |
client_max_body_size 1G; | |
ssl_prefer_server_ciphers on; | |
ssl_certificate /etc/nginx/ssl_key/hmallleasing.com.pem; | |
ssl_certificate_key /etc/nginx/ssl_key/hmallleasing.com.key; | |
ssl_session_timeout 100m; #多长时间内如果再进行连接,则不需要进行握手过程 | |
ssl_session_cache shared:cache:10m; #建立会话的缓存 | |
location / { | |
proxy_pass http://session; | |
include proxy_params; | |
} | |
} | |
server { | |
listen 80; | |
server_name session.hmallleasing.com; | |
return 302 https://$server_name$request_uri; | |
} | |
[root@lb01 conf.d]# nginx -t | |
[root@lb01 conf.d]# systemctl reload nginx |
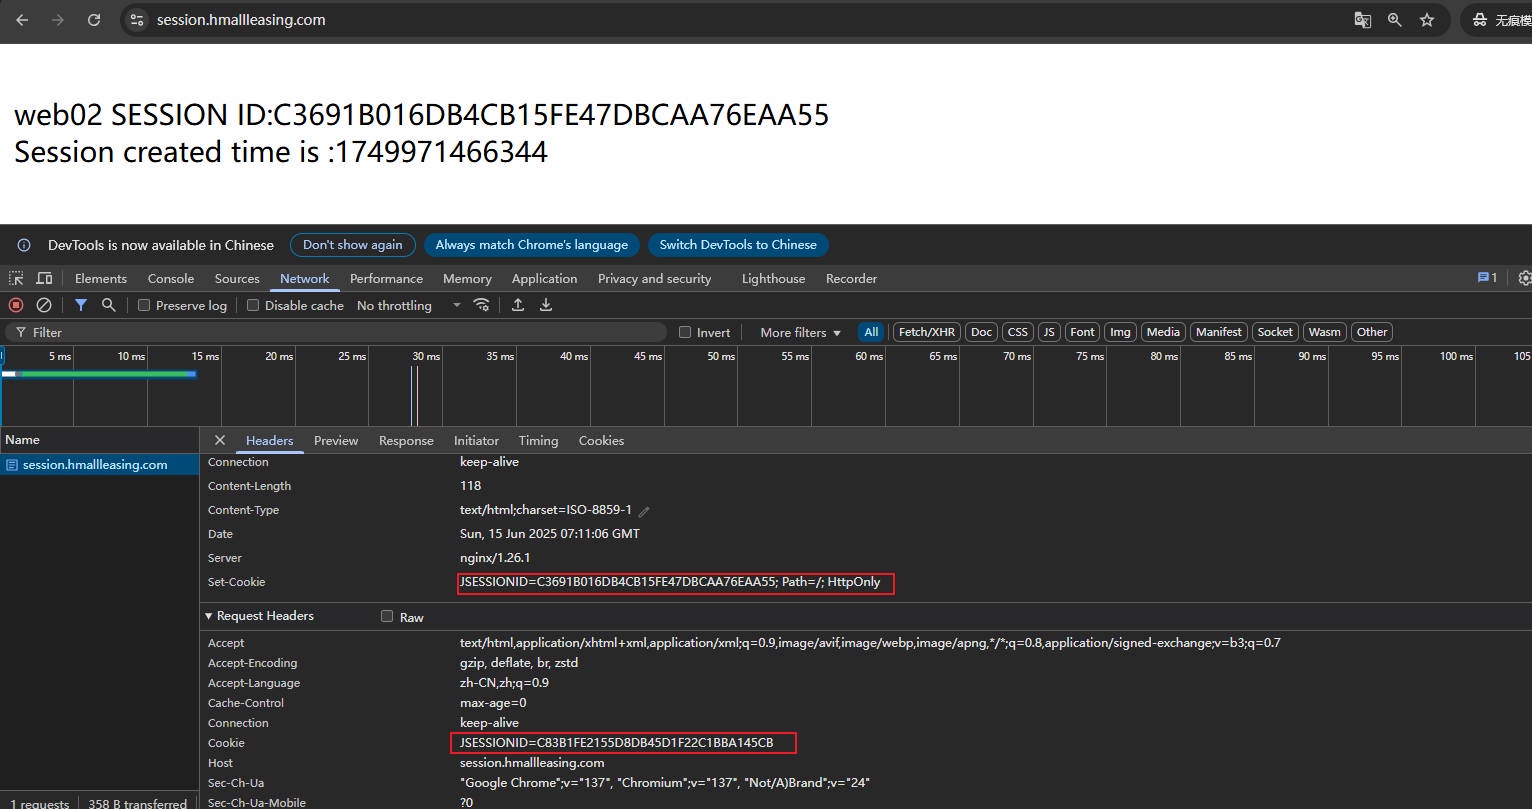
当用户通过负载均衡向服务器 A 发起 http 请求,A 服务器会下发一个 sessionID,通过 head 中 set-cookie 回传用户,用户下次请求时会携带 cookie 字段加上服务器用户名和密码进行请求 A 服务器,该值就是 A 服务器下发的 sessionID,如果验证通过则登录成功。由于负载均衡采用轮询调度机制,请求 A 节点下发一个 sessionID,用户带着 A 节点下发一个 sessionID 请求负载均衡,会调度到 B 节点,B 节点不认 A 节点 sessionID,最终形成死循环。
4、使用负载均衡 ip_hash 来解决 session;
[root@lb01 ~]# cat /etc/nginx/conf.d/session.hmallleasing.com.conf | |
upstream session { | |
ip_hash; | |
server 192.168.40.7:8080; | |
server 192.168.40.8:8080; | |
} | |
server { | |
listen 443 ssl; | |
server_name session.hmallleasing.com; | |
client_max_body_size 1G; | |
ssl_prefer_server_ciphers on; | |
ssl_certificate ssl_key/hmallleasing.com.pem; | |
ssl_certificate_key ssl_key/hmallleasing.com.key; | |
ssl_session_timeout 100m; #多长时间内如果再进行连接,则不需要进行握手过程 | |
ssl_session_cache shared:cache:10m; #建立会话的缓存 | |
location / { | |
proxy_pass http://session; | |
include proxy_params; | |
} | |
} | |
server { | |
listen 80; | |
server_name session.hmallleasing.com; | |
return 302 https://$server_name$request_uri; | |
} | |
[root@lb01 ~]# nginx -t | |
[root@lb01 ~]# systemctl reload nginx |
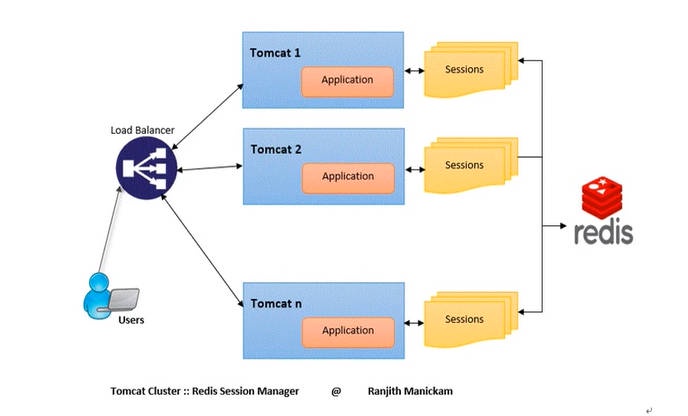
5、通过 redis 来解决 session 会话保持
#1. 安装 redis, 配置 redis | |
[root@redis ~]# yum install redis -y | |
[root@redis ~]# vim /etc/redis.conf | |
bind 127.0.0.1 192.168.40.104 | |
requirepass 123456 | |
[root@redis ~]# systemctl start redis && systemctl enable redis | |
#2. 检查 redis 是否正常能对外提供服务 | |
[root@db01 ~]# redis-cli -h 192.168.40.41 -a 123456 | |
192.168.40.104:6379> keys * | |
#3.tomcat 要支持 redis,需要模块(需要的是 jar 包)所有的应用节点都需要配置 | |
https://github.com/ran-jit/tomcat-cluster-redis-session-manager | |
[root@web01 ~]# wget https://github.com/ran-jit/tomcat-cluster-redis-session-manager/releases/download/4.0/tomcat-cluster-redis-session-manager.zip | |
#4.web01、web02 复制 jar 包到 tomcat/lib 目录中 | |
[root@web01 ~]# unzip tomcat-cluster-redis-session-manager.zip | |
[root@web01 ~]# cp tomcat-cluster-redis-session-manager/lib/* /soft/tomcat/lib/ | |
#5.web01、web02 复制 redis 配置文件到 tomcat/conf 目录中。并更新他; | |
[root@web01 ~]# cp tomcat-cluster-redis-session-manager/conf/redis-data-cache.properties /soft/tomcat/conf/ | |
#6.web01、web02 修改 redis 配置信息 | |
[root@web01 ~]# vim /soft/tomcat/conf/redis-data-cache.properties | |
#- redis hosts. ex: 127.0.0.1:6379, 127.0.0.2:6379, 127.0.0.2:6380, .... | |
redis.hosts=192.16.40.41:6379 | |
#- redis password. | |
redis.password=123456 | |
#7..web01、web02 添加两行配置文件在 tomcat/conf/context.xml | |
[root@web02 ~]# vim /soft/tomcat/conf/context.xml | |
... | |
<Valve className="tomcat.request.session.redis.SessionHandlerValve" /> | |
<Manager className="tomcat.request.session.redis.SessionManager" /> | |
</Context> | |
#8.web01、web02 可选:修改 session 过期时间,默认 30m | |
[root@web01 ~]# vim /soft/tomcat/conf/web.xml | |
... | |
<session-config> | |
<session-timeout>60</session-timeout> | |
</session-config> | |
#8.web01、web02 重启 tomcat | |
[root@web01 ~]# systemctl stop tomcat && systemctl start tomcat | |
#9.redis 查看 session | |
[root@redis ~]# redis-cli -h 192.168.40.41 -a 123456 | |
192.168.40.41:6379> flushdb | |
192.168.40.41:6379> keys * | |
1) "A8704CF8988CF60C30080420BA66AD0F" |